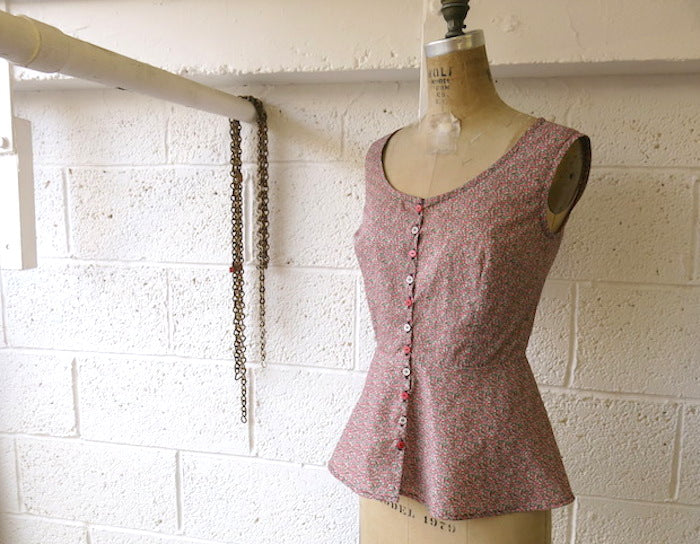
I don't know about you guys, but these #PatternHackathon shenanigans have left me with more inspiration than I know what to do with. My "to-make" list has gone from the obsene to the simply unmanageable! However, nothing's impossible in my book - and as Dory so wisely said, "Just keep swimming, swimming, swimming...". Today I'll be showing you how to hack the Holly Jumpsuit into a sweet and practical (as if the Holly Jumpsuit isn't practical...!) sleeveless peplum top.
You will need:
- Your Holly Jumpsuit pattern, Variation 1 bodice front and bodice back pieces only
- A metre or so of bias binding - either self-made or shop bought is fine
- Our free circle skirt app - choose to work in cm for this tutorial for more accurate results

Step 1
Start by assembling the bodice as normal - stitch the darts of both front and back pieces, close the shoulder and both side seams (omitting the facing part!), finish off your excess seam allowances and give the whole thing a good press. Don't worry about the raw armholes and neckline or the placket for now.

If you need any support for this first step, please refer to our Holly Jumpsuit Sewalong.
Step 2
To cut your peplum, you'll need to use our Circle Skirt App to calculate the radius in order to draw out your peplum on the fabric. We made a half circle peplum, 9" in length (taking into account the 5/8" or 15mm waistline seam allowance and another 3/8" or 10mm for a little hem - to result in a peplum that is 8" waistline to hem when finished) - but you could make a full circle or quarter circle peplum however short or long works best for you. You could even make a gathered peplum like Katie's Holly hack tutorial - totally up to you!
Use the finished waistline measurement of the size Holly bodice you're making, plus 5cm for the placket to calculate your radius.

Once you've cut out your peplum, transfer the placket notches from the bodice front piece to the hem of the peplum openings.

With right sides together, join the peplum to the bodice at the waistline. Press the seam down and finish.

Step 3
Now assemble your placket as you normally would, continuing the placket beyond the waistline and down the opening of the peplum. See our relevant sewalong post here for help with the placket. Leave the buttons and buttonholes for now.
Step 4
To finish the armholes and neckline, we're going to use bias binding as opposed to the given facing. This gives a really neat and satisfying finish both inside and out, and means you could even use a contrast binding for a pop of colour or a flash of a clashing print!

Take one of your shorter lengths of binding and pin it, right sides together, to the armhole starting at the underarm seam. Stitch into place, 1/4" or 6mm from the raw edge leaving the loose ends free about an inch or so either side of the underarm seam.

Now you can take the loose ends of your binding and seam them together to perfectly match the underarm seam. To clarify this process, which if you've never done it before can be quite tricky to explain, we have gone through it in our Polly Top video - skip to 7:40 to get straight to the binding bit ;)
Now turn your top to the wrong side and press the armhole seam into the binding...

...and then press the raw edge of the binding in by 1/4" or 6mm...

...and finally turn the whole binding in to the wrong side of the armhole and pin into place. You may find that you'll have to snip into the seam allowance carefully at the curves if your armhole is looking like it wants to pucker slightly.
Stitch the binding into place from the wrong side, keeping nice and close to the fold of the binding but remembering to keep your stitches parallel to the armhole's edge.

Repeat this process for the other armhole.
To stitch the binding at the neckline, it's basically the same except that we don't have to join the binding into a loop at any point. We do, however, want to get it looking neatly finished at either placket...
Start by stitching your binding to the neckline right sides together as normal, leaving the two loose ends free about an inch or so shy of the plackets.


Tuck the ends of the binding to inside of your bodice and then continue the line of stitching that joins your binding to the neckline.

Then fold in and press the 1/4" or 6mm of the binding (this will get fiddly at the placket!) and then fold and press the whole binding to the inside and stitch as normal.

Step 5
Position and stitch your buttonholes and buttons as normal, and hem your peplum. My favourite way to hem a curve is simply to overlock/serge the raw hemline, then turn it up once and stitch. Quick, professional and effective. If you don't have an overlocker/serger, or would like to explore alternative ways to hem a curve, see our tutorial here.


-
Elisalex de Castro Peake

Comments on this post (0)