
Today's nerdy sewing tip is all about how to make and store bias binding quickly and easily, without the use of any fancy tools or gadgets. In fact, all you will need is:
- your fabric - and this is a great way to use up your scraps!
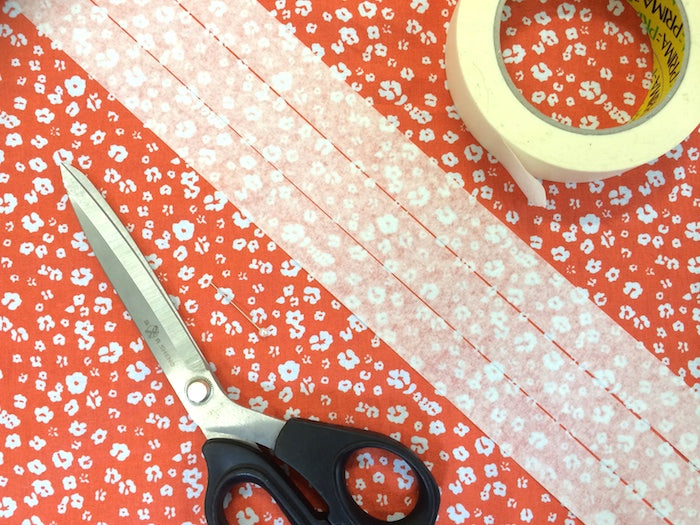
- masking tape - we used tape that is 1" wide which will result in binding that is 1/2" wide when finished
- fabric scissors
- a pin
- an iron and ironing board
But before we start, what exactly is bias binding??
Well, bias binding, or bias tape, is a narrow length of fabric cut on the "bias", meaning that it has been cut at a 45º angle to the grainline or selvedges. When woven fabric is cut on the bias, it has greater flexibility and stretch than fabric cut on the straight grain. This makes bias binding ideal for finishing off a rounded edge, like a neckline, armholes or curved hemlines, as it can smoothly contour it's way around any shaped edge. You'll often find that tank tops are finished with bias binding, like our Polly Top (free to download here!), and it's also super useful for neatly finishing off excess seam allowances - also known as the Hong Kong finish - and edging pretty much anything, such as quilts, placemats, bunting, you name it.
You can of course, buy pre-made bias binding, but this will be limited to the colours and prints you can find in the shops. If you do it yourself, you can make it from any fabric you happen to be using, allowing your binding to perfectly match (or perfectly clash!) your project. You can also buy fancy bias binding making tools which supposedly help you to fold and press the strips of fabric once they've been cut. I personally find these to be a waste of time and money - they're fiddly and tedious in my opinion and you'd have to have a whole army of different sized bias makers to achieve the different widths of binding for various projects. So, as with most things, it's better to make your own from scratch I say!
Step 1 - Finding the bias
You'll need to begin by identifying the grainline and the bias on your piece of fabric. The grainline runs parallel to the selvedges (the woven edges of the fabric as it comes infinitely off the roll. The bias is at a 45º angle to the grainline.


Step 2 - Taping your fabric
Stick strips of masking tape onto your fabric along the bias, leaving 1-2mm between each strip to allow space for cutting.

Step 3 - Cutting the strips
Carefully cut between the tape until you have a bunch of bias strips.

At this point, you could absolutely roll up your strips - still with the masking tape on to prevent them from stretching or distorting out of shape - and put them away for a rainy day.

Step 4 - Pressing
This is the part where normally you'd be rummaging around for that bias maker which you know you last saw in that little box on the shelf... No need to panic. Just grab yourself a pin (that's right, a pin!) and take your bias strips over to the ironing board.
Using the image below as a guide, insert the pin vertically into the fabric that covers the ironing board. You want the "bridge" of the pin (the part that we'll be feeding the fabric under) to be the width that you want your finished binding to be.

Begin by snipping one end of your binding strip into a point, as this will make it easier to feed under the bridge. Fold over each raw edge of the strip and ease it through the pin. Give it a good press as it comes out the other side.

(Please excuse my manky chipped nail polish in these shots - repainting tonight as soon as I decide on a new colour!)
Once you've eased the first inch or so through, you'll quickly see how easy it is to just pull the strip - gently! - through the pin, pressing as you go.

And there you have it - custom bias binding in minutes. No fancy tools needed. Easy peasy lemon squeezy.

Update: Do you need to make bias binding that is infinitely long but you can't quite seem to figure out how to join the strips?? Head to our piping tutorial here to see how to join your bias binding strips together.
-
Elisalex de Castro Peake

Comments on this post (32)
I have been sewing for 61 years now and have been scared to sit and struggle with making bias binding. I tried the gadget and totally disliked it. This is brilliant! I can’t wait to get to the ironing board and remake the bias binding for the Lottie blouse! thank you so much🌺
— Margaret
God, hilarious, this actually works! Just a little care required to guide the strips through with one had, so they stay centred, while pulling through with the other hand.
I spent hours a few days ago trying to get a decent result with my crummy tool, unsuccessfully.
You are brilliant.
— Jane Lochrin
Genius, genius, genius!!! Thanks so much.
— Elizabeth
This is great! I have spent many a frustrating couple of hours just trying to make some bias binding for that ‘quick’ project! This method looks thoroughly therapeutic!
— Delyss
Oh now that’s cunning! Jolly good idea, clever you! Truly customised widths. Nice one, thank you for sharing!
— Rosie
Thank you so much for this, although I wish I’d seen it a couple of days ago, I will now not fear self made bias tape anymore! Great explanation :)
— Jacki
What about using double sided tape? (I don’t sew at all, so maybe I don’t know what i am taking about).
— sue
I have to say I’m not that easily impressed by sewing tips ….. but that one is fantastic, the masking tape is a particularly great tip….. thanks
janet
— janet fairythoughts
Using masking tape to mark your strips is such a great idea. I’ve used the pin trick before and it works a treat. I give my strips a quick spritz with spray starch before I run them through the pin. The moisture from the starch helps them curl up and fold easily as I pull them through and you end up with nice crisp strips.
— Gabriella
thanks I have loads of scraps that I want to try this technique with
— CK
I have a strange urge to go and make some bias tape RIGHT NOW!
— Maaike
Absolute Genius…Thank you
— sandesh
What a great idea! Pins are such useful tools :)
— Geo P
Masking tape!?!? GENIUS!
— ShanniLoves
WOW …brill
— Fiona
if anyone is worried about the distortion when taking the tape off, use painters tape. Thats what I use when working with other issues. Love this tip! Thank You!
— Hope
Wow! I never EVER would have thought of doing this!
— Marilla
Hi Carlalissa, you’re absolutely right that you have to be very careful when you remove the tape from the strips! Sturdier fabrics like cotton should be fine when removing masking tape, but with more delicate fabrics such as voile, silk or viscose you need to be very ginger. If it does become a little stretched or distorted, a nice steamy press should sort it out. Hope this helps!
— Elisalex - By Hand London
Hi Julie, I’m afraid that if you need binding wider than your pin allows, the only answer is longer pins! I usually have loads of weirdly long hand sewing needles lying around for some reason…
— Elisalex - By Hand London
Hi! This is awesome! Thanks so much for posting…I do have a question, and it may be stupid, but, how do you handle it when you need wider than your pin allows?
Thanks so much!
— Julie Boyack
Aargh one day too late! Ordered a set of different sized binding makers only yesterday. Never mind as you say I’m sure they"ll soon be lost amongst all the mess on my sewing table and now I know how to make great binding without. Great tip thank you.
— Jackie Younger
Great tip, thank you. I’m now crossing bias maker off my shopping list :)
— Suzie
Bloody brilliant!
— Tracy Kay
Fab and fabulous, sew very clever…especially as i wanted to make wider binding and I thought it was impossible without the right ‘thingy’ thank you so much for sharing a superb new way to make bias strips….bestest daisy J x
— daisy jones
Damn. This was amazing!! #ohohitsmagic
— Raven