As I'm sure most of you know, it's the little extra details that transform your handmade garms and make them really stand out in a sea of generic High Street trends - things like thoughtful pattern placement, an exquisitely finished hem or the addition of those delicate vintage buttons you found in your Grandma's old sewing box are all details that will keep you coming back to a make to lovingly wear again and again. And with every detail added, you've mastered a new technique for the old mental sewing bank. Today's tutorial will show you how to make your very own piping, for when the shop-bought kind simply won't do (or match!).
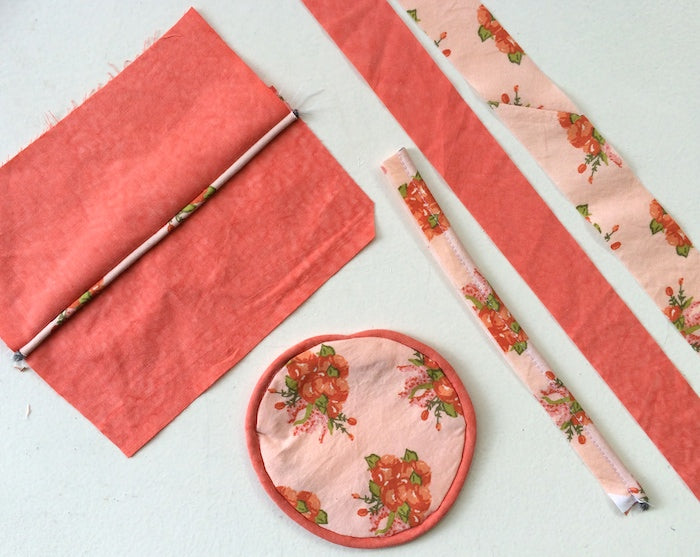
What you'll need:
- Bias binding strips (see our easy peasy bias binding tutorial here)
- Piping cord or chunky yarn/twine
- Regular zipper foot for your sewing machine


Wait! What if I want to make a long strip of piping but my bias binding strips are too short??
Don't panic! If you want to make piping that is longer than the bias strips you've been able to cut from your fabric, it is quick and painless to join multiple bias strips together to create endless strips of binding.
If you have cut your binding from a square of fabric, selvedge to selvedge for example, you'll see that the ends of your strips are trapezoid shaped. This is because the ends are still cut on the straight grain.

Place your strips together at the trapezoid ends, right sides together and at a right angle, with the pointy corners extending out past the strips as shown:

Stitch the strips together along the line at which they overlap:
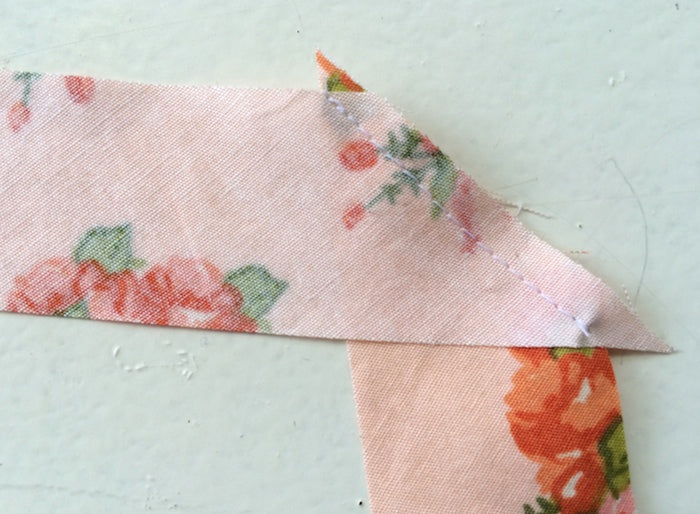
Press open and snip away the excess.


OK! Now let's get back to the piping tutorial...
Take a length of bias binding (wrong side facing you) and a length of your piping cord/yarn/twine. We're using a length of chunky scrap yarn for our piping.
Place the cord down the centre of the binding.

Fold the binding over the cord and pin the raw edge length of the binding into place.

Attach the zipper foot to your machine. Position the binding so that you are stitching directly to the left of the encased cord. Don't worry about getting completely up close (and personal) to the cord, as you'll be stitching it much snugger when you come to applying it to your projects, and definitely won't want these original stitches to show.


Applying piping to a straight seam
To apply piping to a straight seam, like a waistline or a yoke for example, it simply is a case of sandwiching it between the two layers of fabric to be seamed. Easier said than done, right? The trick to getting your piping straight and tight is to baste it into place along one layer of fabric first, so that when you come to sandwiching it between the seam, the piping stays put so you can concentrate on stitching your seam nice and close to the piping.
Pin your piping along the raw edge of your first layer of fabric, taking your desired seam allowance into account. Still with your zipper foot attached to your machine, stitch the piping into place.

Now lay over your second layer of fabric and pin the seam.

Stitch the seam, getting nice and close to the piping, feeling your way as you go. When you're done, open it up and... Voilà!

Applying piping to a rounded seam
When we're applying piping to a rounded seam, a cushion cover for example, the process is essentially the same, and made possible by the fact that the piping has been made with bias binding, which allows for the smooth and flexible turning of a curve. The main thing that we need to consider which isn't usually an issue when piping a straight seam, is how to finish off the two raw ends of the piping.
So. Let's begin by pinning the length of piping into place along the first layer of fabric to be seamed:

As you can see, I have crossed the two loose ends of the piping over each other at the point at which they meet:

Carefully baste the piping into place, stitching over the two crossed ends to secure them. Snip away the excess at the ends of the piping.
Now lay over your second layer and pin along the edge to be seamed, just as we did for the straight seam.

Stitch into place, again nice and snug up to the piping. For this demonstration, I made sure I left a couple of inches unstitched so I would be able to turn my little piped circle out to the right side. If you are making something similar, like a cushion cover or a coaster, make sure you've considered how to turn it out before you stitch the whole thing shut!

When it's turned out to the right side, your overlap should look like this:

And there you have it - how to make and apply your very own custom piping!

-
Elisalex de Castro Peake

Comments on this post (10)
Could I use jute twine for the cording in piping trim for a blouse/jacket?
— Charlotte Curtis
If the piping is for a straight and not a curved seam, does the fabric still need to be cut on the bias or I can use straight grain cuts
— Omotayo
A trick that I’ve always used when making piping, is to stitch the end of the cord in place. I’ve had too many times where I’d be happily stitching along the cord, and accidentally pull the end – leaving me with inches of open tubing hoping for a cord! So I always sew the cord down, and then stitch along side it the rest of the way.
— Tegan
This is fantastic, I was wondering if I should seperate my contrast fabrics on a skirt I’m making, as they are similar colours but different patterns. A nice bit of white piping outlining them would be perfect! You make it sound so easy
www.calascrafts.blogspot.com
— Vicki B
Thank you for sharing! This is very useful!
— Birgit
Okay, Zipper foot all the way! Thank you :)
I think it’s easiest to make continuous tape, so I can cut the lines straight and not worry about matching them up! This is my favorite tutorial, but there are many out there!
http://www.coletterie.com/tutorials-tips-tricks/continuous-bias-tape-tutorial
— Chris Griffin
Hi Chris – yes, zipper foot all the way! No need for the regular foot for this. You want to be able to get nice and close to the piping.
— Elisalex - By Hand London
Hi Charlotte – there isn’t really a knack as such… Just make sure that the ends of the strips are definitely cut on the straight grain and that you place them together at a right angle. You want the pointy ends to be sticking out past the strips (like in the picture) so that when you stitch the ends at the line at which they intersect, when you open it up, it should lie flat and straight. Hope this makes sense!
— Elisalex - By Hand London
Do you use the zipper foot again when sewing the pipping to the first layer and then the 3 pieces together? Or should you switch to a regular foot?
— Chris Griffin
Is there a knack to sewing the bias tape strips together so that they actually line up with each other when you open them out? I more often than not end up with them being really wonky whenever I try sewing multiple strips together!
— Charlotte Skinner