Side-stepping ever so slightly away from the Holly Jumpsuit Sewalong, today we have an adorable Holly pattern hack tutorial from none other than the UX designer behind our app and soon-to-be-revealed new website, and all-round sewing gal pal, Katie Marcus! If you've ever shied away from a jumpsuit pattern, then keep reading friend - this is the hack for you...
Hello! Katie of What Katie Sews here, showing you how to convert the Holly Jumpsuit variation 1 bodice into a sweet and autumn-appropriate button-down dress. It’s a really easy pattern hack, you just need to do a bit of maths to work out your skirt width and make a few extra buttonholes. The Holly dress will work in any of the fabrics recommended for the jumpsuit. You’ll also need about ten extra buttons to go down the skirt. Let’s crack on...
First cut your variation 1 bodice fronts and back, sleeves, cuffs and facings (pieces A - F) just as normal, transferring all dart markings and notches.

Now we’re going to cut the skirt pieces. A good rule of thumb for a nicely gathered skirt is to make it 1.5 times wider than your full hip measurement. For example, for 40" hips you’ll want a skirt measuring 60" around. This gives you your skirt width value (W) used below.

Back skirt: Divide W by 2 and add ⅝" allowance for each side seam - 1¼" in total. So for example my back skirt piece will be (30 + 1¼) = 31¼" wide.
Front skirt: Divide W by 4, add ⅝" allowance once for the side seam, and add 2⅛" (the width of the button placket measured off the bodice) so we can continue the placket down the front of the skirt. So my front skirt pieces will each be (15 + ⅝ + 2⅛) = 17¾" wide.
Length: Determine your preferred length by measuring from your waistline - hold the bodice front up to your body to see where the skirt will begin if you like. Add 1" hem allowance and ⅝" waistline seam allowance. So for a 20" long skirt my rectangles will be 21⅝" long.
You can create paper templates with these measurements or just work straight onto your fabric. Cut 2 skirt front and 1 skirt back pieces.

Copy all the button placket notches from the bodice onto both the top and bottom edges of the skirt fronts. Also snip a notch or make a mark at the centre of the back skirt and centre back of the bodice - these will help with matching up later.
Follow the Holly instructions to sew the darts, close the shoulder seams, join the facings and close the side seams. Close both side seams the entire way as we'll be buttoning ourselves into the dress so won't need the side zip. (You could leave it in there for a quicker entry/exit if you like though!) Don't assemble the placket yet, but you can skip ahead and set in the sleeves and make the cuffs at this point too.

Sew and finish the side seams of the skirt pieces. Then we need to gather the top of the skirt, starting from the outermost front placket notch and ending at the other one (don’t gather past the notch because that’s where the placket will be folded back).

We’re aiming for the gathered edge to end up the same circumference as the bottom edge of the bodice. Here are three methods for gathering; my favourite is the flat elastic because it creates really even gathers and you can cut the elastic to match the length of the lower bodice edge (again, notch to notch) for a perfect fit when joining them together. Mark the quarter, halfway and three-quarter points of the elastic and pin these points to the side seams and centre back of the skirt to guarantee an even distribution of gathers. Baste the elastic with a straight machine stitch so you can remove it after the waist seam is sewn.


With right sides together and the gathered skirt uppermost, match up the bodice and skirt at the centre fronts, side seams, and centre back mark. Pin at each point. Add more pins in between these, making sure the gathers are evenly distributed and lying perpendicular to the edge.
Sew the bodice to the skirt using a ⅝" seam allowance. You may want to baste first to check your gathers are sitting nicely and seamlines are matching up. Remove any gathering/basting stitches, finish the excess seam allowance and carefully press upwards towards the bodice, trying to not crush the gathers.

Now complete the Holly instruction steps to finish the button placket, folding and stitching it along the whole length of the skirt.

Hem the skirt by folding up ½" twice, pressing, and topstitching or hand-stitching in place.

Tip: Tuck in a little triangle at each end on the first fold to get a nice clean corner.

Distribute buttonholes and buttons evenly down the bodice and skirt, making sure to get one close to the waistline to keep it from gaping. I used ten buttons on my skirt.

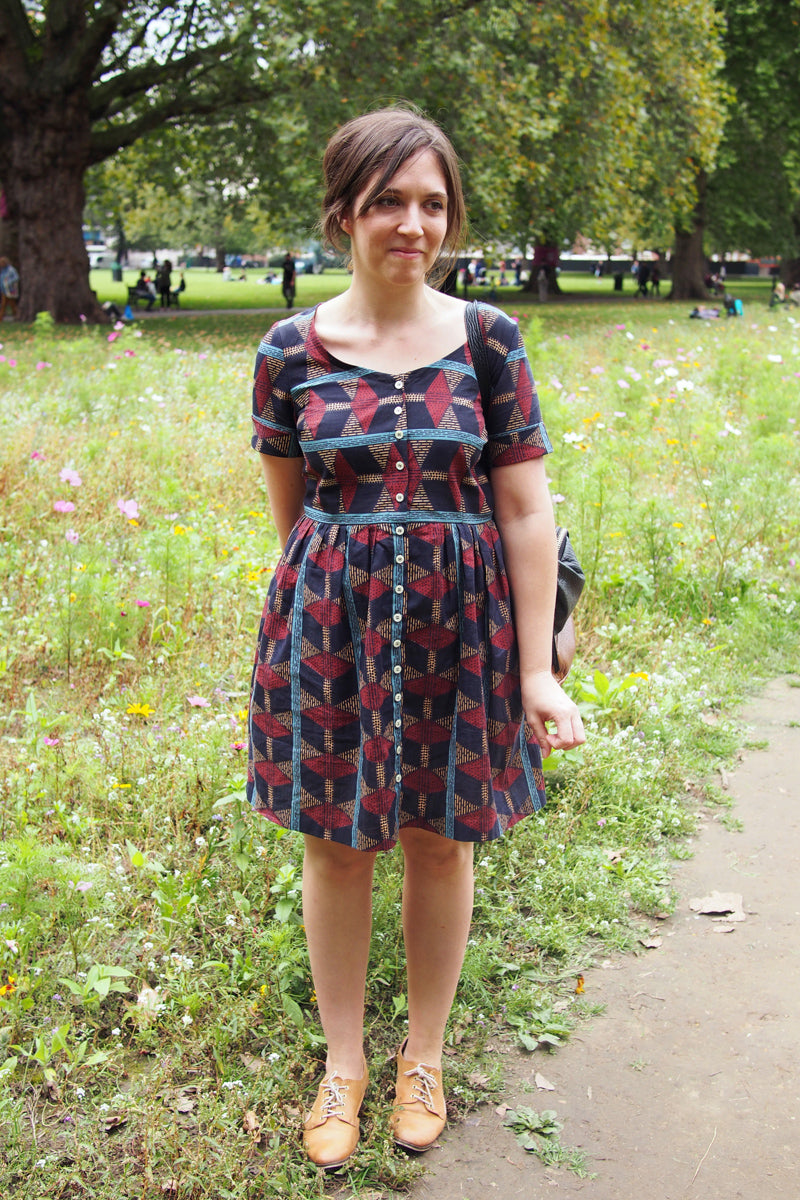
Voila! One pretty Holly dress which, teamed with cosy tights and a cardi, will happily see you through the colder months. Please ask here or on my blog if you have any questions at all.

-
Elisalex de Castro Peake

Comments on this post (4)
Hi Edie, I’m afraid the fabric was a one-off – I bought it from a market here in London. It’s a Ghanaian wax print cotton so maybe have a look for a similar one. Good luck, and thanks for your comments!
— katie
Congratulations on a stunning dress—perfect fit, made-for-you look, perfect choice of fabric, clever hack and great instructions. Oh, and I love the way you switched the stripe direction between bodice and skirt. This one’s going in my file! Can you share info on your fabric? I’d love to find some of this great fall print.
— Edie
I want this exact dress!!!
— Ginger
Ach that print! <3
— Liv