
In this post we'll be going though some common alterations you may need to make to your Rumana Coat pattern in order to get the best possible fit for you. We'll be covering:
- Lengthening and shortening the coat and the sleeves
- Grading out or in at the hips
- Full bust adjustment (FBA)
And you will need:
- Your Rumana Coat pattern
- Scrap paper (we like to use baking paper for pattern alterations when A4 isn't big enough)
- Pens/pencils
- Paper scissors
- Ruler or Patternmaster
Lengthening and shortening the coat
The Rumana Coat can be made as dramatic or as practical as you like. The given length is a traditional mid calf, which allows plenty of scope for lengthening or shortening.
Lengthening the coat
Start by drawing a horizontal line across all the coat shell pieces, approximately a couple of inches up from the vent (for the pieces that do not have a vent, just try to draw your line at the same point by placing them next to the pieces that do have a vent that you have already marked).

Cut across the line and slip a piece of scrap paper underneath. Extend the pattern piece by however much extra length you need by creating a parallel gap. When you're happy, tape or stick it down.

Redraw the seam lines at the gap...

...and trim away the excess scrap paper. Remember to apply this exact process to all coat shell pieces (in the case of the Side Front pieces A & C, you will only need to lengthen piece C) and both lining pieces in the same way.

Shortening the coat
Start by drawing a horizontal line across all the coat shell pieces, approximately a couple of inches up from the vent (for the pieces that do not have a vent, just try to draw your line at the same point by placing them next to the pieces that do have a vent that you have already marked). If you are shortening your coat by a considerable amount of 4" or more, you will need to mark two horizontal lines across the pieces that have the vent - one a few inches up from the vent and one roughly across the middle of the vent. This is so that you can reduce the length of the vent as you shorten you coat, so as to avoid having a vent that starts mid-back! You don't really want your vent to start higher than mid-butt height.

Cut along these slash lines...

...and start to move the bottom portion of your pattern pieces up, thereby reducing the overall length of the coat. In the case of the pieces with the vent, make sure that you divide the total amount you're shortening by evenly between the two sections.

When you're happy with the placement, tape or stick your pieces down. True out the seam lines and trim away any excess.
TIP: To "true out" a line when you're altering a pattern, simply means to redraw a smooth seam line that has become uneven or a bit jagged due to the slashing, spreading, or shortening process.
Remember to apply this exact process to all coat shell pieces (in the case of the Side Front pieces A & C, you will only need to shorten piece C) and both lining pieces in the same way.

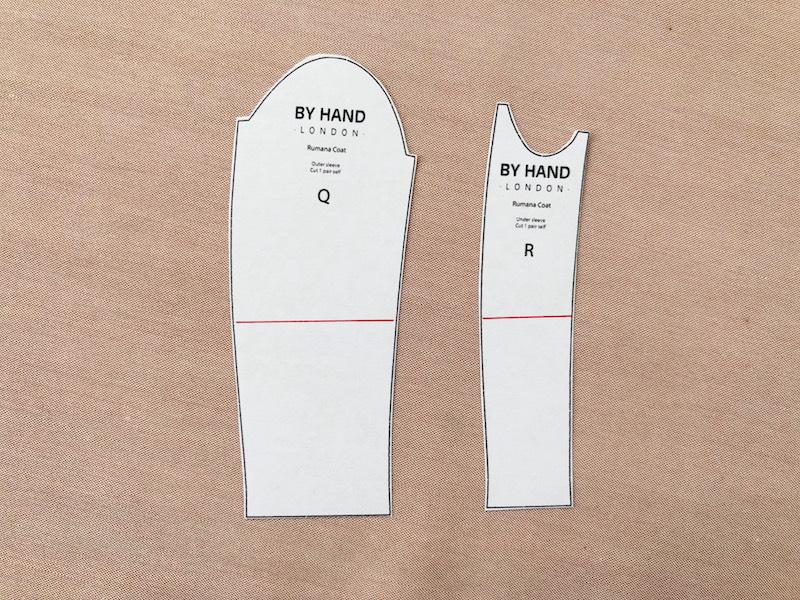
Lengthening the sleeves
Start by drawing a horizontal line, parallel to the cuff, across both the outer and inner sleeve pieces, roughly around about the middle.

Cut along this line and slip a piece of scrap paper underneath to fill the gap as you extend the sleeve length. Make sure that you keep the new gap perfectly even across the width of the sleeve. When you've extended the sleeve by however much extra length you need, tape or glue it down, and extend the other sleeve piece by exactly the same amount.

Redraw the seam lines and trim away the excess scrap paper. Remember to repeat this exact process for the sleeve lining pieces!
Shortening the sleeves
Start by drawing a horizontal line, parallel to the cuff, across both the outer and inner sleeve pieces, roughly around about the middle.
Cut along this line and move the bottom part of the sleeve piece up, thereby reducing the length of the sleeve by however much you need. Make sure that you keep your slash lines parallel in order to avoid altering the angle of the sleeve. When you're happy with the placement, stick or tape it down and repeat for the other sleeve piece.

True out the seam lines and trim away any excess paper. Remember to repeat this exact process for the sleeve lining pieces!

Grading out or in at the hips
If your hip measurement falls into a higher or lower size bracket than your waist measurement, you will definitely see an improvement in the fit and fall of your coat if you grade at the hips.
All grading means is that we're going to redraw the princess seam lines, starting with your waist measurement and then smoothly going out (or in) to meet your hip measurement size as you get to the hip point.
Please note - although you can do this to grade in at the hips, we only really recommend doing it if you need to grade out. By grading in to a smaller hip size, you will end up with a coat that technically fits your overall measurements better, but it will also result in a coat that has a slightly narrower, more rectangular appearance. If you have narrow hips, we recommend just cutting the size as dictated by your bust & waist measurements and leaving the curvier shape at the hips the way that it is!
You will need to apply this alteration to all coat shell pieces and your lining front and back pieces. For both Side Front pieces A & C, tape them together at the diagonal with a strip of easily removable masking tape in order to grade. When choosing your pocket size, make sure you go with the size you have graded out to. When you get down to the hem, bear in mind that if you continue along the larger hip size line, your coat will be a fraction longer. It is entirely up to you whether you go for the hip size at the hem or your original waist size at the hem, but make sure you do the same for all pieces so you don't end up with pieces of different lengths!

Using a brightly coloured pen, carefully highlight your size as dictated by your waist measurement. When you get just past the waist, start to smoothly grade out towards the line that is your hip size. Make sure that you have joined the hip size line by the time you get to the hip point, using the image below as a guide.
Some of the pattern pieces have been spread out ever so slightly so that the different size lines are more distinguishable - pieces A & C (Side Front) and piece G (Side Back). In order to grade accurately for these pieces, you will need to first trace your size as dictated by your waist measurement, then lay that tracing back over your intact pattern and align the side front / side back seam edges with the larger hip size line. Then you can grade out at the other side seam line.

Full bust adjustment (FBA)
If your bust measurement is a good size or more larger than your waist and hip measurements, you will probably benefit from a full bust adjustment. No need to freak out here, it's really very straightforward! If you've ever done an FBA for princess seams, this is exactly the same - no more complex just because it's a coat!
You'll need your Side Front piece C and your Coat Front piece F.
Before we begin, we need to figure out how much we will be opening out the bust by. For example, if your 28" waist measurement tells you you are a size 12, but your 37" bust thinks you're a size 14, you will need to make a 2" FBA in order to up the size 12's 35" bust to your 37" bust. Seeing as we will be working on one side of the pattern, we only need to apply half of that total increase (1") as we do the FBA.
Start by marking out your seam allowances (shown in pink):

Next, we need to mark out our slash lines (shown in red). It is by strategically cutting along these lines that we'll be able to open out the bust to make more space for the girls.
Line 1 goes from the apex (centre of the bust curve, round about where your nipple would be) and down to the bottom where it meets the seam allowance line.
Line 2 goes from the apex and out to the armhole.
Line 3 goes from the apex and out to the side seam.
Line 4 goes across from line 1 to the princess seam edge, about 2" up from the bottom.

Start by carefully cutting along line 1 from the bottom, through the apex and stopping where line 2 meets the seam allowance line. Next, make a little snip from the armhole along line 2 up to, but not through, the seam allowance line. The idea is to create a little hinge point there at the seam allowance line enabling you to easily open out your slashed pattern.


From the side seam, cut along line 3 up to, but not through, the apex. This will act as another hinge point.

Slip a piece of scrap paper underneath your pattern and stick or tape down the top right section, leaving the rest free to move and open out.

Keeping the slash at line 1 parallel, and using my initial example of the size 12 to 14 FBA, open out your pattern until that new opening measures 1", or however much you are FBAing by! When you're happy, tape it down.

Please bear in mind that we are using itty bitty miniatures of the pattern pieces so the measurements are not accurate!
In opening up the bust, we have also increased the length of the bust panel, so we need to now cut along line 4 and bring that bottom segment down a touch in order to be flush with the bottom of the panel again.

We have also now created a dart shaped opening from the side seam which we need to close. Draw a line along the bottom of the "dart", all the way out past the apex.


Cut around your pattern piece to get rid of the excess paper, then cut from the side seam along this new line stopping at the apex.

Creating another hinge point at the apex, cut from the bust curve up to the apex along the rest of that new line.

You'll see that you can now close that dart and make line 3 intact again. Tape that down.

In closing that dart, we have created an opening at the bust curve, which we need to fill. Slip a piece of paper underneath and continue the curve of the bust to fill the gap. Continue also the seam allowance line that you first marked out. Trim away the excess paper.

So now the enlargement of the bust is done! All we need to do to this piece now is get rid of the unwanted extra we've added to the waistline so that we'll end up with a pattern piece that is larger in the bust, but the same at the waist as it was before.
Do this by simply marking in at the side seam the same amount that you opened the bust by (1" in the case of our example), and smoothly redraw that side seam. Trim away the excess.

The last thing to do is transfer the alterations we've made to piece A to piece F so that they match when we come to sewing them together. In opening up the bust, we have also increased the length of piece A - bigger busts are like higher hills in the sense that they need a longer length of fabric to cover them!
Mark two horizontal lines across piece F in line with the extra length we've created at the bust curve and the extra length at line 4.

Cut along these lines and slip some paper underneath. Measuring the extra distance at the seam allowance lines on piece A, lengthen the two sections of piece F by the same amounts. When you're happy, tape it all down, redraw the seam lines and trim away the excess.


Lastly, you'll need to apply this same technique to the lining front pieces as well. In order to focus the FBA on the bust area only, you may find it more straightforward to temporarily cut a horizontal line across the lining side front and lining front at the waistline. Remember to stick your pieces back together when you're done!
And that's it! FBA done! You can apply this exact same technique to any other princess seamed bodice that you need to alter.
Next up: we get to start sewing! In the next post we'll be cutting and interfacing our fabric, assembling the pockets and talking about seam finishes and topstitching... If you struggle with slippery lining fabric, make sure you have a read of this post first.
-
Elisalex de Castro Peake

Comments on this post (2)
Thanks so much for this tutorial! I am thinking I’ll need to do an FBA on my pattern, so it is nice to have a breakdown. How would you suggest I apply the FBA to the lining? Is it the same as the front piece, or would I need to separate it since the front lining seems to include part of the center front area, too?
— Erika Robbins
This is a big help, thank you. I’m doing an FBA to the coat front, so I’m guessing I also need to do one to the front lining piece? And what would be the best way to lower the pockets? My long arms are a bit cramped up in the original position – at the moment I’ve just lopped an inch or so off the top of the lower side front and stuck it on to the bottom of the upper side front.
— Janet