Warning! This post is long-winded and super detailed - pour yourself a cup of tea (or Guinness in my case - I'm nursing a celebratory hangover you see...), settle in with us for the long haul and hopefully you'll come away much the wiser on the subject of bust adjustments!
*To be taken to all the posts in the Flora Dress Sewalong, please click here*
What you'll need:
- Your traced Bodice Front piece of the Flora Dress (Variation 1 or 2, cut out in the size dictated by your waistline measurement)
- Ruler
- Pens
- Paper scissors (not the fabric shears!)
- Extra paper
- Tape
How do I know if I need an FBA/SBA?
There are a number of ways to determine whether or not you'll need to alter your bodice pattern, and by how much. The first thing to be asking yourself (and you probably already have if you're taking the time to read this post!) is how do your clothes - homemade or shop-bought - usually fit you? Do you find that dresses and tops squish down or flatten your tatas? Or is there room for an extra padded bra or two?! If your answer is 'yes' to either of those questions, you've come to the right place my friend. Now let's investigate further...
Some more tell-tale signs that an FBA is in order:
- Your high bust measurement is more than 2" less than your full bust measurement (see this post on how to measure yourself)
- Your full bust measurement falls into a larger size group than that of your waist measurement
- Waistlines on dresses often ride up and sit higher than your natural waist (avoid the temptation to lengthen the bodice before determining if you need an FBA first)
And you'll be needing an SBA if:
- Your high bust measurement is up to an inch less than your full bust measurement
- Your full bust measurement falls into a smaller size group than that of your waist measurement
- Waistlines on dresses often sag down, falling below your natural waistline (avoid the temptation to shorten the bodice before determining if you need an SBA first)
OK guys, let's do this.
*Please note, steps 1-3 are the same for both the FBA & SBA*
Step 1 - Marking the apex
Take your Bodice Front piece (size as dictated by your waistline measurement) and mark the apex (basically the nipple - this is the point where the seams of the bust and waistline darts, if extended, would intersect). Also mark out the seam line of the armscye, 5/8" or 15mm in from the edge of the armhole.

Step 2 - Marking your slash lines
We will be using the 'slash & spread' method here - which basically does what it says on the tin - slashing lines at key points on the bodice, then spreading it out (or sucking it in on itself for the SBA) to create more space for the ladies.
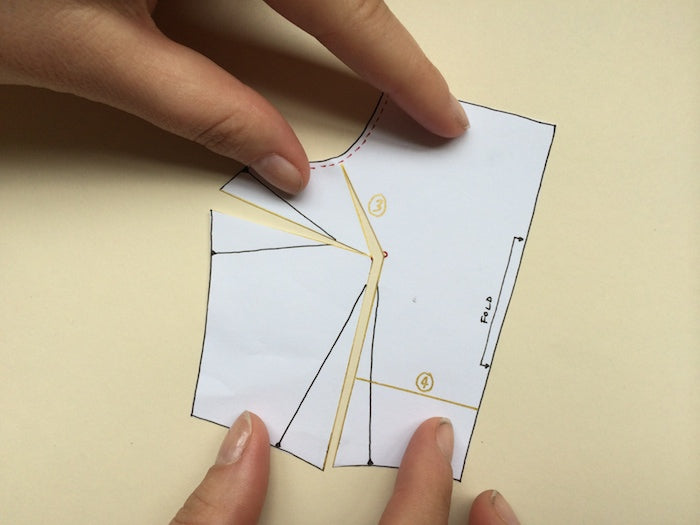
Draw a vertical line through the centre of the waistline dart up to the apex (line 1).
Draw a line through the centre of the bust dart to the apex (line 2).
Draw a line from the middle of the armscye (from the seam line) to the apex (line 3).
Draw a horizontal line from the middle-ish point of the waistline dart and out to the centre front (line 4).

Step 3 - Slashing
Cut upwards through line 1 from the waistline, through the apex and along line 3 ending at the armscye's seam line.

Now cut along line 2 from the side seam, through the bust dart and ending just before the apex - do not cut all the way through it, we need the apex to be able to pivot.

Cut the horizontal line 4.

Finally, snip into the seam allowance at the armhole up to line 3, but not through it - this will be another pivot point.

Step 4 - The FBA
Take your slashed bodice and place it onto a spare piece of paper.
We are now going to open up the apex by however much we need to increase the bust by.
For example, if your waistline measurement is 26" - and you have therefore cut a size UK8/US4, but your full bust measurement is 35" - and therefore 2" larger than that of a size UK8/US4, you will need to increase the apex by 1" to give you the 2" total extra space around the bust.
Spread out the bodice, pivoting at the armhole and apex. When you have opened up the apex by your desired amount, making sure that the vertical opening is even and parallel, tape it all securely down.

You'll notice that by slashing and spreading your bodice, the side seam will have become longer. Because of this, we now need to lengthen the centre front to match. Simply move the bottom right piece (where we cut horizontally from the waistline dart out to the centre front) down, keeping the centre front perfectly vertical. Tape into place.

Almost there guys - the last thing we now have to do to the bodice front is to re-draw the darts. Peasy!
Starting with the waistline dart, mark a point level with the top of your original dart, but bang in the centre of the space we've just opened up. Using a ruler, re-draw the dart legs starting at the point you marked and going out to the waistline dart notches either side. This now much wider dart will close the excess we created at the waistline.
To re-draw the bust dart, draw a line from the centre of the dart to the original apex. On a vertical par with the original bust dart point - but intersecting with the line you just drew - mark a new bust dart point. Use your ruler to re-draw the dart legs from the new point out to the original side seam dart notches.

Before you cut out your new bodice front pattern, fold up the darts as if they were stitched and pressed. Now you can carefully cut out your bodice ensuring that the new dart edges will have the appropriate seam allowance.

Step 4 - The SBA
Take your slashed bodice and place it onto a spare piece of paper.
We are now going to reduce the apex by however much we need to decrease the bust by.
For example, if your waistline measurement is 26" - and you have therefore cut a size UK8/US4, but your full bust measurement is 31" - and therefore 2" smaller than that of a size UK8/US4, you will need to decrease each apex by 1" to reduce the total bust measurement by 2".
Move the bodice in on itself, pivoting at the armhole and apex. When you have reduced the apex by your desired amount, tape it all securely down.

You'll notice that by slashing and reducing your bodice, the side seam will have become slightly shorter. Because of this, we now need to shorten the centre front to match. Simply move the bottom right piece (where we cut horizontally from the waistline dart out to the centre front) up, keeping the centre front perfectly vertical. Tape into place.
Almost there guys - the last thing we now have to do to the bodice front is to re-draw the darts. Peasy!
Starting with the waistline dart, draw a straight line from the top of the dart out to the original dart notches along the waistline. This now narrower dart will keep the waistline measurement the same as when we started.
Repeat this process for the bust dart.

Before you cut out your new bodice front pattern, fold up the darts as if they were stitched and pressed. Now you can carefully cut out your bodice ensuring that the new dart edges will have the appropriate seam allowance.

And there you have it! Hopefully this will have shed some light on these very straightforward processes that will go on to make the world of difference to the way your handmade garms fit. If this has been your first encounter with pattern adjustment and fitting, we definitely recommend that you now whip up a quick toile of your new bodice pattern (front and back!) to check that you're happy with the fit. Then it's anchors away!!
We still have two more pattern adjustment posts coming this weekend - next up we'll be showing you how to fix gapey/tight backs, swiftly followed by how to lengthen or shorten your bodice.
Tip from the top: once you're happy with your newly adjusted pattern, copy it out onto some card for extra safe-keeping! Although this is an easy adjustment to make, no one wants to have to do it twice...
-
Elisalex de Castro Peake

Comments on this post (20)
Thank You a million times over for “Sew Along”.
I have looked at so many over orchestrated directions, hints, and tips all impossible for me to use. You’ve taken it to a place that is simply a “just do this.” The Anna dress that I almost did not get because it has a small bust in the small size. It’s been a problem since puberty made its’ adjustments to my once boyish 12 year old body. It was all about poor me as I hacked and whacked at a wardrobe in hopes of adjustments. But here it is an easier instructional pictorial how to understand what to do and how to make it work.Thank You a 1,000,000,
Maggie
— Maggie
Hi Sonja, Ellie and IJ. Have you seen our Bodice Fitting Companion, this will be able to answer your detailed questions. Alternatively, if you’re still struggling please email help@byhandlondon.com and we can work through it together.
— Jessica - By Hand London
Hi, I’m sewing the tank version and this is my first project that’ll actually be fitted. So I did a musslin with no changes to the pattern and apparently I need an SBA and in addition the Darts don’t seem to point towarts the apex. Should I move the darts first and then do an SBA? I looked at a lot of photos of Floras on IG and it looked like most darts don’t point directly towards the apex…? Any help appreciated :)
— Sonja
Just added 1.5 inches FBA, now my armsyc looks an odd shape, is that ok?
— Ellie
What happens when you draft a bodice with your waist measurements, then do a FBA/SBA and then the shoulder, across chest, upper bust do not fit?
— IJ
Just the tutorial I needed, but think I’ll try it out on muslin first. Thank you!
— Siany
Hi Mel,
If you’re performing a SBA to your size 18 bodice, both bodice front and back will need to be cut in a size 18. It’s the adjustment that will reduce the bust size to a 16. I hope this makes sense!
— Elisalex - By Hand London
Hi thanks for he tutorial. I am making sba as waist is 1 size bigger than bust, waist is size 18, bust 16, so I will do he sba. Where I’m confused is so I cut the bodice back out a size 16 or 18? I can see previous question regarding this and you confirmed you don’t have to alter the back, but I’m not sure if I cut it out to size 16 or 18? Thanks so much
— Mel thorley
Hi Genevieve, the fact that the width of the darts changes doesn’t actually affect the finished waistline/side seam measurement as we haven’t actually taken away or added any length either side of the dart’s stitching lines – does that make sense?? If you’re in doubt, please feel free to email me at help@byhandlondon.com!
— Elisalex - By Hand London
If the waistline dart and/or the bust darts become narrower, how do you surmise that the lengths stay the same as before the adjustments were made?
— Genevieve
I have the same problem as Barbarajanemade had with the gapping under the arm. Could you please tell me if an extra dart is needed?
Thanks!
— Kathy
Hi Willow,
Hmmm not sure what went wrong there! Did you open up the bust by a full 2" (meaning a total 4" FBA)? Or just 1" to your pattern and therefore a 2" total FBA? Maybe you could send me some pictures to help@byhandlondon.com and I’ll see if I can help…
x
— Elisalex - By Hand London
Hi. I’ve just done a 2" FBA on the tank bodice and I don’t know if I went wrong somewhere but I now have a bodice with a pointy bust that would put Madonna to shame. Any ideas? Thanks
— Willow Harriet
Hi Lisa,
I’m afraid we don’t have a picture of a finished dress with an SBA… If your bodice is now too tight on the waist, I’m thinking that you may have altered the dart? In the SBA that we show above, as you reduce the volume, you also reduce the width of the dart which should ensure that the waistline stays the same. Check that you haven’t moved the positioning of your waistline dart legs, and if all else fails, you could always add a sliver onto your side seam to enlarge the waistline by however much you need.
Hope this helps!
— Elisalex - By Hand London
Any chance you have pictures for the SBA? For the hard of thinking among us (me, basically)?
I thought I’d followed the instructions exactly, but being aware that I have the tendency to be a bit of a pillock, I made another toile.
Before I did the SBA, I had gapey pits, but the bodice fit perfectly around the waist. Afterwards, no gapey pits, but too tight in the waist.
I’m sure there’s something I have interpreted creatively that is causing this…
— Lisa
Hi Cat, yep – just cut straight across for line 4. Just make sure that you move it down without adding any length to the waistline. You’ll have to true out the neckline before you cut out your new bodice piece. Hope this makes sense! x
— Elisalex - By Hand London
Hi, I’m making the wrap top version of the top. For line 4 – do we just cut straight across even though the centre front mark is on the waistline and not on the side as for the tank bodice and then just join the lines as for the example above?
Thanks!
— Cat
Hi Madeinadelaide! You don’t have to alter the bodice back – the extra length added/removed onto the side seam by the FBA/SBA is evened out by the dart becoming wider/narrower so it should still match up nicely! x
— Elisalex - By Hand London
Hi, thank you for the detailed pattern adjustment. I just have a silly question here. Do i have to alter the back bodice as well, if yes, how can i do it?
Thank you again.
— Madeinadelaide
Hi ya, thanks for the sewalong. Both my daughter and I generally need an FBA but we also often get gapping under the arm, where your line 3 is. Do you have any suggestions for solving this? Is an extra dart needed maybe?
— Barbarajanemade