Aloha Sewists, and welcome to the Alterations Week for the Charlie Dress Sewalong! Throughout these posts we will be going through as many pattern alteration tutorials as we can physically crush in, relevant to the Charlie Dress. But it doesn't end there - the extra great news is that a lot of these tutorials will be applicable not only to the Charlie, but to a huge amount of other patterns too as we tackle most of the common issues surrounding pattern fitting.
Today, we'll be showing you how to:
- Perform a full bust adjustment (FBA)
- Perform a small bust adjustment (SBA)
And you will need:
- Your Charlie Dress pattern
- A tape measure
- Some extra pattern paper - we like dot & cross or baking paper
- Pens, a pencil and a ruler
- French curves or a patternmaster (optional)
- Tape - masking tape is good as it is easily removable if you make a mistake
- Paper scissors
Before you begin, have you read our posts on how to take accurate body measurements, and how to download, print & assemble a PDF sewing pattern?
*Click here to be taken to all the posts in the Charlie Dress Sewalong*
Full Bust Adjustment (FBA)
How do I know if an FBA is in order?
- Your full bust is more than 2" bigger than your high bust measurement (see this post on how to take accurate body measurements)
- Your full bust measurement falls into a larger size group than your waist measurement
- Dresses that fit your waist tend to squish down the ladies
- You find that your waistlines often ride up (avoid the temptation to lengthen the bodice)
Step 1
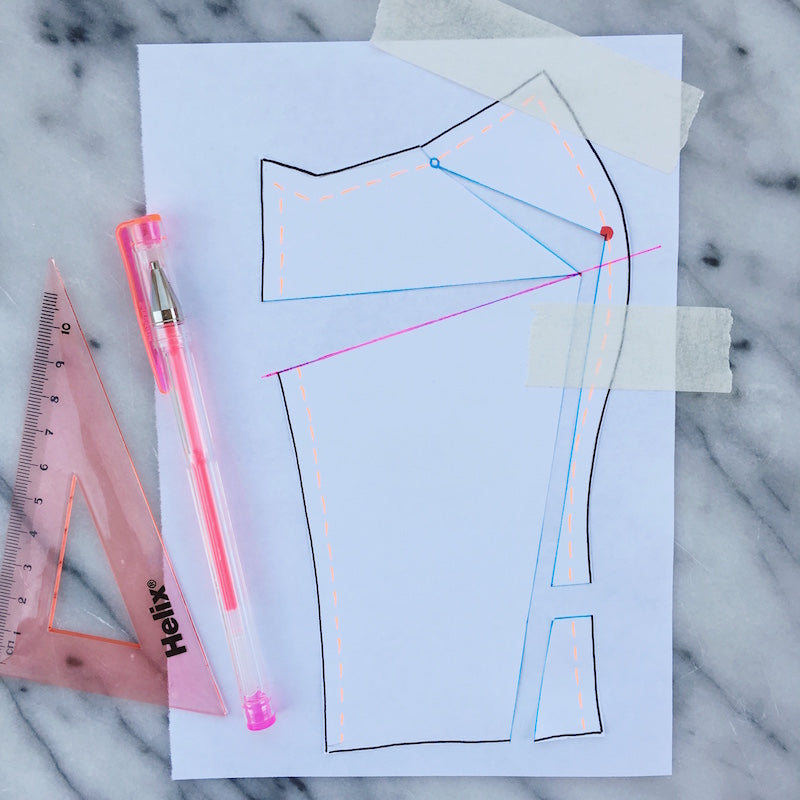
We need to begin by taking the bodice centre front and bodice side front pieces and marking out the seam allowance lines at the side front seam, the underarm seam and the side seam (shown in fluo orange).
We also need to mark the apex (shown in red) - this is basically the fullest part of the bust, or the nipple point.
Step 2
We now need to mark a series of slash lines along key points of the bodice side front - it is along these lines that we're going to cut and open it all up to create some more space for our ample bosoms!
The first line goes from the apex and down to the waistline, skimming the seam allowance line.
Step 3
Draw a second line from the apex and up to the armhole. In order to be able to open up the bust to create space without chopping up the bodice completely, we need to factor in some pivot points, or hinges. The first pivot point is marked by a little circle at the seam allowance line at the armhole. When we come to cutting along this line, we'll cut right up to the circle, and then we'll snip in to the circle from the seam allowance.
Step 4
The third line we need to mark goes from the side seam - a couple of inches down from the underarm - and up to the apex. Where this line meets the apex will also be a pivot point.
Step 5
Aaaaand the final line is a small horizontal line going from the first line we drew out to the side front seam edge.
Step 6
Now comes the fun - but also quite fiddly! - part: slashing.
Cut line 1 from the waistline up to the apex and continuing along line 2 until you get to the armhole pivot point.
Snip the seam allowance at the armhole to meet the pivot.
Cut along line 3 from the side seam, stopping just shy of the apex, allowing this point to pivot also.
You should be able to see now how we can open the bodice up to create more space, or close it in on itself to reduce volume.
Step 7
Take your bodice side front and place it onto a piece of scrap paper. Tape down the top of the side seam to secure it.
Step 8
We're now going to spread the pattern out according to how much we need to increase the bust measurement by.
For example, your bust measurement is 37" putting you in the size UK14 bracket, but your waist measurement is 28" putting you in the size UK12 bracket, and you have therefore cut out a size UK12 bodice. Seeing as your bust is 2" larger than the size UK12 bust of 35", you'll need to open up each side of your bodice by 1", totalling 2" extra inches all round. Remember, you only need to open up your bodice pattern piece by half of the total amount you need to increase the bust by, as once it's all cut out you'll have two!
Open up the pattern piece and measure your 1" (or however much you're increasing your bust by) across the split line 1:
Step 9
When you're happy, tape it down.
You'll see that the right hand portion of the bodice is now significantly longer than the left hand slither - fix this by snipping line 4 and bringing it down to match the waistline, keeping the side front seam line flush.
Step 10
Now that we've created more width across the bust, we need to close up the massive side dart we've ended up with!
Using the image below as a guide, draw a straight line (shown in pink) along the bottom part of line 3, continuing through the apex and out of the side front seam edge.
Cut from the side seam along this new line (let's call him "red line"), stopping at the apex.
Now cut along the red line from the side front seam towards the apex, but not through it - we need to keep the apex as a pivot point!
You'll see that you can now hinge the bodice, allowing you to close that side dart, bringing line 3 back together, and thereby opening up the curve at the bust.
Slip another little piece of scrap paper underneath this opening at the bust, tape it down and redraw the bust curve. In doing this, we've now increased the width at the bust and made that curved side front bust seam a little longer and bustier, without affecting the side seam.
Step 11
We have, however, increased the width at the waistline, which is exactly what we do not want!
This is easily amended by measuring the amount by which we've increased the waistline by...
And transferring that increase in from the side seam. You'll see the new side seam line drawn in pink below:
Cut out your freshly altered bodice side front piece, and you should have something a little like this!
Step 12
Now that we've altered the bodice side front, we need to make just a couple of alterations to the bodice centre front piece to ensure that the two match when we come to sewing them up.
We need to transfer the extra length that we've added to the side front bust seam to the corresponding seam at the centre front - simply draw two horizontal lines across the centre front piece that mimic the two openings at the bust curve and further down towards the waistline:
Cut across these lines and open them up by the same amount as on the bodice side front, making sure that the centre front line remains straight.
Slip some scrap paper behind, tape it all down and cut it out.
Small Bust Adjustment (SBA)
How do I know if an SBA is in order?
- Your full bust is less than 2" bigger than your high bust measurement (see this post on how to take accurate body measurements)
- Your full bust measurement falls into a smaller size group than your waist measurement
- Dresses that fit your waist tend to be baggy at the bust
- You find that your waistlines often droop or sit too low (avoid the temptation to shorten the bodice)
Step 1
The good news is that a small bust adjustment is a much quicker and more straightforward process than the full bust adjustment. The bad news is that in order to properly diagnose a small bust and figure out by how much we need to alter the pattern, we also need to have made a toile.
To alter for a small bust, we are going to be doing two things - we need to decrease the width across the full bust measurement (for which we need our measurements and sizing chart), and we need to shorten the bodice as there will be less of a curve for the fabric to make its way over with a smaller bosom (for which we need a toile).
Start by taking your bodice centre front and bodice side front pattern pieces. Keep your toile handy too!
Step 2
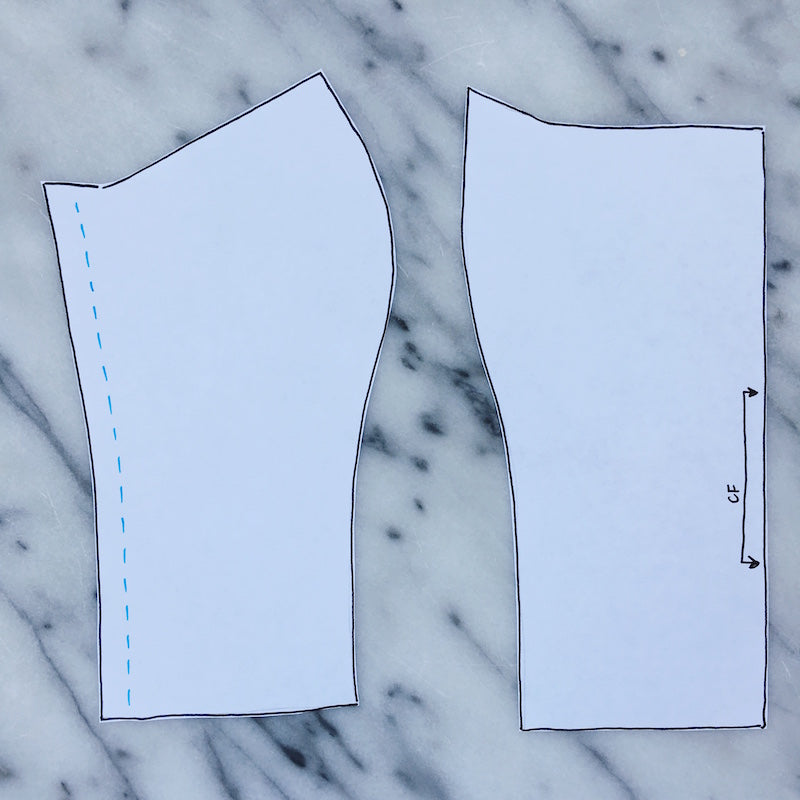
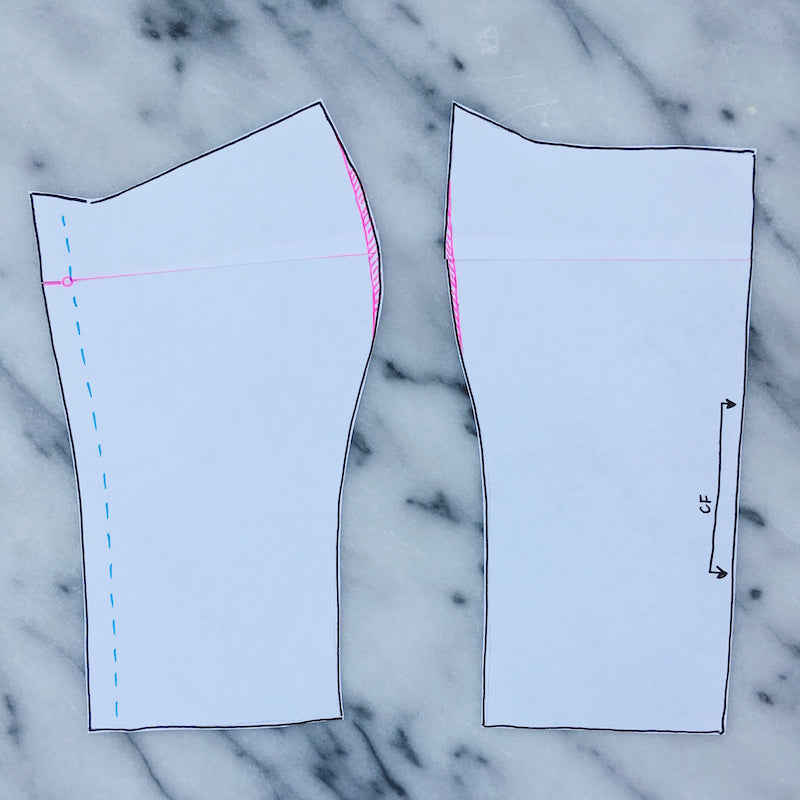
Mark out the seam allowance line at the side seam of the bodice side front (shown in blue).
Firstly, we're going to shorten the bodice, but in a different - more bust specific - way to the usual way you would go about lengthening or shortening a bodice.
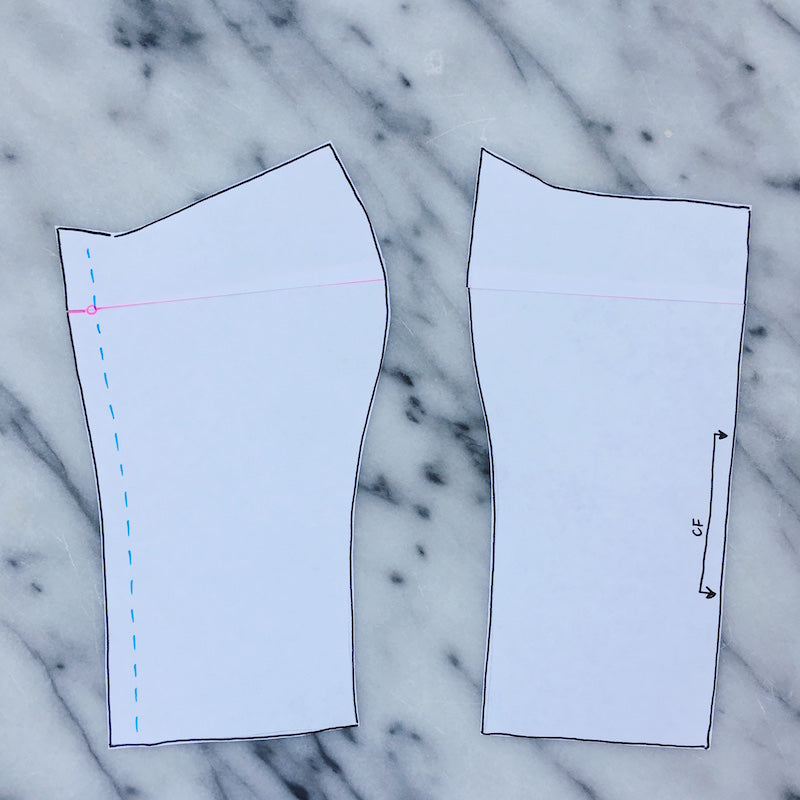
Draw a straight horizontal line across the bodice centre front piece at the fullest part. Now draw a similar line across the bodice side front piece, starting at the fullest part of the bust and going across to the side seam (both lines shown in pink). We want to keep the length of the side seam the same while shortening the length of the centre front seam and the side front seam, so we need to create a little pivot point, or hinge, at the side seam (shown as a little pink circle).
Step 3
Cut along these pink lines - right the way across in the case of the bodice centre front piece, and from the side front seam and out to the pivot point in the case of the bodice side front piece. To allow the pivot point to really hinge, snip in towards it from the seam allowance.
Step 4
You'll see that you can now decrease the length of the bodice pieces by overlapping the cut lines - and to know by how much to overlap, you'll need to refer back to your toile to see how much the waistline needs to come up by in order to sit comfortably for you. This measurement could be anything from about half an inch to two-ish inches, depending on how dramatic a small bust adjustment you need to make.
When you're happy with the overlaps, tape them down. Make sure that you've shortened both pieces by the same amount, and in the case of the bodice centre front, the overlap is parallel.
Step 5
So that takes care of the unwanted length in the bodice, we now need to address the unwanted width across the bust. To figure out by how much you'll need to decrease the bust measurement, refer back to your measurements and our sizing chart.
For example, your bust measurement is 32", putting you in the UK6 size bracket, but your waistline measurement puts you in the UK8 size bracket. You have therefore traced and cut a size UK8 according to your waistline, but seeing as the UK8 bust is 33", you need to decrease the bust by 1" total to bring it down to your 32". Remember, you're working on one half of the bodice, so you only need to reduce your pattern pieces by 1/2" to make the total of 1" when you cut two of each piece.
To reduce the width at the bust, it's as simple as redrawing the curve at the fullest part of the bust on both bodice front pieces, coming in by 1/4" at the fullest part on both centre front and side front (which will then total a reduction of 1/2" on the one side of the bodice, and a total of 1" altogether when you factor in the other side of the bodice):
Snip away the excess and you're good to go!
Tip from the top: Always check your adjustment by making another toile to check the fit. Once you're happy with your newly adjusted pattern, copy it out onto some card for extra safe keeping! Although this is a straightforward adjustment to make, no one wants to have to do it twice...







Comments on this post (0)