
Those of you making your Eloise with sleeves, today is the day it really takes shape! And, if you're making the shift dress option (no hem frill), then after this post you're basically done, save for hemming and sewing the button - which we'll cover in the final sewalong post. If you've never set a sleeve in before, fear not! We're doing it the easy way ;)
**To be taken to all the posts in the Eloise Sewalong, please click here**
In this post we will be:
- Gently gathering the sleeve head
- Setting the sleeve head into the armhole (flat method)
- Assembling and basting the waist tie backs
- Sewing the side seams
THE SLEEVES
The first thing we need to do in order to make sewing the sleeve to the armhole easier, and create a subtle but pretty little puff at the shoulder seam, is gather the fullness at the top of the sleeve head.
Start by running two parallel rows of wide basting stitches along the top of the sleeve head:

Gently pull on the bobbin threads (holding them together so they gather at the same rate) to gather the sleeve head ever so slightly. Don't worry about getting it to the right length just yet - we can adjust that when we get to pinning the sleeve head to the armhole.

Now take your dress and lay it out flat, right side facing you.
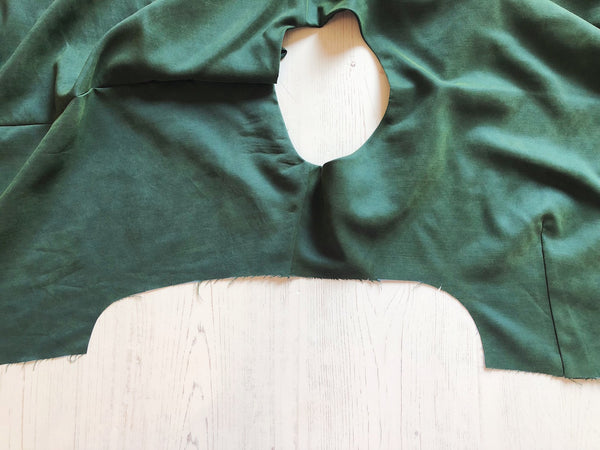
Take a sleeve and lay it onto the corresponding armhole right sides together - Check that the notches match up either side of the shoulder seam / sleeve head to be sure that you're about to attach the right sleeve to the right armhole!
You'll see that the curve of the sleeve head is wildly different to the curve of the armhole - that's fine, it will work I promise! Start by pinning the notch at the top of the sleeve head to the dress' shoulder seam.

With the sleeve head anchored at the shoulder seam, we can now bring either side of the sleeve down to start pinning the rest of the armhole. Remember that we're creating something 3D by joining these two opposing curves together, so there will be an element of manual manipulation here as you ease the sleeve head around the armhole.
Make sure that your notches and underarm all match up and that you distribute the gathers evenly at the sleeve head to fit.

Carefully sew your sleeve to the armhole with 1/2" or 12mm seam allowance.

Finish the excess seam allowance, repeat for the other sleeve and remove any visible basting stitches.
THE WAIST TIE BACKS (Variation 3 only)
If you're making your Eloise with the waist tie backs that are sewn into the side seams as opposed to the loose waistline belt, you need to get those in now before we close the side seams.
Take your long tie back strips and fold them in half lengthways and pin.

Stitch with the usual 5/8" or 15mm. Remember to leave the straight end open so that we can turn the ties out to the right side.
Grade the seam allowance and clip all the corners to reduce bulk before we turn the ties to the right side.

Turn to the right side and press.

Lay out your dress with the right side of the front piece facing you. Pin the ties to the waistline notches as shown below:


To check that you're happy with the placement of the ties, you could slip the dress over your head and adjust the height of the tie placement according to your figure and preferences.
When you're happy, baste the ties into place.
SIDE SEAMS
To finish up today's post, we're going to close the side seams and sleeve's underarm seam in one fell swoop - the beauty of setting in sleeves flat!!
Take your dress and, with right sides together, pin the side seam and sleeve's underarm seam, matching the underarm seam, waistline notches and hem. The waist ties (if you have them) should be hidden inside the dress at this point.

Stitch the underarm and side seam in one continuous line of stitching with 5/8" or 15mm seam allowance.

Finish the excess seam allowance and press the seam towards the back. Alternatively, press the seam open and finish each seam allowance layer individually. Up to you. Turn your dress out to the right side and it should be looking a little something like this....!


NEXT UP ON THE ELOISE SEWALONG...
The next post will be the penultimate post in the Eloise sewalong! We'll be assembling and attaching the hem and sleeve frills - up to you whether you decide to go for one or the other or both for full on frill fabulosity!
-
Elisalex de Castro Peake

Comments on this post (0)