With each sewing pattern we release, we do our very best to make each accompanying sewalong even more comprehensive than the one before. That's all great, until we look back on our older sewalongs and realise how incomprehensive they were... So in the interest of beefing them up, and providing equal support for all of our patterns, we thought we'd start filling in some gaps... First up, a small bust adjustment (SBA) tutorial for the Anna Dress.
You will need:
- The Anna Dress pattern, bodice front traced and cut out in the size as dictated by your waistline measurement
- Scrap paper
- Pens and pencils
- Ruler
- Paper scissors
- Tape
Please note: We are using itty bitty replica's of the pattern pieces to illustrate the alterations as simply and clearly as possible - please make sure that you alter your real-life pattern pieces, complete with notches, pattern info and grainlines!
*To be taken to all the posts in the Anna Dress Sewalong, please click here*
How do I know if I need an SBA?
- Your waistline measurement falls into a higher size category than that of your bust measurement
- The difference between your full bust measurement and your high bust measurement is less than 2" (please see this post on how to take accurate body measurements)
- You often find that fitted dresses are loose or gapey around your bust
Step 1: Prep your bodice front
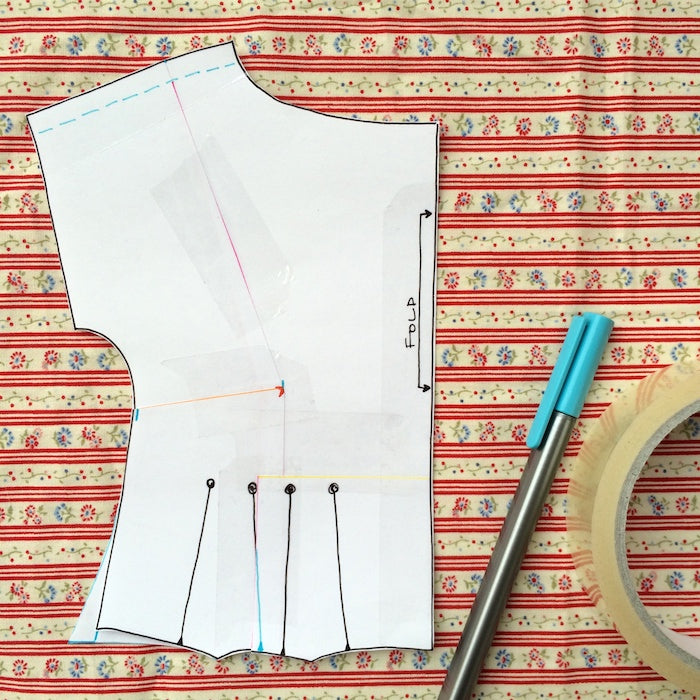
To begin with, and as with most paper pattern alterations, we need to mark out some key points on our bodice front, and the lines we'll be slashing in order to reduce the unwanted excess at the bust.
Using the images below as a guide, mark out:
- The seam line (5/8" or 15mm in from the raw edge) at the shoulder (shown in blue)
- The apex - basically the nipple point - which in the case of this design is about 3" up from the end of the waistline pleats (shown in red)

- A straight line going from the waistline - in between the two pleats - up to the apex and then diagonally up to the shoulder seam (shown in pink). Stop when you hit the seam line
- A straight line from the side seam (shown in orange) - about 2/3 up from the waistline - to the apex
- A straight horizontal line going from the pink line and out the centre front (shown in yellow)

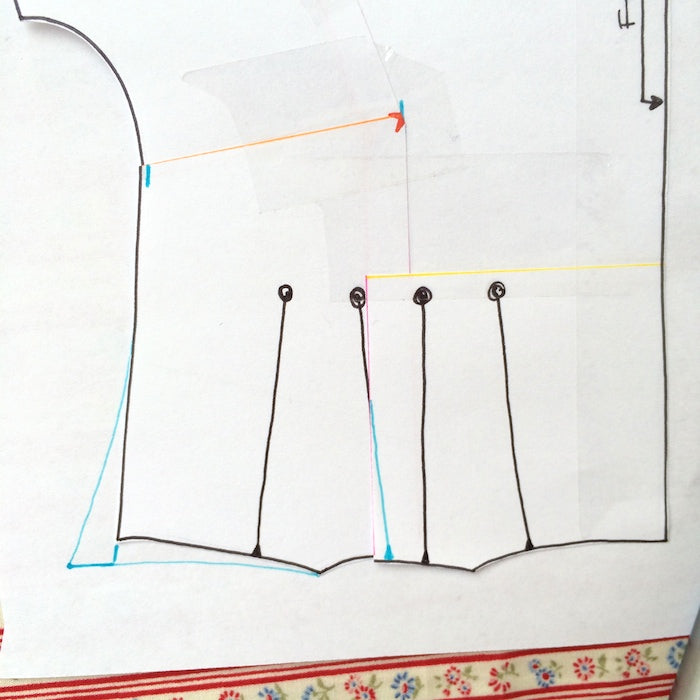
Step 2: Slashing
Cut up the pink line from the waistline, through the apex and up to the shoulder seam.

Snip into the seam allowance of the shoulder seam - but not past the seam line! - to create a pivot point at the seam allowance line.

Now cut along the orange line from the side seam and up to the apex - do not cut right up to the apex though as we need this to be another pivot point!

Finally, cut along the yellow line.

Step 3: SBA
Now we can get a shimmy on with the alteration! You'll see that by moving the side seam into the bodice we can reduce the bodice at the bust, but before we tape anything down, we need to figure out by how much we need to decrease the bust measurement.
For example, your waistline measurement is 32", and you have therefore cut a size UK16, but your bust measurement is 37" - 2" smaller than that of a size UK16. You'll need to reduce the bust by 1" on your bodice front piece (which represents half of your complete bodice front), which will result in a total 2" reduction to your dress' bust measurement.
Measuring from the apex across towards the centre front, mark out 1".

Now you can move the side seam portion of the bodice in to meet your 1" mark. Tape down the diagonal slash coming from the shoulder.

Bring the bottom right hand portion up and in so that the centre front and waistline are once again flush.

If you find that you have covered up one of the dart legs (like we have) simply re-draw it:

Now that the bust has been reduced, you'll notice that the side seam and waistline have become a little shorter - seeing as we only wanted to make the bust measurement samller, we need to fix this.
Place your pattern piece onto your scrap piece of paper and tape it down the centre front to keep it secure.

Firstly, we need to fill in that teeny gap we've created in the seam allowance at the shoulder - simply redraw the raw edge of the shoulder. Don't worry, this won't affect the way it matches up with the shoulder of the bodice back piece as the stitching line remains the same.

To get the side seam back to it's original length, measure the little overlap at the orange slash line, and make a little mark the same length as the overlap down from the waistline:

Do the same to measure the overlap at the waistline and mark that out from the lengthened side seam:

Now re-draw the side seam and waistline, using the image below as a guide.
Tape it all down and cut your new bodice out.
All done! With every pattern that you alter, always be sure to make a toile to check that you're happy with the fit before hacking into your lovely fabric.
-
Elisalex de Castro Peake

Comments on this post (8)
Thank you for this! Exactly what I was looking for and a very clear explanation!
— Bec
Hi messaged you earlier about the Anna pattern. I’ve found it but when I went to buy the pattern I cant pay for it as I get a warning notice.
Lynda
— Lynda Powell
Hi Charlie, by the sound of your sizing, it definitely sounds like you need an SBA! Give it a go on some cheap practice fabric and see how it makes a difference. Bear in mind however, that the Anna has a kimono bodice, meaning that it is designed to have a relaxed, not too fitted, fit – there will always be some gentle creasing/foldiness of the fabric around the bust and underarm area.
Hope this helps!
— Elisalex - By Hand London
hi!
I have made anna a couple of times but notice that it is very gapey around the bust. I fall into a UK14 for waist and hips and UK 10 for bust. Do I need to do an SBA given that my second version which was a straight 14 is also quite loose under the arms or can I just grade up from a size 10 bust to 14 at the waist?
Thanks in anticipation!
Charlie x
— Charlie Wensley
I’ve had the same issue with the bust adjustment, Size UK waist 12 to Size UK 8 bust, and the front darts overlap so one nearly disappears – have you come to a solution with Robin?
Love the pattern, can’t wait to get it sorted!
— Claire
Hi Robin! Hmmm definitely a bit of a conundrum… Would you mind dropping me a line at help@byhandlondon.com if possible with some images of what you’ve done so far so I can have a proper look? Thanks!
— Elisalex - By Hand London
So I need to adjust from a 32" waist (UK16 – 39" bust)) to a 35" bust (UK12). That’s 4", so 2" on the folded pattern piece. When I do this and replace the lower right segment, I lose an entire pleat line – like it’s way far under the crossed-over portion. I’m unsure what to do – would you re-draft the pleat, like add in a new line 2" toward the centre
You’re going to be so fed up of me asking! I feel this will be the last time, I am almost certain :)
If this SBA does not work for an odd pear like me, I will try grading, or using one larger size and playing with the seam allowance.
— Robin (again)
I’ve been umming and ahhing about buying this pattern. Should I buy it? Chances are I’ll have to work out how to alter it and I’m not really good at it.
You just convinced me to buy it with this post! Thank you!
— Emma