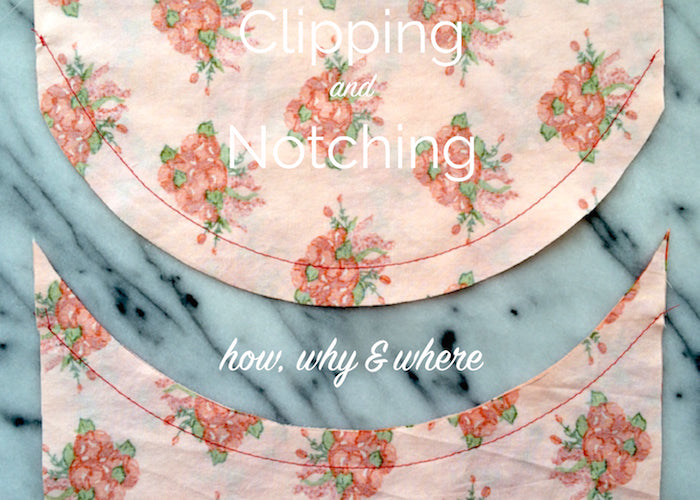
More often than not, it's smallest details that make the biggest difference to the finish of your handmakes. But knowing what technique to apply, and when, and why, can sometimes baffle even a seasoned seamstress. If sewing a curved seam was already tricky enough, then getting it to sit perfectly crisp once it's pressed can prove to be even more frustrating... Unless you know when to clip and when to notch.
Clipping your seam allowance
If you have a concave seam - one that looks like a smile - you'll need to clip the seam allowance. This type of seam would most likely be found on a neckline or a curved side slant pocket.
Once you've sewn your concave seam, have a go at turning it to the right side and getting it to lie flat. It won't. The shorter curve that is the raw edge of your seam allowance will stop you from being able to spread the seam allowance out in order to press.

By simply snipping, or clipping, into the seam allowance getting nice and close to your line of stitching - but not too close! - you will release the tension and find that pressing your seam out to the right side is now easy as pie.


Notching your seam allowance
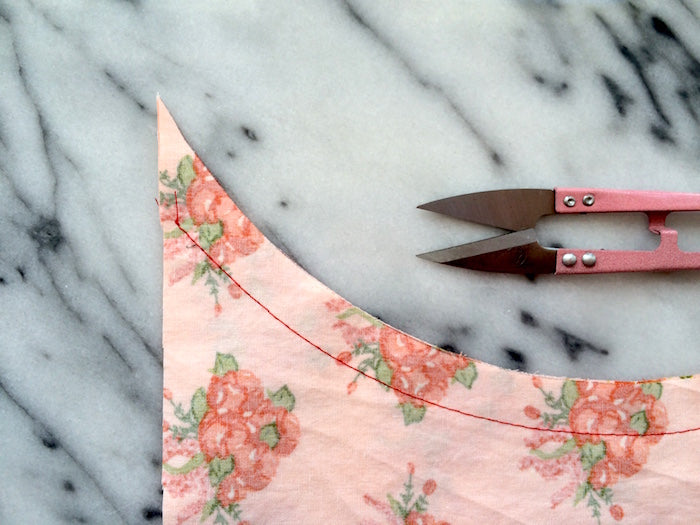
No points for guessing that if we clipped a concave seam, then surely notching must be applied to a convex seam, ie. a seam looking a little like a hill or the top of a bowler hat. You'll find these sorts of seams on bust shaping princess seams and scalloped hems.

Again, if you try to turn your convex seam out to the right side pre-notching, you'll find that the excess seam allowance bunches up as the curve of the raw edge is longer than that of the seam. Notching helps us to get rid of this unwanted excess.

To notch your convex seam, snip little triangles out of the seam allowance every 1/2" or so. Get nice and close to your stitches, without snipping right through them of course.

Turn your seam out to the right side, give it a good press and revel in that lovely un-bunchy flatness!

-
Elisalex de Castro Peake

Comments on this post (10)
Thank you “sew” much for the pricelss info. I love being in this group.
— Florah
I haven’t sewn for a while, and I’m making a couple of “bone” pillows with concave and convex seams. It was great to refresh and get the information about how and when to clip and notch!
— Susan Wallace
Thanks, everyone, for this good discussion! I was wondering the same thing as Meg. I may well go ahead with K’s suggestion of just trimming to 1/8". Pressing the notched or clipped seam allowance toward the facing, and then trying under-stitch neatly with them there, is a pain. I so appreciate every little nugget I can pick up!
— Tracy
I learned this long ago, but a little refresher is always nice. Thank you.
— Kathy
Thanks, Elisalex! I love the things I’ve learned from following your blog. :)
— Meg White
Hi Meg, a good question indeed! If your clipped or notched seam is going to be hidden by a facing or a lining, I wouldn’t finish them at all. Overlocking or binding a hidden seam will only add unwanted bulk. If your seam is going to be exposed on the inside of your garment however, overlocking right up to the seam line will finish it off just fine, and will trim away enough of the excess seam allowance that you probably won’t even need to to clip or notch in the first place! Hope this helps!
— Elisalex - By Hand London
Thanks for this post! I was wondering… When I need to clip or notch a curve, how should I finish the raw edges? I usually overlock my raw edges, but how can I do that on a seam that needs to be clipped? Thank you!!
— Meg White
You will get a far superior result if you trim curves back to an 1/8th inch and do not clip or notch. The result will be truly smooth curves without ANY angles and a cleaner result without lumps and bumps from clipping and notching showing. If you still feel the urge to clip or notch then I agree with Linda and stagger them.
— K
Thanks for the tip Linda! x
— Elisalex - By Hand London
I would add, if you alternate the notches or divets between facing seam allowance and fashion fabric allowance, you won’t get divets when you press because no two will line up on top of one another…
— Linda