When it comes to pattern hacks, our favourites are always the ones dreamt up by you! When your keen eyes look at a pattern we've designed, and see something we never even thought of, well, that's when our babies truly fly the nest and come into their own. Today's pattern hack is inspired by, nay, blatantly copied from French blogger extraordinaire Anna, who caused a bit of a stir in the studio, to say the least, when we saw the sneaky peek of her hacked Kim on Instagram. We immediately began plotting our own tie strap Kims, and thought we'd put together a little how-to in the process...
What you need:
- The Kim Dress sewing pattern
- Some scrap paper, pencil, tape and paper scissors to alter the pattern
- Your fabric, allowing about 10" on top of our fabric recommendations for both the shell and lining
- Your usual dressmaking tools and supplies
Step 1 - Altering the pattern
Extending the shoulder straps couldn't be easier. Take your bodice side front and bodice side back pieces and tape the shoulder seam down onto a piece of scrap paper. Using the image below as a guide, draw the extension of the shoulder straps, tapering or shaping the ends however you fancy. Extend by 6" at least.

Once your bodice shell and lining pieces are all cut, you should have something that looks a little like this:

**Disclaimer - the deliciously delightful Liberty lawn featured in this tutorial was very generously gifted to us by the lovely Susan at Sewbox.co.uk. You can find it here, and on sale too!
Step 2 - Assembling your bodice
With your bodice pieces all cut out, go about the sewing of the princess seams as normal. Then take your bodice front shell and lining and lay one on top of the other, right sides together.
Starting at the underarm, pin all along the underarm, up the strap and down the other side, along the neckline and finishing with the second strap and armhole.

With your usual 5/8" or 15mm seam allowance, stitch the shell to the lining. Take care whilst turning the sharp corners at the tips of the shoulder ties, going slow and pivoting as you go.
Trim away the excess seam allowance with pinking shears, getting as close (but not too close!) to your line of stitching as possible so as to reduce bulk.

Turn your bodice front out to the right side and give it a good press. Use a point turner, a knitting needle or some other long pokey device to push out the tips of your ties.
Repeat this to join the shell to the lining of the bodice back pieces.

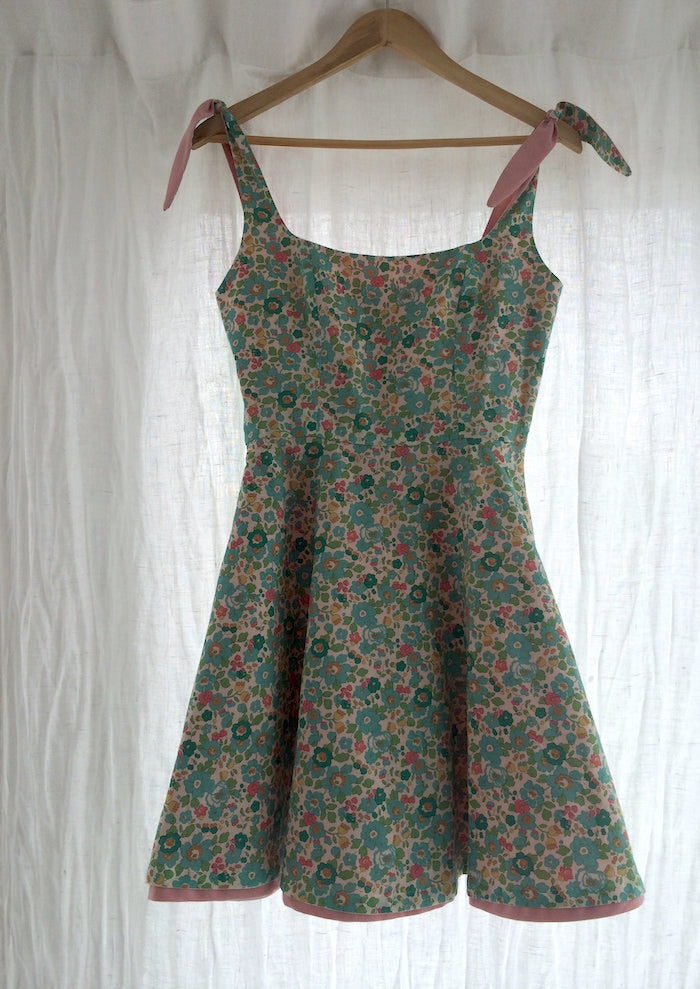
Close your side seams as normal, press, and tie your shoulder straps into little double knots (you can always adjust the tightness according to your own frame once the dress is finished), and there you have it! One sweet n' summery tie strap Kim bodice done!

Finish by assembling and attaching your skirt, installing the zipper and all those little finishing touches.


You'll notice that I struggled to decide which fabric I wanted as my shell and lining... At first, the plan was to have the pink chambray (a recent-ish Goldhawk Road find) for the main dress and keep the Liberty floral print as a subtle pop for the lining, but once the half circle skirt came on (and luckily I fully lined it) my mind was immediately changed - there was no way that pretty print was going to shy away on the inside...!

And here's a beautiful one in cotton silk that Charlotte made earlier! Funnily enough, we both decided to hack our Kims one step further by adding a half circle skirt as opposed to the gathered or wrap skirts that come with the pattern. Great minds!

-
Elisalex de Castro Peake

Comments on this post (4)
Hi Chrystal, sorry to hear that the straps keep falling off! That will probably be solved by making this tie strap hack, as you’ll be able to tie them as loose or as tight as you need. I’m not sure what you mean by the width of the strap making them fall off… do you have any pictures to illustrate this? Please don’t hesitate to email me at help@byhandlondon.com and I’ll do my best to help you out! Elisalex x
— Elisalex - By Hand London
I adore this pattern hack! I may or may not be making it in the exact same fabrics :) But one question – the shoulder straps are way too wide and fall off my shoulders :( how do I make the shoulder straps narrower without changing the shape of the rest of bodice as I love it!!!
— Chrystal McKay
Every time you post a new pattern hack or tutorial I become the happiest girl ever. This is adorable! One of my most lived in summer dresses has tie straps. Can’t wait to try this out—I’m envisioning gingham and polka dots, and since I can’t decide which would be cuter as the shell and as the lining, either, I guess I’ll just have to make up one of each combination.
— Caroline
What a sweet dress! I love the contrast on the tie, and what dress is not made prettier with Liberty fabric!
— Elizabeth Made This