
We've got a fair amount of ground to cover on our Rumana coats today, sewalongers! Lots of small bitesized chunks though, so hopefully it won't feel like too much of a schlog!
Today we will be:
- Sewing the back neck darts
- Sewing the lining's fisheye darts
- Sewing the centre back seams of both shell and lining, prepping the vent as we go
- Assembling the knife pleat of the lining
- Sewing the shoulder seams and side seams of the lining
- Sewing the side back seams of the shell
Darts
Ok. Let's start with something nice and satisfying. Start by taking one of your two centre back pieces. Assemble the dart at the neckline by pinching it between your fingers, right sides together. Make sure that the two notches meet, and that the fold goes directly through the dart's vanishing point, and then place a couple of pins to secure it.
Sew the dart, backstitching at the neckline but not at the vanishing point - instead, tie the threads in a secure double (or triple!) knot.

Press the dart towards the centre back and repeat for the other side.

Now for the fisheye darts on the lining back pieces. If you've never sewn a fisheye dart, no need to worry - it's no different to sewing a regular dart! It will help massively though if you use a fabric pen or tailors chalk to draw the dart points and legs out on the wrong side of your fabric in order to provide a clear stitching guide (we used Frixon pens which disappear with heat when you press it).

Again, pinch the dart and pin into place, making sure that the midway points meet perfectly either side of the fold, as well as the dart legs. We like to do this by popping a pin through the fabric along the marked line of the dart and checking that it is coming through the line on the other side. You may need to adjust a few times before you get it just right.

Start sewing your fisheye dart from the widest points in the centre, backstitching and sewing out to one vanishing point (again, not backstitching but tying off the threads instead) and then sewing from the centre and out to the other vanishing point.

Press the fisheye darts towards the centre back and repeat for the other side.

Sewing the centre back and vent
This is where things get a little tricky today. But the good news is that we don't actually sew the vent all in one go, so what we get done today will essentially be setting us up for when we get to finishing the vent at the end.
Let's start with the shell...
Take your two centre back pieces and with right sides together, pin the centre back seam, matching notches, neckline and the top of the vent.
Start sewing with your usual 5/8" or 15mm seam allowance from the neckline down. Stop momentarily when you get to the top of the vent. We're going to continue sewing along the top of the vent with the same 5/8" seam allowance so make sure you pivot at the right spot!
End your line of stitching no more than 3/8" or 10mm from the raw edge of the fabric.

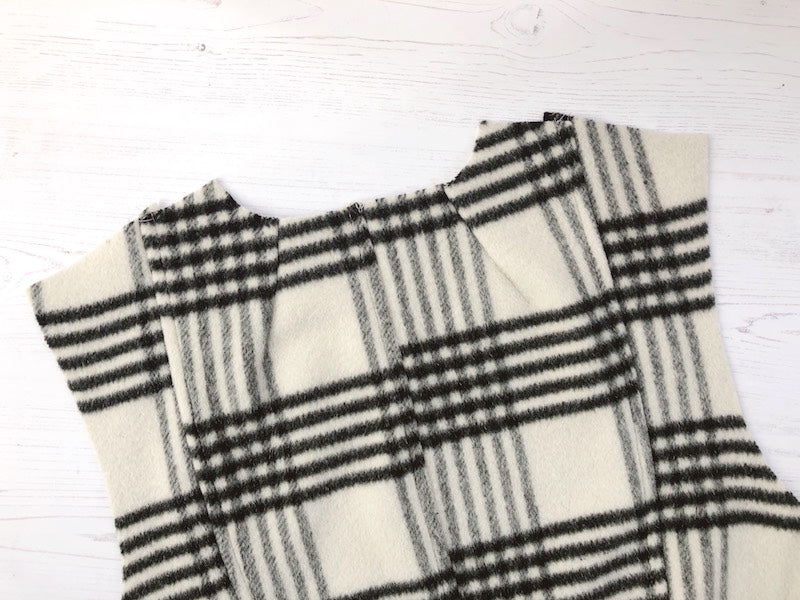
Now, looking at your centre back seam from the wrong side of the fabric, grade the righthand layer of seam allowance and press that whole seam - vent included - to the right.

Using pins to keep the seam allowance in place if you need, and this time working from the wrong side of your fabric (so you can see the vent clearly), topstitch the seam allowance in place just as you did with the other princess seams in the last post. When you get to the top of the vent, pivot and continue topstitching along the diagonal of the vent as well, ending your line of stitching at 3/8" from the end. This is how it should look from the inside:

And from the right side:

Now for the centre back seam of the lining...
Right sides together, start pinning the back seam from the neckline down to the vent. As soon as you get to the top of the vent you'll see that you can't go any further as one side of the lining has a protruding vent, and the other has an inverted vent.

I think it might be more straightforward here if I actually show you a picture of what our goal with these opposing vents is, before we start trying to get there... Here is what the vent will look like when it's done from the wrong side:

And from the right side:
So we basically need to manipulate those opposing vent diagonals in order to stitch them together and make it look like it was easy! Kind of like an extreme princess seams when you have to somehow get a dramatically concave curve to fit a dramatically convex curve to fit in order to create a beautifully rounded 3D shape from two opposing 2D shapes. I hope that theory makes sense??
Start by snipping into the inner corner of the protruding vent. This will enable you to bring it down to meet the diagonal edge of the inverted vent.

At this point, as you start pinning the two diagonal edges together, it will seem like the diagonal edge of the inverted vent is not long enough to match the protruding one. This is correct! It's actually much easier if you pin from the side with the protruding vent as you will be able to see and manipulate that excess fabric as it folds out of the way:

As you sew the centre back seam, you'll need to pivot at that corner in order to continue along that awkwardly manipulated diagonal. The aim here is to continue sewing about 3/8" beyond the end of the inverted vent top, stopping no more than 3/8" before the raw edge of the protruding vent. If there is a much bigger discrepancy between vent top lengths at this point, you will need to make that initial corner snip a little deeper, and then it should be easier to manipulate.
We actually find that it is easier to start sewing from the beginning of the diagonal edge of the vent and up towards the neckline, again, so that the excess fabric is visible as opposed to smushed on the bottom layer. Like this...
Start sewing about 3/8" - 5/8" from the edge of the vent along that top diagonal edge. Remember that doing it this way will mean that you have the bulkier protruding vent side on the top:

When you get to that corner, and making sure your needle is firmly in the fabric, lift your presser foot in order to pivot and help move that excess fabric out of the way of your line of stitching (this is the fiddly bit):

Swing the seam around so that the remainder of your centre back seam is aligned with the seam allowance guide on your machine. Put the foot down and finish sewing your centre back seam:

Please remember, this part is fiddly for anyone, so go slow and don't beat yourself up if you have to unpick and try again to get it right! It is very common to get some puckering at that pivot point, which, if only minor, should smooth out with a good press.
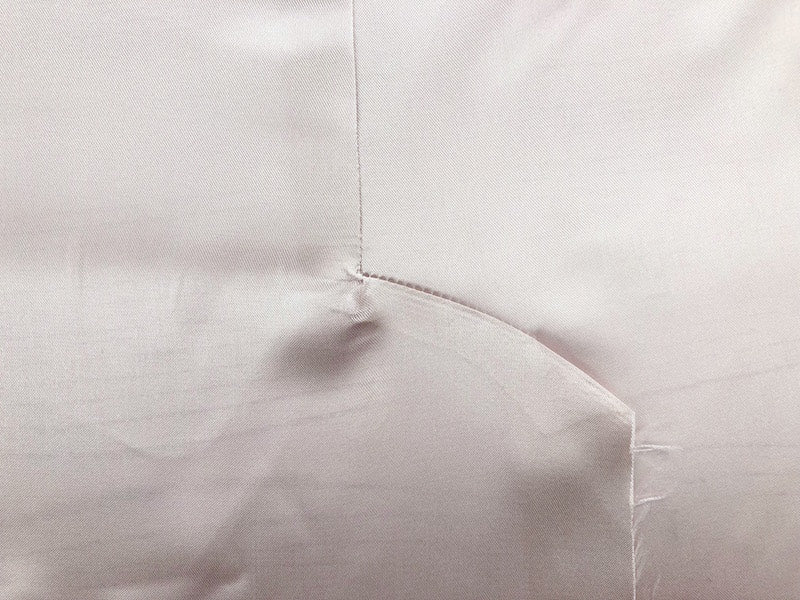
When you're done, press the whole seam to the right and it should sit nice and flat! And you'll see now how essential that snip was to making this happen as it should now be looking all spread out like this:

Phew! It's aaaaalmost time to put your feet up, but for now give yourself some serious props because that vent lining part was up there with the trickiest aspects of making Rumana!
All that's left to do now is basically wrapping up the initial assembly of the shell and lining so we're ready to move on to sleeves and collars next.
Assembling the pleat
Assemble the knife pleat at the lining's neckline by bringing the notch on the left of the centre back seam (seen from the right side of the fabric) across to meet the notch on the right. Pin into place and baste to secure.

Final seams for today
Lastly, we just need to whip up the last side back seams of the coat shell and the side and shoulder seams of the lining.
Do this in the usual way - right sides together, 5/8" or 15mm seam allowance etc. For the side back shell seams, grade the seam allowance closest to the centre back, press the whole seam towards the centre back and topstitch.

For the lining, the acetate fabric we're using is very prone to fraying so we've overlocked our side and shoulder seams to make them more secure. This is totally optional, but if you do, press side and shoulder seams towards the back. If not, press seams open instead.

If you want to neaten your lining seams as well, but you don't have an overlocker / serger, you can always go over the raw edges of the excess seam allowance with a zigzag stitch instead. Avoid fancier seam finishes such as Hong Kong / bound seams or even turned under and stitched seams as they will add unwanted bulk to your lining, and all that hard work won't ever be seen!
Next up: We'll be cleansing our palates with some straightforward sleeve assembly and insertion before tackling the next big hurdle - collars!
-
Elisalex de Castro Peake

Comments on this post (1)
Please don’t encourage people to use Pilot Frixion pen to mark their fabric (if that’s what you meant by “Frixon” in the post). Ink from the pen does not disappear with the heat! It only becomes invisible and comes back in sub zero temperatures. I don’t think people will be happy about that when they wear this fabulous coat during winter. Same mistake made Deer and Doe company in one of their posts, I hope they corrected it.
— Zuzana