Today we get the sleeves done - halfway there Sewalongers!
*To be taken to all of the posts in the Sarah Shirt Sewalong, please click here*
Prep - Variations 1 & 2
Before we get to the nitty gritty details of each sleeve variation, there are two things that apply to both - prepping the sleeve head and sewing the underarm seams.
Both sleeves options for the Sarah Shirt feature a gently gathered sleeve head, meaning that it pouffs out ever so slightly at the shoulder. In order to achieve this, we need to gather the top of the sleeve head before we set it into the armhole.
If you look at your sleeve piece, you'll see a single notch either side of the very top notch. It is between these two outer notches that we need to gather:

To gather your sleeve head, run two parallel lines of basting stitches - one at 3/8" or 10mm from the raw edge and the second one 3/4" or 20mm from the raw edge - in between those two notches, going past that central notch at the top of your sleeve head.

(Apologies for the blue dawn tinge to the short sleeve photos - I was trying to be extra efficient and get the short sleeves done and photographed before my son woke up... I'll know not to be so keen next time - lunchtime light is so much warmer!)
Gently pull on the bobbin threads to evenly gather the sleeve head. Don't worry about gathering it to the exact amount now; we'll come to that when we're setting the sleeves into the armholes.

Now we need to sew the underarm seams. Seeing as I sewed the side seams of my shirts with French seams, I'm going to keep things consistent and do the same for my underarm seams.

*For a French seam recap, have a little skim read of our last Sarah sewalong post here*
If you've opted for standard seaming, go ahead and stitch your underarm seam with the usual 5/8" or 15mm, press open and finish your seam allowance as you usually would.
Variation 1 - Long sleeves
Definitely my favourite of the two sleeve options, I find the feminine, billowy sleeves of Variation 1 so perfectly elegant! A little fiddlier to assemble, for sure, but deeply satisfying and well worth the glamorous result.
Note: The dark blue viscose voile that we're using for Variation 1 has proved to be a little tricksy when it comes to showing close up details on camera... Luckily, I have a third Sarah Shirt on the go (Sarah fever?!) in a stunning black and beige striped silk, which is looking much better in photos, so I'll be subbing that in for now...
With the sleeve head prepped and the underarm seam sewn, all that's left to do is bind the cuff opening, gather the sleeve at the wrist, and assemble and attach the cuffs.
Let's start with some prep... Assemble your cuffs by folding them in half lengthways, right sides together, and stitch the ends with 3/8" or 10mm seam allowance. Snip away the corners of the seam allowance near the fold to reduce bulk (you could even grade the seam allowances here too if you feel like it), turn to the right side and press.

I also find it very helpful at this point to press the raw open edges of the cuffs in by 3/8" to make things easier when it comes to attaching it to the sleeve, but it's not essential.
Next, prep the binding by pressing in one of the long raw edges by 1/4" or 6mm. This will help to make thing less fiddly when we come to turning the binding out to the right side and topstitching.
To bind the cuff opening, take a length of cuff binding and your sleeve, inside out. Pin the unpressed length of the binding, right side to the wrong side of the sleeve at the T-slash going up from the wrist. Stitch with a scant 1/4" or 6mm seam allowance, pivoting around the top. Don't panic that the binding it longer than the opening, just trim away the excess once you've stitched it into place!
From the wrong side of your sleeve, it should be looking something like this...
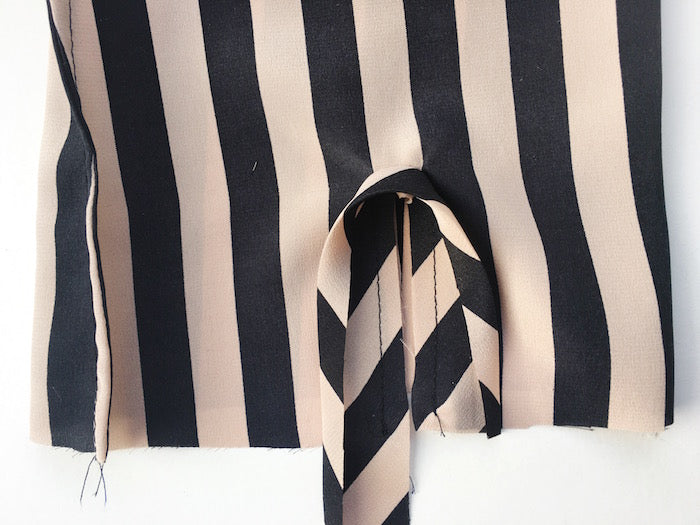
...and like this from the right side:

Press the seam into the binding and turn your sleeve to the right side. Fold and press the binding out to the right side and pin into place, thereby sealing that raw edge and ensconcing the seam allowance.

Topstitch as close to the pressed fold of the binding as possible, going slowly and carefully around the curve at the top.

At this point, if you don't like the way the binding sticks out a little at the top of the opening (personally, I quite like it as long as the fabric is super fine and drapey. Not so much if the fabric is less floaty...), turn your sleeve back to the wrong side and pinch the top of the cuff binding. Pin, and stitch across the pokey bit of the binding, making a little triangle out of the pinch. Press off to one side, and you'll see that your sleeve now sits smooth and streamlined.


Nice.
Ok, time to gather the wrists ready for the cuffs. Just like we did for the sleeve head, run two parallel lines of basting stitches starting at the edge of the binding and ending at the edge of the binding on the other side. We're going to be attaching the cuff with a slightly smaller seam allowance of 3/8", so run your basting stitches 1/4" and 5/8" from the raw wrist edge.

Gather the wrist by pulling evenly on the bobbin threads.

Making sure that the wrist fits exactly in the cuff, and that your gathers are evenly spaced, pin the wrist of your sleeve to one of the open raw edges of the cuff, right sides facing. Stitch with 3/8" or 10mm seam allowance.

Press the seam allowance into the cuff and if you haven't done so already, press the unstitched raw cuff edge in by 3/8" and pin into place at the inside of the sleeve. You could close the inside of your cuff by hand with a blind slipstitch, but I prefer to do it by machine...
Place your pins from the right side, going in at the ditch where your cuff and sleeve meet, and coming out from the main body of the cuff:

Have a little peek at the inside - the goal is to have caught the unstitched edge of the cuff with both pricks of the pin so that when we topstich the cuff from the right side we are guaranteed to be securing the inside of the cuff also.

Topstitch as close to the fold as possible all around the cuff. Remove your basting threads, sit back, and admire those sleeves!

Variation 2 - Short sleeves
Now that you've got your sleeve head prepped and your underarm seam stitched, all that's left to do is assemble and attach the cuff.
Take your cuff pieces and fold them in half, short ends together, and stitch with 5/8" or 15mm seam allowance to form a loop. Pivot when you get to the peak of the subtle V, and notch a little triangle out of the seam allowance in order to reduce bulk when it gets turned to the right side.

Press the seam open, and now fold your cuff lengthways and press, ready to attach to the sleeve.

Take your sleeve, inside out, and slip on a cuff. Pin into place, raw edges together, matching notches and the cuff seam to the sleeve's underarm seam.

Stitch with 3/8" or 10mm seam allowance. Now turn your sleeve to the right side and press the seam allowance up towards the sleeve head. Before turning the cuff out and up to the right side, we're going to understitch the seam allowance to the sleeve to help keep the cuff up and in place.


Turn and press the cuff out to the right side. Tack the cuff down at the underarm seam with a couple of stitches (hand stitches or very narrow zigzag machine stitches) for extra security.
Alternatively, you could make a feature of the cuff here and topstitch the cuff to the sleeve with a pretty little peek of ricrac poking out...

I couldn't resist...!
Setting in the sleeves - Variations 1 & 2
With your shirt inside out, and your sleeve right side out, slip the sleeve into the shirt and out of the armhole so that the right side of your sleeve head meets the right side of your shirt's armhole. Start by matching up the corresponding notches and seams at the sleeve head and armhole. When you've got those pinned and anchored into place, you'll be able to see how much to gather your sleeve head in order to get it to fit the armhole.


When you're happy with the way the sleeve head is fitting, stitch into place with the usual 5/8" or 15mm seam allowance starting at the underarm seam. Sew with the fabric of the sleeve head on the bottom - as it passes through, the feed dogs on the bottom will guide the gathered sleeve head without distorting the gathers, which the presser foot can do if the gathers are on the top.
A word about French seaming the armhole - while I like to keep things consistent, I've chosen not to French my armhole seam despite having Frenched my side seams and underarm seam. Don't get me wrong, armholes - and curves in general - can be closed with a French seam, but given the gathered sleeve head of the Sarah Shirt, I feel like there would be too much bulk were those gathers to be doubled up and Frenched. Instead, I've sewn the armhole normally, pressed the seam towards the neckline and finished off my excess seam allowance on the overlocker/serger.
Check it out! A beautiful pair of sleeves, set. Remove any basting stitches, press the seam towards the neckline, finish the excess and admire!

Up next: We tackle the final hurdle in the making of the Sarah Shirt - collars and plackets!
-
Elisalex de Castro Peake

Comments on this post (4)
Ooops! Sorry for the typo, it should read, needless to say!
— Liz
What a beautiful blouse/shirt. Stunning fabric and, needless today, perfectly made.
Thanks for sharing it with us.
— Liz
Aaah finally! Thank you for explaining it so simply! So glad I found your blog. Have a great day!
— Zainab
I would love to see a facing on that neckline – the stripes and pleats are so beautiful as they are! Will be really interesting to see the collar though :)
— Tina