Things are really starting to take shape today as we get the main body of our Sarah Shirts assembled. We'll be sewing at a nice and easy pace, with nothing too fiddly to conquer (fiddly bits to come next week...), but for those of you who have never tried the 'burrito technique', you're in for a very satisfying learning curve!
*To be taken to all of the posts in the Sarah Shirt Sewalong, please click here*
Today we will be:
- Assembling the pleats
- Joining the front and back pieces to the yoke
- Discussing topstitching
- Sewing the side seams
- Talking about French seams
Pleats
To give the Sarah Shirt its soft fullness at the bust and volume at the back, we need to assemble the three inverted box pleats...
At top centre of your shirt back piece you have three notches. To assemble the inverted box pleat, bring the outer notches in to meet the central notch, and pin into place.

We're going to run two parallel lines of basting stitches (wide, straight machine stitches that do not need to be backstitched at the start and finish of your line) to hold our pleat into place - the first needs to be 3/8" or 10mm from the raw edge, the second one up to an inch from the raw edge. By securing the pleat either side of what will be our seam line (at 5/8"), we're guaranteed to end up with a pleat that meets perfectly in the middle without any gaps or overlaps.

Repeat this process for the pleats on your shirt front pieces.

Joining the yoke, the burrito way
If this is your first time assembling a shirt the burrito way, you are in for a treat! No fiddly pressing, no hand stitching, no stitching in the ditch. Just smooth satisfaction all the way through.
Start by taking your inner yoke piece and laying it out, upside down and right side facing you:

Now place your shirt back piece, right way up and right side facing you, onto the inner yoke matching that straight horizontal raw edge.

Finally, lay on your outer yoke piece, wrong side facing you. Pin all three layers into place, matching the central notches on the yoke pieces with the centre of your pleat.


Stitch all three layers together with your usual 5/8" or 15mm seam allowance. When you open up the yoke pieces you should have something that looks like this:

Grade the seam allowances to minimise the bulk at the seam. Starting with the seam allowance closest to the inner yoke, trim it down to a scant 1/4". Trim the middle seam allowance down to 3/8", and leave the final one as is.

Press both yoke pieces up.

Let's just take a moment to bask in the glory of that perfect centre back pleat...

We're now going to baste the shirt fronts to the inner yoke, roll the whole thing up into a nice little sausage and seam all three layer of outer yoke, shirt front, inner yoke in one fell swoop. No hand stitching needed with this technique!
Lay out your shirt back, wrong side facing you. Take a shirt front piece, right side facing you and pin the (sort of) shoulder edge to the corresponding edge of the inner yoke only. The right side of your inner yoke should be facing the wrong side of your shirt front.

Baste to secure with 3/8" or 10mm seam allowance:

Repeat for the other side, and lay out your shirt, right side & shirt fronts facing you. As you're laying your shirt out, hold it by the basted shoulder seams, letting the loose outer yoke at the back flop down. Let's start wrapping this burrito up!

From the hem of your shirt, grab both front pieces and the shirt back piece and start rolling them up to meet the shoulder seams...

Keep rolling... Stop rolling when you've revealed the loose outer yoke piece and the main body of your shirt is all nice and tightly rolled up, like in the image below:

Bring that outer yoke piece up and pin the loose shoulder edges to the already basted inner yoke and shirt fronts.

You should have all three layers - inner yoke, shirt front, outer yoke - all pinned together, and the main body of your shirt rolled up all snug between the two yoke pieces.

Stitch both seams with the usual 5/8" or 15mm seam allowance.

Grade the seam allowances just like we did for the back...

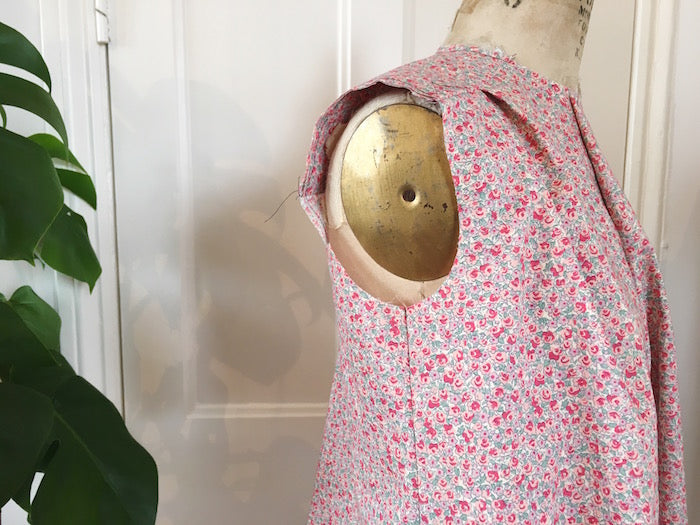
...Aaaand turn your shirt to the right side through the neckline and press. Now how satisfying was that?!

Before we move on to the side seams, we need to secure the two yoke layers at the armholes and neckline, just to prevent them shifting around when we come to setting the sleeves in and attaching the collar. Simply run a line of basting stitches along the armholes and neckline to seal the two yoke pieces as one.

Topstitching (optional)
If you want to topstitch or edgestitch along those yoke seams, now's the time - I like to baste the yoke pieces and topstitch all in one go...
Topstitching the yoke where it meets the shirt back and fronts is very useful - advisable even - if you're making your shirt from a pesky fabric that doesn't like to be pressed, polyester crepe for example. Topstitching 1/4" from the seam or edgestitching just shy of the seam will give your shirt some much needed structure. Top/edgestitching can also be done for decorative reasons, and you may even want to consider opting for a thread of contrasting colour.
For my floral Variation 2 Sarah, I chose not to topstitch as the cotton lawn presses beautifully, and there's already a lot going on with the print, so I thought I'd omit the extra stitches. For my blue viscose voile Variation 1 Sarah however, I will be edgestitching - basically topstitching but verrrry close to the seam, mostly for decorative reasons seeing as my fabric is a plain solid colour. I toyed with the idea of contrasting thread, but after having tried a few out on a piece of scrap fabric (I tried off white, grey and even gold!), I settled on the chic simplicity of matching thread. I'm planning on chucking in some hardware embellishments later on, so didn't want to go over the top with my stitches too!
I used an edgestitch foot for my machine to get my stitches right up close and neat as can be:

Starting at the front necklline, I edgestitched along the front of the yoke seam (stitching on the yoke piece of course, not over the pleats!), turned the corner and basted the yoke armhole, edgestitched across the back of the yoke, basted the other armhole, edgestitched the front yoke seam on the other side and finished up by basting around the neckline.

Side seams - to French or not to French?
Just the side seams to go and we're done for today! Now, you could of course simply sew your side seams by pinning front to back, right sides together and stitch with your usual 5/8" seam allowance. Press open, finish the seam allowances and you're good to go. But, if you want to get a really clean, beautiful and secure finish to your side seams, I'd go French if I were you...
French seams are the perfect choice for sheer fabrics as they look just as good from the inside as they do from the outside. No scruffy overlocking or fraying raw edges showing through! Extra bonus points for the fact that French seams are way more secure than regular seams as they've been stitched twice, making them ideal for delicate or fine fabrics.
With wrong sides together, pin a shirt front to the shirt back at the sides seam. Stitch with 3/8" or 10mm seam allowance.

Trim the seam allowance down to a scant 1/8"...

...Press the seam open, and then turn your shirt out to the wrong side. Press the side seam and pin into place ready to stitch.

Finally, sew your side seam with 1/4" seam allowance. In doing this, you will have sewn your seam with a total of the required 5/8" (3/8" the first time, 2/8" the second time), and your raw edge will be ensconced within itself - neat and strong!

Press the seam towards the centre back and repeat for the side seam on the other side.
Looking good!
Up next: We'll be assembling and setting in the sleeves of both variations...
-
Elisalex de Castro Peake

Comments on this post (5)
I am a new sewer and have a lot of trouble reading pattern directions. Largely because I am not familiar with the basics. I bought the Sarah Shirt pattern and just happened to look on the internet to see if there were comments on the pattern. I lucked upon your sew along . . A dream come true.! These are the most marvelous instructions ever! I want to thank you now even though the hardest parts are yet to come. What a stroke of genius
— Connie McDougald
I LOVE the way to attach the yolk – it works so well! A revelation!
— Emily
Hi Tracey, you could try our Charlie Dress pattern – Variation 1 has a very Spanish/Flamenco style gathered skirt with a ruffled frill – http://byhandlondon.com/products/charlie-dress-pdf-sewing-pattern
Hope this helps!
Elisalex
— Elisalex - By Hand London
Do you have how to sew a circle skirt with ruffles to look like a Spanish skirt for a primary school concert
— Tracey
Do you have how to sew a circle skirt with ruffles to look like a Spanish skirt for a primary school concert
— Tracey