This is it guys - we've come to the end of the Kim Dress Sewalong, and as always, we can't wait to see yours! We'll be publishing a round-up of your makes at the end of next week, so please share your Kims with us on Facebook, Instagram or Twitter using the handy hashtags #KimDress and #KimSewalong. We love mail too, so feel free to email us your Kim pics to help@byhandlondon.com if you'd rather.
*To be taken to all the posts in the Kim Dress Sewalong, please click here!*
Today we will be:
- Hemming our dresses
- Neatening off the bodice lining
- Stabilising the wrap front (Variation 1 only)
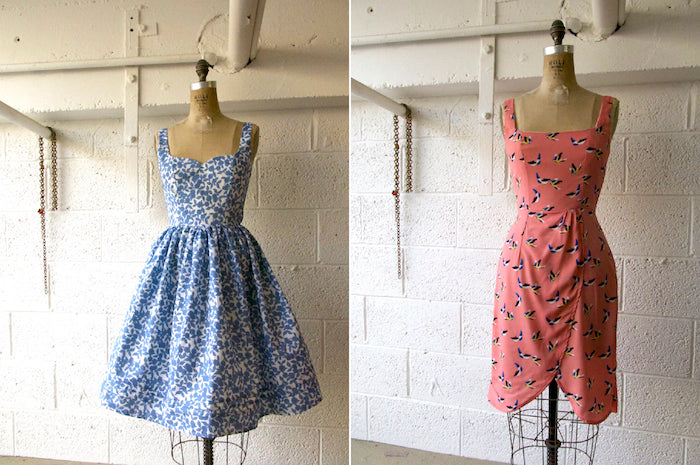
Hemming (Variation 1)
Hemming the curved wrap skirt of Variation 1 is slightly trickier than the straight hem of Variation 2, but no need to panic - we've already laid the groundwork in the form of the stay stitching we did right at the start, and the hem prep we did when we basted the skirt fronts at the centre front.

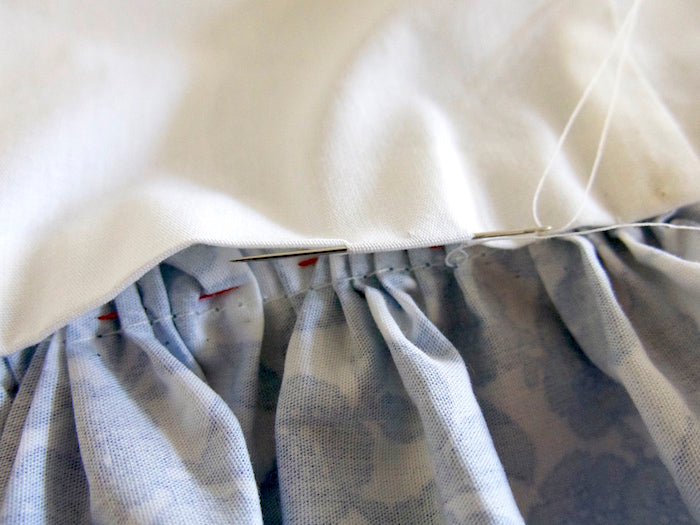
Starting at the waistline, where we started to prep our hem, press the hemline in using the stay stitches as a pressing guide. Press the hem in again by the same amount, and pin into place.

Continue to stitch the hem using the same method you used to prep - I'll simply be topstitching 1/4" or 6mm from the fold. You could also hand sew the hem with a blind slip stitch for a flawless finish, or if your fabric is proving especially tricky to ease at the curves.

Hemming (Variation 2)
Hemming the straight skirt of Variation 2 is incredibly straightforward, will either provide you with a nice and mindless final task in the making of your dress, or be a great opportunity to practice a hand stitched or decorative hem. Check out this post for tips on hand sewing, or if you feel like trying out some of the fancy stitches your machine has to offer, make sure that you practice on a scrap of fabric first.
I've opted for a very simple, neat little hem that although basic, has a very professional finish to it. First, I overlocked/serged the hemline to neaten any fraying fibres. Then I pressed it up once and stitched it into place a scant 1/4" or 6mm from the fold. You could of course press the hem in by however much you need in order to achieve your desired skirt length - try your dress on now if you're unsure! - but I'd been a bit restricted fabric-wise and been forced to shorten the skirt by an inch or so at the cutting stage, so am making up for it now with a teeny tiny hem!


Finishing the bodice lining
Please note, this step will apply to both variations, and those of you who have fully lined your wrap dresses according to this post, but will not apply to you if you have fully lined your gathered skirted dress of Variation 2 by joining a skirt lining to the bodice lining at the waistline.
Press in the seam allowance at the loose back seam and waistline of the bodice lining, and pin it to the bodice shell down the zipper tape and along the waistline seam. Snip away the tops of the zipper tape if you find it getting in your way.


Thread up a hand sewing needle, and using a blind slip stitch, secure the lining to the dress along the waistline and at each length of zipper tape. Just make sure that you don't stitch too close to the zipper teeth as this will give you a massive problem when you come to zipping your dress up!

Stabilising the wrap
If you find that your wrap skirt is flashing a little too much leg, it's quick and easy to stitch the upper layer down to the under layer to keep things more modest like.
Lay out your dress flat and pin the upper wrap layer to the under wrap layer, being careful not to distort the fall of the skirt.

Stitch from the waistline down, using the same method you used to hem - if you machine stitched your hem, simply topstitch your wrap into place following the hemming stitches. If you hand stitched you hem, tack the wrap down by hand as well.
And there you have it! Kim Dress, done. You still have a week to send us your Kim pics - we'll be rounding up some of your makes on Friday 20th March 2015. For now, happy stitching, and happy weekend! Over and out.

-
Elisalex de Castro Peake

Comments on this post (1)
Hello
My friend Fritha sat next to you at a dinner party back in November or December and spoke about what I do.I just wondered if there was any synchronicity? I run all kinds of workshops here from sewing, quilting upholstery, block-printing, painting and even food fermentation workshops as well as pop up dinners. We are in East Sussex in Forest Row. I just wondered if it may be fun if you ran a couple of workshops in the Easter Holidays or one weekend?
this is our website (apologies in process of being updated) www.onethesquare.co.uk and you can follow us on instagramm one.the.square. and FB.
Just a thought
Best wishes
Magdax
— magda devaris