The sewalong has come to an end, and we can't wait to start rounding up everyone's fabulous Holly's for you to vote on. One superstar winner will get 3m of custom or gallery printed fabric, plus aBHL pattern of their choice and a super exclusive BHL goodie bag to boot, while the two runner-up sewists hot on the winners heels will also be snapping themselves up a goodie bag each.
Here's how to enter the Holly Sewalong comp:
- Show us your Holly! Tag us in your tweets and Instagrams @byhandlondon including the hashtag #hollysewalong
- Share your picrels on our Facebook page for all the fans to see
- Email us your snapshots to help@byhandlondon.com
- Please make sure your pictures are light, bright and clear
- Only one entry per person, so if you've already made a gazillion Holly's, please just submit your favourite one
- All entries need to be in by midnight GMT on Sunday 17th November
*To be taken to all the posts in the Holly Jumpsuit Sewalong, please click here!*
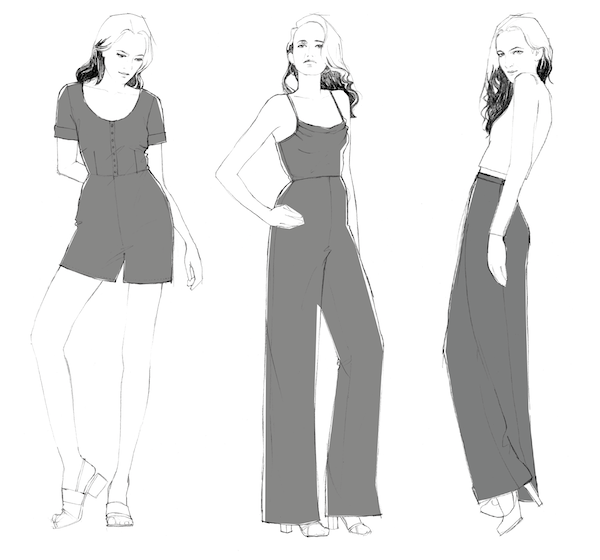
Today we will be:
- Fitting the shoulder straps - Variation 2 only
- Hemming the trousers
Fitting the shoulder straps - Variation 2 only
To put the finishing touches to your cowl bodice, the last thing to do is to fit your shoulder straps. If you can get another human to help you out here, all the better!
Put your jumpsuit on, and pin the loose ends of your shoulder straps to the bodice back, however tight or loose feels comfortable for you. Align the straps with the side back seam and tuck to the inside of the bodice before stitching into place.

Hemming
There are a myriad of options when it comes to hemming your handmades. The technique you go for will be dependent on the fabric you're sewing with, the shape of the hemline and the type of garment you're making.
For the Holly Jumpsuit, we're dealing with a basic straight hem. No curves to ease in here, people! So, to begin with, we're looking at applying basic hemming techniques. The next things to consider are the fabric and type of outfit you're making - is it a sheer silk jumpsuit with glitzy Christmas party written all over it? You'll probably want to hem by hand. Or is it more of a Southern-Hemisphere-appropriate terry cloth romper?? Machine hem that baby!
Seeing as we have three variations, we're going to show you our three favourite straight hem techniques...
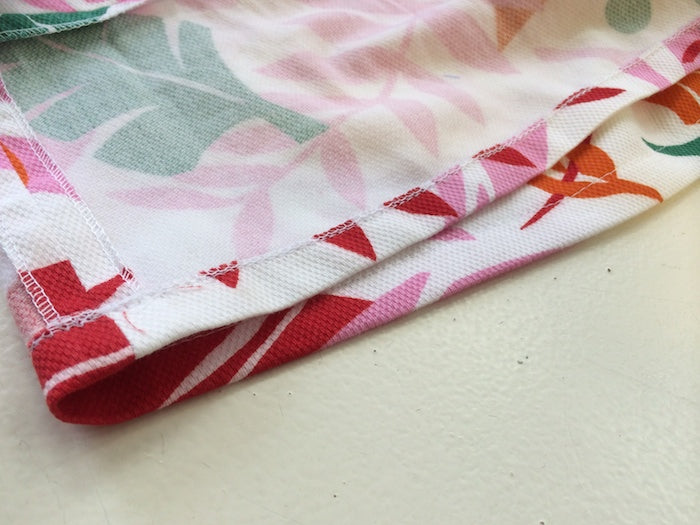
Variation 1
For this tropical number made from a beautifully soft and textured printed cotton, we're going to hem as casually as this playsuit should be worn.
- Overlock/serge raw hemline
- Turn up 1" (or however much to achieve desired length) & press
- Machine stitch just inside the overlock stitches, keeping your line of stitching parallel to the folded hem


Variation 2
Another fairly everyday/everynight outfit, nothing super dressy about this, but we are dealing with a drapey fabric. Also, bearing in mind that we hemmed the cowl neckline by pressing it in twice and then topstitching, we're going to treat the trouser hems in the same way for garment consistency.
- Press the hem of the trouser leg in by 1/2", or by however much to achieve your desired length
- Press the hem in again by the same amount and pin into place
- Stitch hem by machine from the wrong side of your fabric, keeping your line of stitching parallel to the fold


Variation 3
We made these trousers from a fairy heavy, and quite cushy - if you know what I mean - wool tweed. If I were to hem these guys by machine, I feel like the machine stitches would end up being visible in a not-so-great way, creating a sort of indent in the soft fabric at the hem.
What I want here is an invisible finish. This invisible hem would also be something I'd go for if I were sewing with silk, or if I simply didn't want any stitches to show. Check our tutorial, four hand stitches you need to know, to choose your favourite technique.

And there we have it, Sewalongers... I hope these posts have been helpful in the making of your Holly's! Remember, you can always come back and refer to all of our Sewalongs as and when you need. If you have any queries just leave us a comment below and hopefully we'll be able to shed some light, or even add bonus posts for anything that might need further clarification.
Until next time... It's been a pleasure. Elisalex x
-
Elisalex de Castro Peake

Comments on this post (0)