Crafting your way to a self sufficient life that is not only sustainable and beneficial to our planet, but that also looks grrreat is becoming easier and more accessible by the day. It fills me with hope to see so many people reducing -and even eliminating- their need for single-use products such as plastic bags, make-up remover wipes and period products by making their own reusable alternatives.
This shopping bag is nothing new or groundbreaking; I've made a few string bags similar to this in the past trying out some of the various patterns out there, and I've owned one or two that I bought in a market. This pattern is essentially me documenting my perfected string bag pattern, which is a pastiche of other patterns and elements that I've put together to create my ideal string bag.
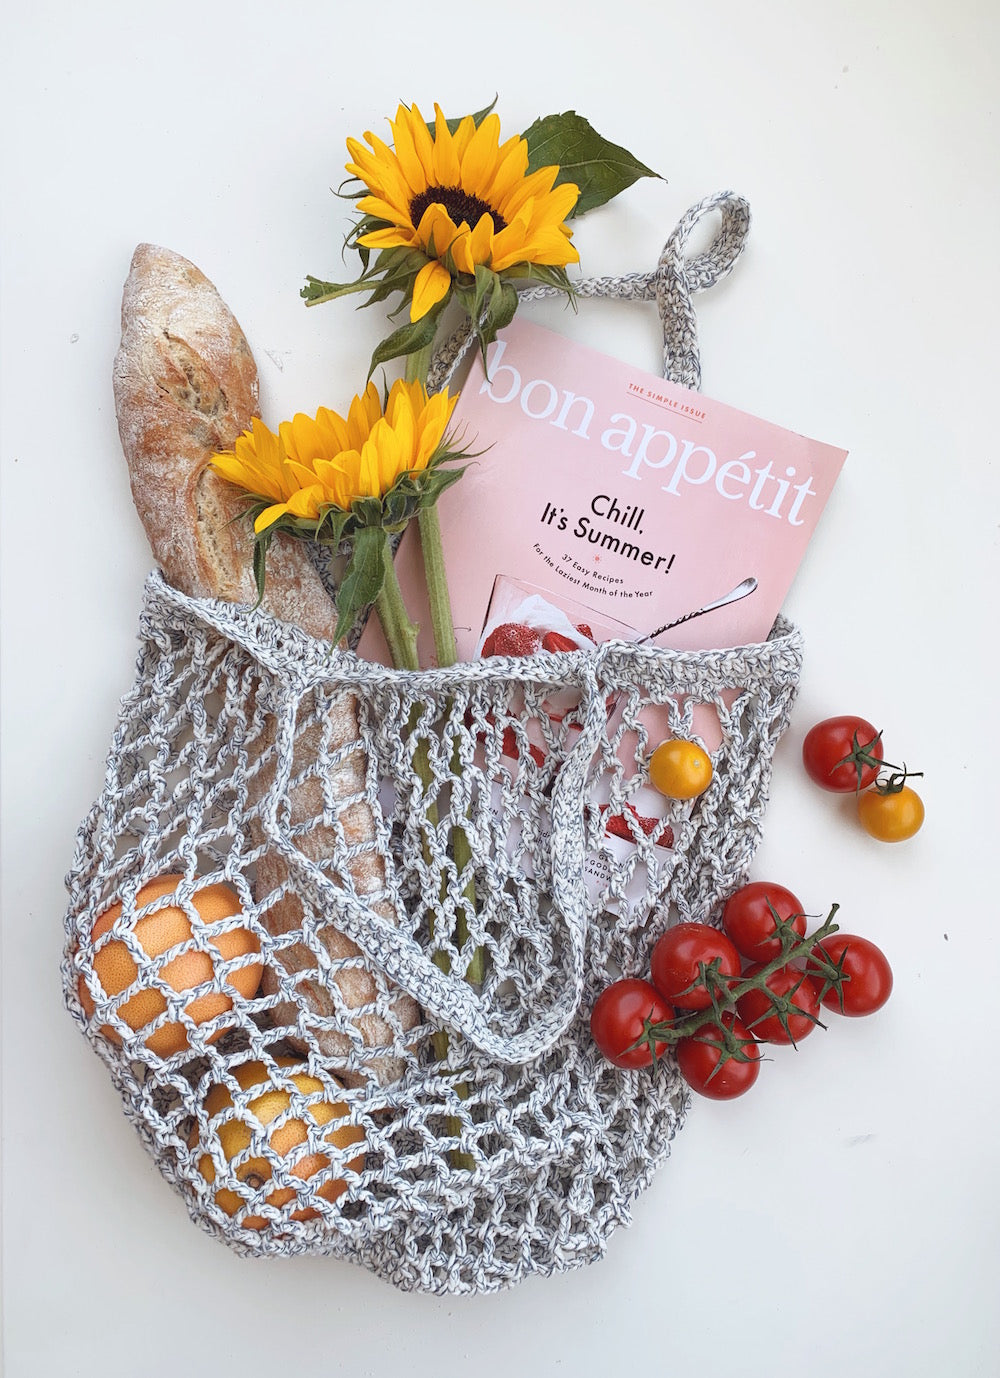
Unlike some of the string shopping bags I've seen in the shops, this one has a solid base, which the netted stitches then radiate out of, starting small and compact and getting larger and more open as the bag grows; I prefer this construction as it makes for a stronger bag and means you avoid things poking out through the bottom - like flower stems or pointy carrots. You could totally play around with that circular base and try different designs of round crochet motif.

You will need:
- 2 x balls / 200g of Wool & The Gang billie jean cotton yarn (or similar aran/worsted weight yarn)
- 4.5mm crochet hook
- scissors for snipping threads

Abbreviations (please note that we are using UK crochet terminology)
ch - chain
dc - double crochet (US equivalent: single crochet)
tr - treble crochet (US equivalent: double crochet)
st - stitch
sl st - slip stitch
rnd - round

The base of the bag
Start by making a magic circle / sliding loop.
Rnd 1 - ch 3 (counts as 1st tr), 11 tr into the ring, pull the tail to close the ring tight. Join with a sl st to top of ch3 (12 tr).


Rnd 2 - ch 3 (counts as 1st tr), tr in same st, 2 tr in each tr around, join with a sl st to top of ch3 (24 tr).

Rnd 3 - ch 1 (counts as 1st dc), dc in same st, ch 2 and skip 1 tr, *dc in next tr, ch 2, skip 1 tr; repeat from *. Join with a sl st to 1st dc.

Rnd 4 - ch 3 (counts as 1st tr), 3 tr in next ch2 space, *tr in next dc, 3 tr in next ch2 space; repeat from *. Join with a sl st to top of 1st ch3.

Rnd 5 - same as rnd 3.

Rnd 6 - ch 3 (counts as 1st tr), 2 tr in next ch2 space, *tr in next dc, 2 tr in next ch2 space; repeat from *. Join with a sl st to top of 1st ch3.

The net body of the bag
Rnd 7 - ch 1 (counts as dc), *ch 3, skip 1 tr, dc in next tr; repeat from *. Join with a sl st in 1st ch1.

Rnds 8-9 - sl st over to the centre of the 1st ch3 space, *ch4, dc in next ch3 space; repeat from *. Join with a sl st at the base of the first chain loop.
Rnds 10-12 - sl st over to the centre of the 1st ch4 space, *ch 5, dc in next ch4 space; repeat from *. Join with a sl st at the base of the first chain loop.

Rnds 13-16 - sl st over to the centre of the 1st ch5 space, *ch 6, dc in next ch5 space; repeat from *. Join with a sl st at the base of the first chain loop.
Rnds 17-20 - sl st over to the centre of the 1st ch6 space, *ch 7, dc in next ch6 space; repeat from *. Join with a sl st at the base of the first chain loop.
Rnds 21-24 - sl st over to the centre of the 1st ch7 space, *ch 8, dc in next ch7 space; repeat from *. Join with a sl st at the base of the first chain loop.
Rnds 25-27 - sl st over to the centre of the 1st ch8 space, *ch 9, dc in next ch8 space; repeat from *. Join with a sl st at the base of the first chain loop.
The top edge border
Rnd 28 - sl st over to the centre of the 1st ch9 space, dc, *ch 2, 1 dc in next ch9 space; repeat from * over the next 7 ch9 spaces, *ch 4, dc in next ch9 space; repeat from * over the next 9 ch9 spaces, *ch 2, 1 dc in next ch9 space; repeat from * over the next 7 ch9 spaces, *ch 4, dc in next ch9 space; repeat from * over the next 9 ch9 spaces, join with a sl st to 1st dc. This results in two sections of the bag's border that are more gathered; this is where the handles will grow out of.


Rnd 29 - ch 1, *1 dc in ch2 space, 1 dc in dc; repeat from * until you get to the ch4 spaces, *3dc in ch4 space, 1 dc in dc; repeat from * until you get to the next set of ch2 spaces and repeat from the 1st * until you get back to the beginning. Join with a sl st in 1st dc.


Rnd 30 - ch 3 (counts as 1st tr), 1 tr in each dc around. Join at the top of the ch3.

The handles
Carrying on from where you ended the last rnd, ch 70. Being careful not to twist the chain, anchor it down approx 16 stitches along with a sl st. The handles are positioned at either end of the gathered section.

1 dc in next tr, turn your work and make 1 dc in each ch. Anchor this 2nd row with a sl st in the next tr along from where the chain started. 1 dc in next tr, turn your work and make 1 dc in each dc.

Repeat this process for two more rows so that your handle is 4 rows deep.
Slip stitch over to the next gathered section, approx 30 stitches along. Repeat the last steps to make a second handle.

Fasten off your work and weave in any loose tails of thread.

-
Elisalex de Castro Peake

Comments on this post (10)
I’ve just completed my first attempt and have a lovely but very skinny bag! I must have gone wrong near the start as the opening is very much smaller than it should be (only 16 chains)- suitable for baguettes or a bottle maybe!! How many stitches should I have ended up with before starting the chain rounds please? Definitely going to have another go.
— Rachel Browne
Hi Jacquie, These are the stitches used in the pattern (UK version):
ch – chain
dc – double crochet (US equivalent: single crochet)
tr – treble crochet (US equivalent: double crochet
sl st – slip stitch
You should be able to find YouTube tutorials for each individual stitch. Jessica BHL
— Jessica
I would love to make this bag but have just started crocheting and don’t understand patterns. Is it on YouTube at all. Cheers jacquie
— Jacquie
Fantastic pattern. So easy to follow. Made 6 in lockdown for my whole family to go to market and shop. Love it to death. Thank you you clever girl.
— Sue Rose
What a quick and lovely pattern! I finished my bag yesterday and have already gotten many compliments!! Thanks! :)
— Katelyn
Thanks so much for this gorgeous pattern! i just finished a bag using about two thirds of a Caron Cotton Cakes skein. I’m so excited to use it for my produce! I love how easy this pattern is to manipulate to be whatever size you need. Thanks again!
— Charlie
I’ve been looking for a good pattern. I’m competent enough, just, to make my own up, but I havnt really got the time for trial and error so Thankyou for taking your time to make such a sensible bag!! Here’s goes….!! X
— Anita
Thank you very much! I was looking for a bag pattern just like this! This pattern was super easy to follow and I love the clear pictures! From Seattle, Wa usa
— Brittney
Thank you for this fab pattern – very useful and versatile and have already worked up 2 of them and used them at the shops.
— Sharon Mackey
I love this – thank you for the pattern. I’ve been wondering if it’s possible to make my own string bag – Australia has banned free plastic bags in shops now.
— Emma