Hello all, and Happy New Year!! Hoping a good rest and a harder play was had by everyone, and that not too many resolutions have already bitten the dust...
We kick off 2015 as we mean to carry on - with a spectacular and inspiring pattern hack tutorial from one of our #PatternHackathon entrants. Over to you, Jessie!
Hello there! I'm Jessie, a beginner sewist from Singapore who blogs at jesssewfabulous.wordpress.com. If you're more an instagram-type of person, you can find me @jessiehuen where I post most of my WIPs and perpetuate Asian stereotypes by posting lots of photos of food. Do pop by and say hello, I'd love to get to know more of you guys!
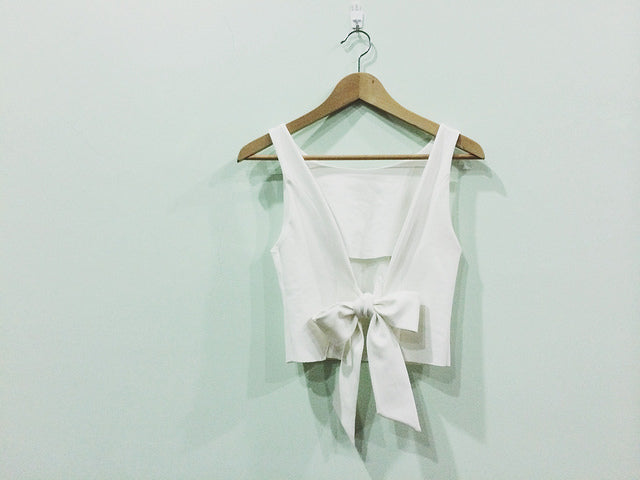
Today, I'm here to show you how I went about pattern hacking the By Hand London Sabrina Dress into a V-backed crop top with a bow closure. I'm not at all sure that the techniques I've used are the best out there, so please do let me know if you've got any suggestions!
Materials needed
- Fabric: 1 metre of any fabric suitable for the Sabrina dress. Note: The first time I tried this pattern hack, I did it in the white bamboo knit which you see in the photos above. So when I decided to make a second top, I wanted to try it in a light woven fabric to see how it would compare. Personally, I prefer the bamboo knit version as I find it has more body and holds its shape better than the black woven fabric I used the second time round (as seen in the tutorial pictures). That being said, both woven and knit versions turned out well in my experience.
- Matching thread
- Chopstick or point turner (optional)
- Hook and eye closure (optional)
Directions
Step 1 - Alter the paper pattern from a dress into a crop top
If you prefer not to mark on the original pattern pieces themselves, trace out copies of the centre front, side front, centre back and side back pattern pieces. Include any fit changes you had already made to the pattern (my pieces show alterations for a small bust adjustment!).
On the side back and side front pattern pieces, draw a horizontal line from the first notch below the arm hole to the corresponding notch on the other side (highlighted in yellow).


On the centre back and centre front pattern pieces, draw a horizontal line from the second notch on the curved princess seam across the pattern.


Step 2 - Alter the centre back pattern piece to cater for a V-back instead of a zip closure
Decide how deep you want your V-back to be. I wanted it quite low, so I went with a height of 2.5" for the bow closure (I'm going to call it a "waistband" for easy reference even though it really isn't). If you prefer a shallower V-back, go with a taller height and vice versa.
Mark the height of your "waistband" on the pattern piece, along the side where the zip would have been.

Draw a straight line connecting the strap of the pattern piece (at the point where the strap merges into the boat-neck collar, pictured below, highlighted in red) to the "waistband" mark made previously. This is your v-back. Do note that the V will get a little bit wider after hemming.


Step 3 - Alter the back facing pattern piece
Place the back facing pattern piece over the centre back piece and trace the V-back drawn earlier.

Step 4 - If you haven't already made up a muslin of the Sabrina dress, you may want to do so now and include any fit adjustments (optional)
Step 5 - Follow the Sabrina dress instructions to construct the top (including attaching the facing pieces)
Go ahead and finish all the seams, but leave the bottom edge of the top un-hemmed.

Step 6 - Make the sash / bow closure
On a piece of paper / or directly on your cloth if you prefer, draw out a rectangle with the desired dimensions of your sash. My rectangle measured 6"wide by 23" long.
Cut out two rectangles in your desired fabric, one for each side of the closure. Fold in half lengthwise, right sides together, and pin.
If you wish, snip diagonally across one end of the rectangle to create a pointed end to your sash.

Sew up the long side of your sash, pivoting at the diagonal point and backtracking at either end. Leave the shorter, non-diagonal side of your sash open.
Turn the sash right side out, using a chopstick or a point-turner to push out the pointed end.

Press. Repeat for the other sash.
Step 7 - Attach the sash to the top
Pin the sash at the open end to the "waistband" of the top, right sides together.

At the same time, fold and pin the unfinished edge of the V-back (if any). I folded it by 5/8" to match the seam allowance used to attach the facing to the V-back.
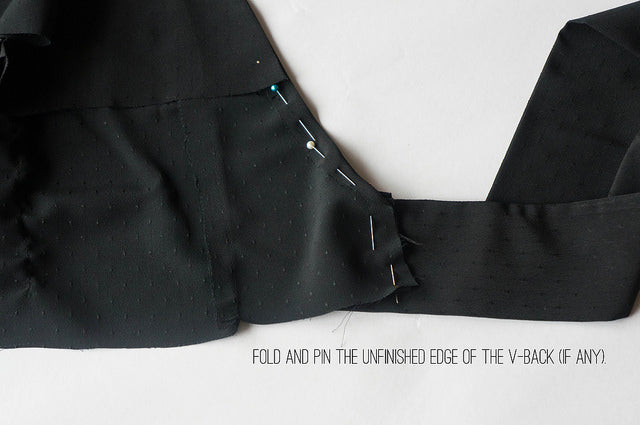
Sew the sash to the "waistband" and top stitch the edge of the V-back, backtacking at both ends.

Press. Repeat for the other sash.
Step 8 - Finish the raw bottom edge of the top
I simply folded it under and top stitched the hem.
Bonus: If you feel insecure with the idea of a simple bow holding your top closed, you could put in a hook and eye (or two) at the "waistband". It should be covered by the bow once it is tied up.
Step 9 - Press

And it's done! My favourite thing about this top is how it's a little sexy yet classy and totally not skanky - perfect for an anniversary or Valentine's day (and great for people like me who aren't comfortable with exposure in the front!).


I hope you guys liked this tutorial, and if you have any questions at all do let me know here or over on my blog. Bye for now!
-
Elisalex de Castro Peake

Comments on this post (5)
Awesome, classy yet sexy and perfect with midi-skirts!
— Kathi
Brilliant! It looks fab! xx
— Claire
Love love love this pattern hack!
— Naomi
Awesome pattern hack Jessie! Thanks for the tut! Wish it was warm enough to wear backless right now – I’ll have to wait until spring!
— maddie
Jessie, I LOVE what you have done! I would not have thought of that myself. You made it look pretty easy and I will have to make my own top for sure! Thanks for the inspiration!!! <3
— Catie