
A nice and easy post today (before we tackle the vent in the next one!), but one that will see your Rumana Coat really start to take shape. We'll be sewing the princess seams of the coat shell - which can get a teensy bit fiddly either side of the pockets, grading the seam allowance and showing you how to topstitch for a really professional looking finish.
You will need:
- Your Coat Front, Side Front and Side Back pieces. Make sure that the Coat Front pieces are interfaced and ready to go
- Pins and your usual dressmaking tools and supplies
Start by taking your Side Front piece (the one with the pocket which we assembled in the last post) and its corresponding Coat Front piece.

With right sides together, pin these pieces together at the curved bust seam. Make sure that you're matching notches, your hem edges are flush and keep the pocket bag out of the way.

With the pocket bag flipped up and out of the way, we're going to start sewing from the hem up, stopping (and not forgetting to back stitch) at the fold of the welt.

To finish this seam, we're now going to sew from the top of the princess seam and down - go slow around the curve of the bust, easing the fullness as you go. Flip the pocket back down into place and stop your line of stitching just after you clear the diagonal pocket seam.

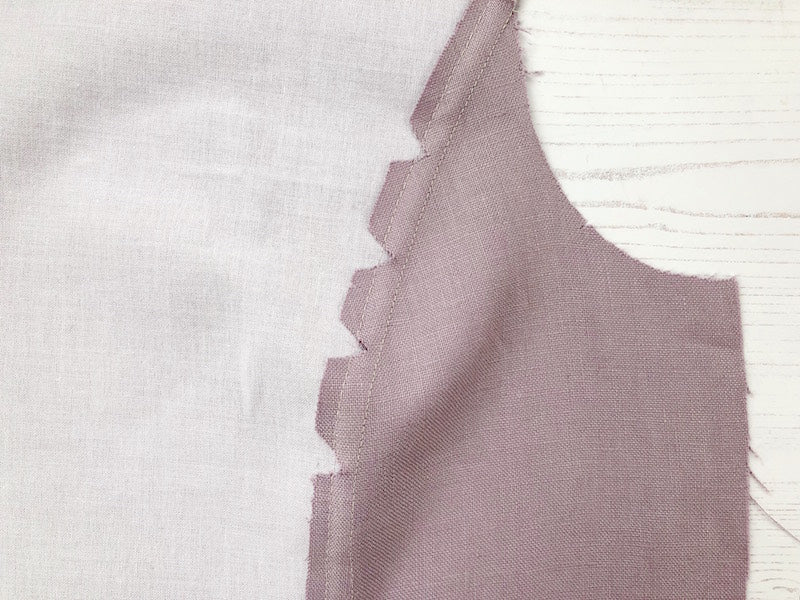
Now we're going to grade the seam allowances to reduce the bulk when we come to pressing and topstitching the seams. Grading simply means trimming one layer of seam allowance narrower than the other in order to stagger the excess bulk.
Now, normally, you would trim down the layer that is going to be furthest from the garment's outside when pressed, leaving the layer that will be directly touching the garment's shell wider. This is so that when the seam is nicely pressed, you don't actually notice the staggered seam allowance from the right side. However, because the fabric we're using for a coat will typically be thicker and less likely to show what's going on underneath from the right side, and because we want our topstitching to keep those seam allowances firmly in place, we're going to be trimming down the layer of seam allowance that will be closest to the coat shell when pressed.
We will be pressing the seams away from the pockets and towards the centre front, so trim down the seam allowance of the Coat Front piece.

When you get to the bust curve, carefully snip little triangle shaped notches out of the seam allowance - this also helps to reduce bulk when you press the seam off to one side.

Press the whole seam towards the centre front.
From the right side of your coat, we're now going to topstitch that seam allowance in place. If you find it helps to keep your seam allowance down, pop some pins in there but make sure that they are placed from the right side of your coat, and perpendicular to the seam so that they're nice and easy to whip out as you topstitch.
To topstitch, choose a slightly longer stitch length than you would normally use for seaming. 3-3.5mm is good. Align the seam with the righthand edge of your presser foot and stitch! Remember, you're topstitching down the Coat Front piece, not the Side Front piece.


From the inside, your seam should look like this:

By trimming down the inner layer of seam allowance, all of the excess seam allowance gets beautifully secured by the topstitching, making it both a detail from the outside and functional on the inside!
Repeat this process for the side seam as you join the Side Front to the Side Back. Press this seam towards the back, trimming down the seam allowance of the Side Back piece only, enabling you to topstitch the seam on the other side of the pocket. Do not sew the Centre Back pieces to the Side Back pieces yet, as we first need to tackle the vent...
Next up: If you've been scratching your head over the vent, the next post will shed some light! We'll be sewing the centre back seam of the shell and the lining, getting that vent all ready for later. We'll also be sewing the darts on the back pieces and the fisheye darts of the lining, and sewing up those last remaining side back seams...
-
Elisalex de Castro Peake

Comments on this post (1)
Thank you so much for your wonderful explanation. I will try to stitch like this I don’t know how to put pocket and how much seams on bag out and on pockets or all the seams thank you
— Pushpa