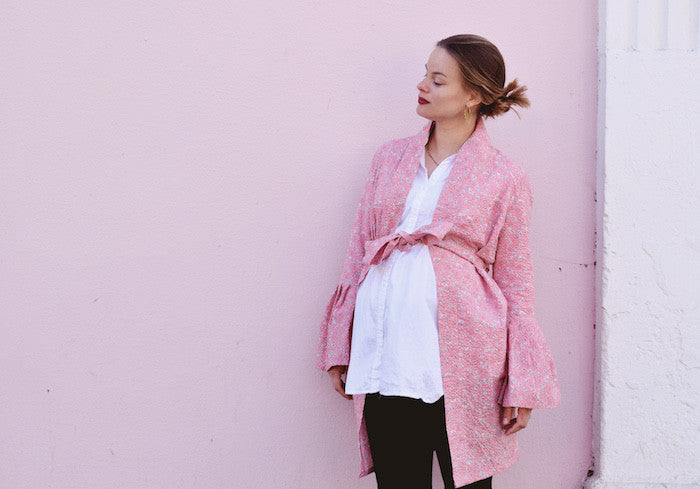
You heard it here first (unless you also saw it in the Sunday Times Style a few weeks back...) - Summer 2017 will be the summer of the Day Gown. That's right, time for the kimono to move aside, your festival essential just got a makeover and things just got a whole lot swishierrrrrrr. And when I say Day Gown, I do basically mean a dressing gown, but not the pink and fluffy kind. Think floaty voiles, faded florals and drapey crepeys, effortlessly flung over jeans, billowing behind you as you swan your way through life. Why haven't we done this before?! All you need to make your own Day Gown is our Victoria Blazer pattern, and some cunning pattern hackery...


This really is just about the easiest hack you'll ever do. Just lengthen the sleeves (if you want - you can totally leave them 3/4 length as Charlotte has done), lengthen the blazer front and back pieces, adding in a little extra volume for maximum swishability, and substitute the collar and lapel pieces for one long neckline band. Let me break it down...
First things first, you will need:
- The Victoria Blazer pattern: front, back and sleeve pieces only
- Pattern drafting paper
- Pens, pencils and a ruler
- Paper scissors
- 3-3.5m of drapey fabric (more or less depending on the width of your fabric and how long/short you want your gown to be)
- Your usual sewing tools and supplies
Lengthening the sleeve (optional)
Start by tracing around your sleeve piece onto a piece of dot & cross paper, or whatever you usually use for tracing your patterns. Swedish tracing paper or even baking paper are excellent for tracing patterns!
Measuring down the centre of your sleeve piece, mark how long you want your sleeve to be. Remember to factor in the seam allowance already added at the sleeve head, and hemming allowance at the cuff.
Draw in your new cuff hem, keeping it the same width and directly below the original cuff line.
Use a ruler to join the new cuff line to the underarm to create your new sleeve seam lines. Your new sleeve piece should look a little something like this:

Lengthening the blazer front and back pieces
Again, start by tracing your blazer front and back pieces, making sure you have plenty of space on your paper to extend the length and increase the volume at the side seams.
Measuring down the side seams, and going out at a slight angle (approximately a 20° increase from the original side seam), mark how long you want your gown to be. Make sure that your side seam extension measures the same for both front and back pieces.
On the front piece, you now want to redraw the hemline simply by drawing a horizontal line joining up the side seam to the centre front.

On the back piece, you can have a little more fun - why not dip the hem ever so slightly? Join the side seam to the centre back with an ever so slightly curved line, using the image below as a guide:

Remember to extend both centre front and centre back lines to meet the newly extended hem.
Belt loops (optional)
Making a pair of belt loops to sandwich between the side seams couldn't be easier - start by cutting two rectangles that measure 4" x 1" / 10cm x 3cm.
Assemble them by first pressing them in half lengthways, wrong sides together, then pressing the raw lengths in to meet the central fold. Fold lengthways down your first crease and pin the open pressed lengths together and topstitch as close and neatly to the edge as you can.

When you come to closing the side seams of your gown, baste the loops (folded as shown in the illustration below) to the right side of your gown front at the side seam, just above the pockets if you're including them. Then lay over the gown back piece and stitch your side seams as normal, sandwiching the loops between the front and back.

Now you'll just need to make a long tie to put through the loops! Cut two long lengths of fabric 2" x 70" / 5cm x 180cm (or longer if you prefer), cutting the ends diagonally (as shown in the image below) and assemble by placing both lengths together, right sides facing, and sewing all around with 3/8" or 1cm seam allowance, leaving a gap of about 1 1/2" or 4cm through which to turn your tie out to the right side.

Press, and close the opening by hand with a blind slip stitch.

You can now go ahead and sew up your Victoria as normal - shoulder seams, centre back neckline, dart, side seams, pockets, belt loops, sleeves assembled, hemmed and inserted - and stop when you get to finishing the neckline...
Cutting the new neckband piece
Measure the centre front neckline from the centre back seam down to the hem. Mine was about 57" or 145cm. Draft yourself a new neckband piece that is as long as the measurement you just took + 5/8" or 15mm seam allowance (for the neckband's centre back neckline seam) and 6" or 15cm wide. Cut one pair, and sew together, right sides facing, at one of the short ends. Press this seam open, then fold and press your neckband in half lengthways, wrong sides facing.
Now pin your new neckband into place all along the neckline of your gown, making sure that the centre back neckline seams match. You should have three layers pinned together: the neckline of the gown and the two layers of the neckband. Stitch the neckband into place with the usual 5/8" or 15mm seam allowance and finish the excess.

Alternatively, you could stitch just the one layer of the neckband into place to the right side of the gown, and then hand sew the unstitched neckband edge to the inside of the gown, thereby hiding the raw seam allowance.


Adding a pleated sleeve flounce
To recreate Charlotte's painfully on trend pleated sleeve flounce, you'll need to keep the sleeve as is, without altering or lengthening the original pattern.

Next, cut yourself a length of fabric that is as long as you want your flounce to be + seam allowance + hemming allowance, and three times the width of the sleeve's cuff.
Grab yourself a fork (yes, really!) and use our nifty knife pleating tutorial to pleat the edge that you will be joining to the sleeve's cuff...
With right sides together, join your pleated flounce to the sleeve's cuff, then go ahead and close the underarm seam, set in your sleeve and hem the flounce as normal. So simple, yet amazingly effective!

-
Elisalex de Castro Peake

Comments on this post (2)
Hi I Blame Paris! That pink fabric is from DIY District and it is suuuuuper lush!
— Elisalex - By Hand London
I love this! Must get the pattern. And, please, please, tell me where I can find that gorgeous pink fabric. Thanks!!
— I blame Paris