A quick nerdy sewing tip today - one that some of you may already know, of have a similar version of up your sleeve, but if you don't know, believe me when I tell you that this trick will change your life. Forever.
OK. Hands up if you're constantly having to unpick and re-stitch that pesky second side to the zipper tape because the waistline never matches up either side! And how completely demoralising is it when, after re-stitching it for a third time, you realise it was better the second time and you probably should've just left there and then because, let's face it, there aren't exactly any guarantees that it's going to come out perfectly on try number four?! I'm here to tell you friends, that your zipper-induced frustration can be a thing of the past...
Step 1
Start by sewing the left hand side of your zipper as normal: with right sides together, pin your zipper tape into place down the left hand opening of your garment. Stitch into place (keeping the zipper teeth in the left hand tunnel of your invisible zipper foot).
Please note, I'm showing this technique on a skirt where the invisible zipper continues through the waistline and to the top of the waistband. If you are making a dress, the steps are exactly the same.

Step 2
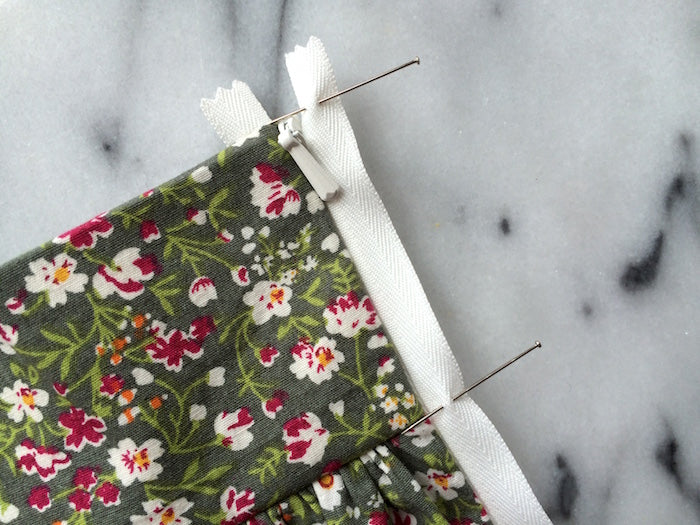
With the first side of your zipper tape stitched into place, zip up your zipper to the top.
Now for the Eureka! moment... Place a horizontal pin in the unstitched side of the zipper tape, perfectly aligned with the waistline on the stitched side. Do the same to mark the top of the waistband (or top of the bodice if you're making a dress).
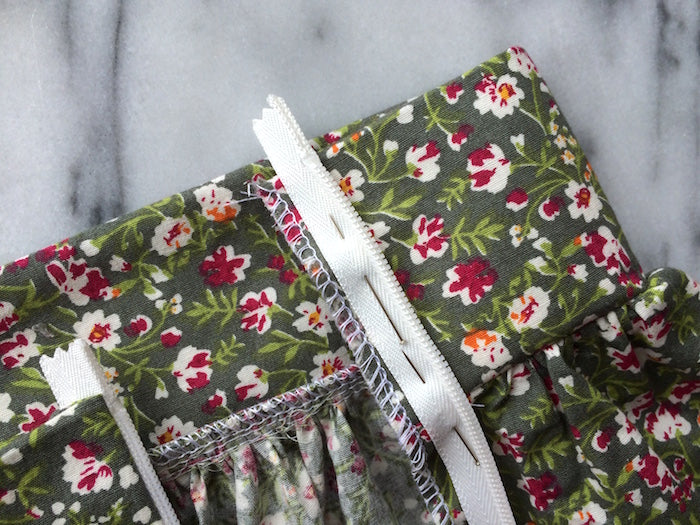
Step 3
Now unzip your zipper (keeping the pins in place!), flip the loose tape over ready to be pinned into place down the other side of your garment. Use the two horizontal pins to dictate where the zipper should be placed - use the pin that marked the waistline to pin your loose zipper tape precisely on the waistline of the unstitched side, and pin the tape so that the top pin is be flush with the top of your garment also. Pin the rest of the zipper in place to secure it.


Step 4
Stitch the second side of your zipper tape into place (zipper teeth in the right hand tunnel of the invisible zipper foot this time), turn your work to the right side, zip up your zipper, and......

The most beautiful, perfect, unbroken, but most of all, effortless zipper insertion of all time! Now simply snip away the tops of the zipper, close the remainder of your back/side seam and finish as normal. Just bear one thing in mind - only show off your perfectly aligned waistline to a fellow sewist; no one else will understand!

-
Elisalex de Castro Peake

Comments on this post (11)
Excellent! Why haven’t I thought to do something like this? Will definitely use this method.
Also, came across your site by sheer accident and it is full of such useful information .
I’m going through all your sewing tips/advice – what a find!
— Gaynor Mainwaring
This is a genius tip, and saves a lot of aggravation in placing the zip. Sadly it hasn’t stopped my needles breaking and my machine jamming when I get to the waist seam (Anna dress) but at least I can get the zip in the right position now! Should I alter the tension at all when I sew a zip in? And should the seam be so close to the teeth that it is almost impossible to see? I’m wondering if it could be because I’m using a universal invisible zip foot instead of one specifically for my machine. Not sure how many more zips I can face unpicking.
— JackieL
I tried this on an Anna Dress on the weekend and it worked wonderfully! Thanks.
— Mary-Liz
Amazing! Thank you! Also love that fabric.
— Amanda
Thank you – such a simple and easy step to save hours of frustration. :D
— veronika
Pure genius! Will be using this every time!
— Amanda
i do this, but when the fabric has a tendency to stretch I baste in place as well.
— Claire
That’s so simple! Thanks for the tip! :)
— Samantha
Thanks for this, I would have never thought to do this.
— georgine
The most clever trick ever!!
— El
So clever! I love it and will use this trick forever now :)
— Liliana