There's no denying it - the most luxurious and covetable fabrics in the world are often the hardest to work with. And maybe it's exactly that that added to their stature in the first place: not everyone could just pick up a few metres of silk chiffon and whip up a gown in a day. But luckily for us in this age of information, there's no longer the need to spend months picking the brain of the elderly dressmaker in the village across the stream - with some helpful hints sourced from around the interwebs, and plenty of self-imposed practice, becoming a master of tricky fabrics is completely achievable. Today, we tackle velvet.
Velvet, and specifically velvet woven from silk threads, has always been associated with royalty and nobility. A multitude of factors contribute to the high ranking of silk velvet - not just it's notoriously shifty temperament: velvet is traditionally woven on a very unique loom that weaves two layer of fabric together, face to face. From the diagram below, you'll see how the silk thread is woven through both layers of fabric, and then cut through the middle to separate them. It is those cut threads that creates the velvet pile. This of course can be done with any fibre, be it silk, cotton, viscose or polyester, but it is the light reflective quality of silk threads that creates the most dramatic velvets, not to mention it's soft and drapey texture as well.
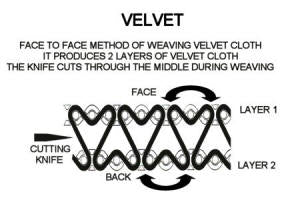
And the difference between velvet and velveteen?? That's simply a case of how the double layer of fabric is woven: velvet pile is created from the warp (the threads that run vertically, parallel to the selvedges) and velveteen pile is created from the weft (the threads that run horizontally along the width of the fabric).
Types of velvet
I love me a good list, so you'll have to forgive me for blatantly copying and pasting this one from Wikipedia, and not even attempting to rewrite it in my own words. It's good one though.
- Chiffon (or transparent) velvet: Very lightweight velvet on a sheer silk or rayon chiffon base.
- Ciselé: Velvet where the pile uses cut and uncut loops to create a pattern.
- Crushed: This type of velvet can be produced by pressing the fabric down in different directions. It can also be produced by mechanically twisting the fabric while wet. The result is patterned appearance that is very lustrous.
- Devoré or burnout. A velvet treated with a caustic solution to dissolve areas of the pile, creating a velvet pattern upon a sheer or lightweight base fabric.
- Embossed: A metal roller is used to heat-stamp the fabric, producing a pattern.
- Hammered: This type is extremely lustrous, appears dappled, and somewhat crushed.
- Lyons: A densely woven, stiff, heavier-weight pile velvet used for hats, coat collars and garments.
- Mirror: A type of exceptionally soft and light crushed velvet.
- Nacré: Velvet with an effect similar to shot silk, where the pile is woven in one or more colours and the base fabric in another, creating a changeable, iridescent effect.
- Panné: Also a type of crushed velvet, panné is produced by forcing the pile in a single direction by applying heavy pressure. Sometimes, less frequently, called paon velvet.
- Pile-on-pile: A particularly luxurious type of velvet woven with piles of differing heights to create a pattern.
- Plain: Commonly made of cotton, this type of velvet has a firm hand and can be used for many purposes.
- Utrecht: A pressed and crimped velvet associated with Utrecht, the Netherlands.
- Velveteen is a type of imitation velvet. It is normally made of cotton or a combination of cotton and silk. It has a pile that is short (never more than 3mm deep), and is closely set. It has a firm hand and a slightly sloping pile. Unlike true velvet, this type has greater body, does not drape as easily, and has less sheen.
- Voided is deliberately woven with areas of pile-free ground (usually satin) forming the pattern.
- Wedding ring or ring velvet: Another term for devoré and/or chiffon velvets which are allegedly fine enough to be drawn through a ring.
Getting ready to cut your velvet
The issue of "nap" is of utmost importance when it comes to velvet. Like suede, you'll see that the shimmer changes depending on whether you run your hand along the pile upwards or downwards. Generally speaking, most velvet garments are cut with the pile facing down (think about how much more natural it is to stroke a bodice from top to bottom as opposed to running your hand up!), and this shows off velvet's light-catching, shimmery nature. Cutting it with the pile going up is also completely acceptable, and makes for a darker, richer look.
The most important thing to remember, regardless of which direction you choose to cut your velvet, is to cut all pieces facing the same direction!
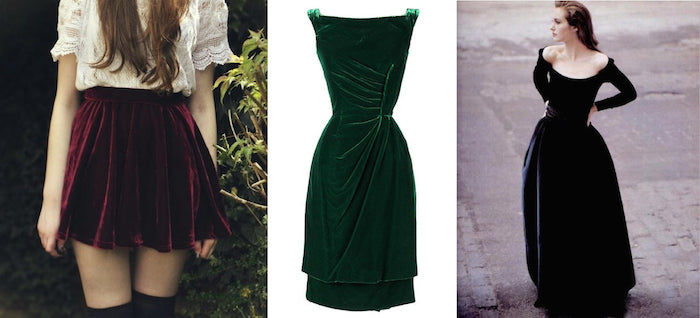
In terms of choosing the right sewing pattern for your velvet, the good news is that the world is your oyster! Simple, drapey dresses are elevated to gown-worthy status by the luxurious quality of the fabric, while more structured, intricate designs made in velvet will make you feel nothing short of regal.
The romantic shimmer of the velvet brings out the best in this easy peasy gathered skirt.

*
This figure hugging beauty has Kim Dress written all over it...

*
This. Gown. No extra fuss in the form of gaudy jewelz, dramatic makeup or hairdo's needed. 90's glamour at its best!

*
Cutting & marking your velvet
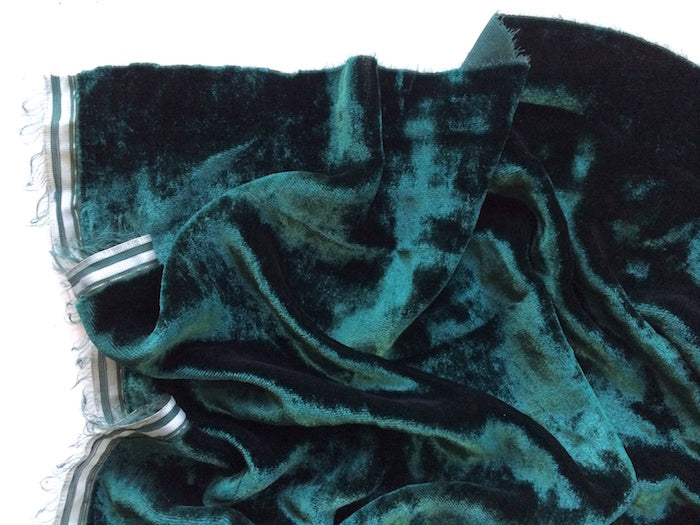
Silk velvet from the right side
The first rule of thumb is to cut from the wrong side. Velvet pile has a similar feel to that of a fuzz-cut - just imagine trying to keep a pattern piece securely in place on top of those shifty little hairs that insist on moving side to side!
Keep pattern pieces in place with weights and cut with a rotary cutter for best results.

Velvet pile is notoriously shifty, especially when right sides are together, so the second rule of thumb is to cut pattern pieces from a single layer of fabric, as opposed to cutting pairs from folded fabric.
For pattern pieces that require you to cut a pair, a bodice back for example, remember to flip your pattern piece over once you've cut the first side to avoid cutting two of the same. When cutting a pattern piece that requires you to cut it on the fold, cut one side and then carefully flip it over, keeping that centre front line intact as shown below:

As you cut, little hairs cut from the pile will go everywhere, so it's not a half bad idea to keep a vacuum cleaner handy!

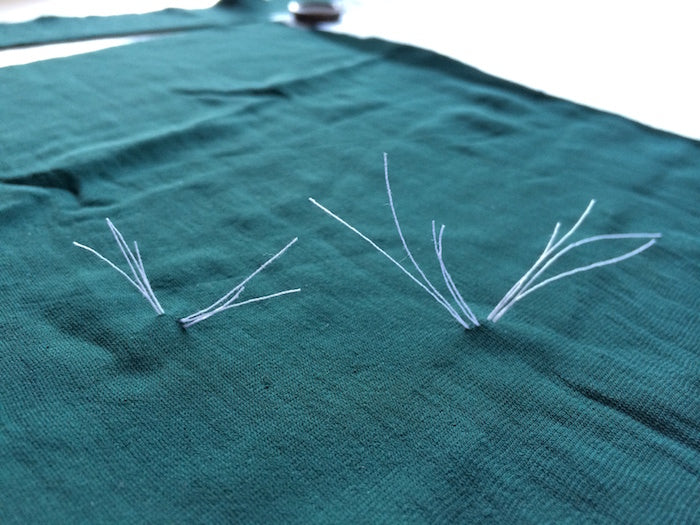
When it comes to marking construction points such as darts, your best bet is the ever faithful tailor's tack. While the pattern paper is still in place, thread up a sewing needle and loosely sew through the dart point a couple of times - going through both paper and fabric - to create a loop. Snip the treads and carefully remove the pattern paper, leaving the cut threads behind.
Sewing & pressing
If you weren't pulling your hair out with frustration trying to cut your pattern pieces with some degree of accuracy, then attempting to sew your first velvet seam will do the trick! When pile meets pile, as it inevitably will have to do when it comes to sewing up your garment, you'll immediately realise that those right sides do not want to go together. The key here is to breathe deep, go slow, and use every stabilising trick in the book in order to sew a precise seam.
First, pins. Lots of pins.

Second, baste. Hand sew two rows of basting stitches either side of your actual seam line. This will essentially create a stable pathway to help you machine stitch the seam without the two layers distorting out of place as you sew.
Third, stitch. Choose a wide-ish straight stitch, and you might find that reducing the pressure on the foot helps to prevent further shifting.

Velvet and irons are not friends. Too much heat and pressure will crush the pile (which is something you could experiment with to create crushed velvet). Instead, crank up the steam and lightly press seams with the tip of the iron.
For best results, lay your velvet onto a velvet board, a towel or a piece of scrap velvet so that the piles sort of interlock and therefore don't get crushed.
If the pile does get crushed, a good tip is to hold it over a steaming kettle and brush it out with a soft toothbrush.

Avoid lining or facing velvet with anything too slippery or tricky to work with (especially not more velvet!); choose something nice and easy to sew and feels good against the skin - something like cotton lawn or voile is ideal.

Steer clear of fusible interfacings!! If you need to give your velvet a smidge more substance or stability, opt for a no-sew interfacing or interline with cotton organza.
If the pile is long, trim or shave it down along the excess seam allowances to prevent bulky seams.
Some velvets do not take well to overlockers/sergers. It's always a good idea to test out a scrap to see how it reacts before applying it to your garment.

Hemming & finishing
As I'm sure you've already gathered, sewing successfully with velvet requires time, love and a pinch of perfectionism. Don't let that slide when the finishing line is so close in sight! Always take the time to finish a velvet hem by hand. A turned-up-twice hem that's machine stitched will be bulky, unsightly and can ruin the drape and fall of an otherwise delectable dress! The same goes for topstitching - when working with velvet, always aim for a finish that is invisible and flawless.
Caring
This may go without saying, but... Do not pre-wash! Dry clean only! In fact, just keep it away from your laundry room full stop!! Invest in professional after-care that reflects the level of pre-care that you put in in the first place.

And there you have it. I hope these tips, tricks and things to remember will make sewing with velvet less daunting for the velvet virgin. If you have any tips and tricks of your own that I've not covered, please leave us your pearls in the comments below. As with all skills - and trust me, sewing with tricky or delicate fabrics is indeed a skill - honing and practice is essential in the quest for perfection!
-
Elisalex de Castro Peake

Comments on this post (31)
One of my very first sewing projects was seeing some dresser scarves for my room. I had managed to get some burgundy velvet and some white satin that I lined them with. I did manage to sew the seams, but never could get them to lay flat on a dresser! Obviously, I chose the wrong fabrics to use for the project that I had in mind. It did however, give me a lifelong healthy respect for velvet. I have a tunic that to my dismay, rolls up at the hem. After reading this information, I am going to see if I can wear it with a Slick fabric and see if that makes a difference. Maybe put a little lining under the hem if that doesn’t work. Any other ideas that might be offered would be appreciated!
— Carey M
Thankyou for very helpful advice for sewing velvet.but I have a pattern I am keen to make up with velvet but the bodice & skirt are one piece with seam centre front & back & sides & the skirt is very full so when held out on both sides it forms a half circle which means the nap from about waist down would be running in a different direction down the side seam from the centre front & back seams, do you think this will look odd,
I welcome your thoughts
— Barb Nicol
Hi. How do you get burnout velvet to stop shedding?
Thanks.
— Kate
Hi I bought a lovely burnout velvet kimono in a vintage floral print. I’ve worn it twice, and both times it shed all over my other clothing. It is washable, so between wearings I washed it and put it in the dryer with a McSteamy ball. I thought that would beat the loose fibers away, but it did not. Any ideas on how to make it stop shedding?
— Katherine
gorgeous black velvet dress in picture…. is a crepe wool jumper, silk-satin sash and cotton pants from Bergdorfs. as pictured in 9th May 1988 edition of New Yorker Magazine page 61 interview by Wendy Goodman with Isaac Mizrahi.
if anybody fancies making me a dress like this in velvet – please get in touch :)
— wendy
Wow—I missed out ever going to a sewing-designing school,for fashions,, cause I was never rich enough—but it seems I may pick up techniques here,and on the web..Some of those fashion-schools will not even let you buy any of their BOOKS.. (The big one in San Francisco,CA, USA .) But if there are enough blogs like this,I might pick up enough techniques to at least make some of my own dresses.. (I have some very thin, drapey fabric, I love.) If anyone knows of any instructions online on “how to make a SARI at home”, drop me a line.. I notice Saris work very well with drapey-fabrics..—and every time we spotted Indian women in saris, we really admired how they looked. —very beautiful. Thanks!!! :)
— Doreet
Question:
Lining velvet with s t r e t c h. Should I still line with lawn-like fabric, or equally stretchy fabric? Making a ballroom dance dress (well trying to;)
Thanks for a grand tutorial!
— Diane Johnson
Machine Embroidery Digitizing
Thank you for a great explanation. I was looking online for a similar idea and really appreciate it
— Aimee Aimee
Hi!
Such a great post!! I just wondered if I wanted to toile before making what base you would reccomend? I am hoping to use a viscose velvet or something similar (lighter weight and with a good drape? maybe a bit of stretch) Also with this in mind would you reccomend overlocking for construction and hand sew to finish?
many thanks!!
Hannah
— Hannah
Hi Adrienne,
This is pretty common with velvet, especially if you’re wearing tights! The only thing you can do to prevent the velvet hem from riding up is to put something slippery between the hem and your legs! A slip would work, or a slippery lining.
Hope this helps!
Elisalex
— Elisalex - By Hand London
Hi Sara,
That doesn’t sound right – the velvet pile definitely shouldn’t be shedding! I’d get in touch with the vendor and try to get a refund if I were you…
Elisalex
— Elisalex - By Hand London
Hi i have a few velevet skirts but on the ends they keep rolling up hiw can i stop this.
Tia
— Adrienne Juniper
Thanks so much for this post! I’m currently making a dress using crushed velvet, but the materialwon’t stop shedding! You run our hand over it and get a hand full of fluff. It’s literally going everywhere to the point where I’m worried I won’t be able to wear it. Do you have any tips for this? Did I buy the wrong kind? The link to the one I bought is below. Please reply I’d really appreciate the help!
http://www.ebay.co.uk/itm/201168382728
Thanks,
Sara
— sara
I am shortening velvet palazzo pants from Chicos. How do I finish the raw edge before turning up the new hem for hand stitching. These were expensive pants, I have 50 years of sewing experience, but no experience with velvet. Please advise, thanks
— Brenda
Extremely helpful, thank you! Got hold of a beautiful velvet dress on eBay which is far too big but can’t bear to part with it so I’ve been thinking about cutting a simple shift from it. Now I feel brave enough!
— Megan
Hi Alice – you could try steaming the velvet gently from the wrong side… Or gently pressing it, again from the wrong side and with the right side laid onto a towel. Hope this helps!
— Elisalex - By Hand London
Hi Annie – that does sound frustrating! I’m afraid I don’t have any tricks up my sleeve to solve this problem, but maybe you could try wearing a coat with a slippery lining?
— Elisalex - By Hand London
Thank you for the thoughtful how-to. I’ve had a black silk velvet for years that I haven’t used because I’m just afraid to start cutting into it and then sewing it! I’m concerned that it has permanent markings from folds. I’ve kept it rolled up but it still has developed crushed markings. Any hints on how to remove them? Is it true that darts and decorative seams should be minimal when working with silk velvet?
Best, Alice
— Alice Thomas
Very interesting, thanks! (Especially the bit about how velvet is actually made.)
I have a velvet post-production problem: when I wear a coat over my velvet dress, the coat and the velvet dress grab at each other as I move, and the body and the sleeves of the dress twist around me. So uncomfortable! Any idea how to solve this?
thanks,
Annie
— Annie
Superb tutorial! Thank you for the encouraging tips for sewing with this beautiful fabric. I am going to give it a go for a gown. Never used v before. You helped take the “fear factor” out:)
— Diane
I am so grateful that I read this post before investing in velvet, I’m sure I would have done something wrong in the handling and sewing project. Thank you so much, most informative.
— Carol Ann Cameron
Great post! Corrects some bad information out there on the web. Thanks for that!
I wash my velvets, even silk ones. What results is a change of hand that is glamorous, lush and vintage looking. The rayon/acetates really take well to this. I do that prior to construction but after construction, dry clean to maintain shape.
And thanks for showing the double basting, sooooo important for a relaxing sew as well as great, even seams.
— Bunny
I wish I’d read your blog BEFOREi started the dress for my son’s wedding! The most challenging fabric I’ve ever worked with but I just love the shimmering and draping of silk velvet!
I just the very full hem to do now and I’m pretty nervous! Don’t want to spoil all my hard work!
Helen
— Helen Peachey
Hi Mandy, Your best bet is to work with some very fine and very sharp handsewing needles – the finer and sharper the better! Good luck!
— Elisalex - By Hand London
Hi, I have an awful lot of velvet on velvet 3d applique to do and im doing it all by hand. I need needles which slide through easily.
Can someone tell me which needles I can use for man made velvet?
— mandy