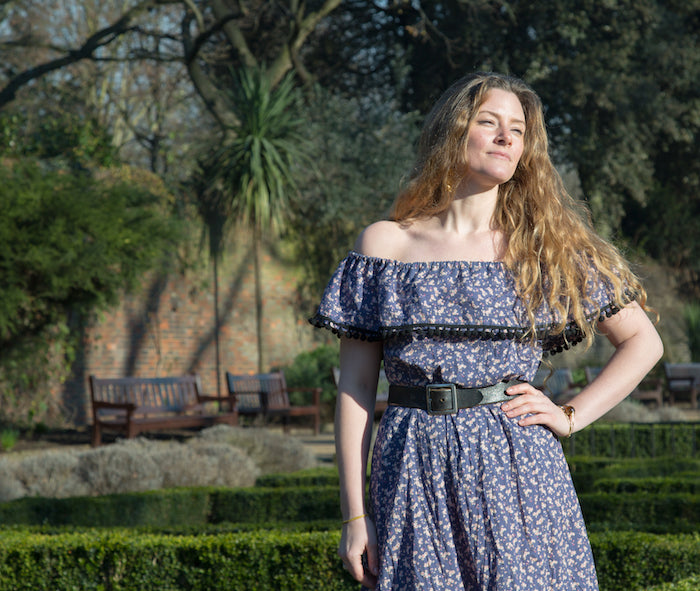
Ok ok so I may be jumping the gun in a major way with this tutorial, but after the recent burst of Springtime sunshine here in London Town, I've been getting very excited for my Summer sewing plans... Floaty and free is how I'm feeling this season, and I think this dress is exactly that. Quick and easy to draft and sew, even easier to wear day in/night out, all Summer long.
You will need:
- Fabric - lightweight wovens are ideal: cotton lawn, voile, viscose rayon (anything soft and floaty!), but knits will work too
- Pattern drafting paper
- Pencils, ruler, French curves/Patternmaster, paper scissors etc
- Your usual tools and sewing supplies
Drafting the pattern
Start by drawing a vertical line roughly 35” long (shown in magenta; line 1). This part doesn’t need to be accurate yet, it’s just our starting point for the rest of the pattern. This vertical line represents the centre front and centre back of the dress, to be placed on the fold. Both front and back pieces are identical, so we just need to draft one, and cut two.
***
From about 6" down from the top, draw a horizontal line that measures (your high bust measurement + 1”) ÷ 4 (shown in red; line 2).
Now measure 4” up from red line 2 and 6” horizontally out from this new point. This is your neckline (shown in purple; line 3).
Using a French curve, or your best hand-drawing skills, connect the neckline to the high bust line. This is your armhole (shown in green; line 4).
Now measure 28 1/2" down the centre front line from the neckline. This is the point where we'll be joining the hem frill.
To figure out by how much to measure out and across by, thereby determining the flare of your dress, a good rule of thumb is to divide your full bust measurement by 2.2 and measure out by that amount. I measured out and across by 15" (shown lightly in pencil; line 5).
To draw the side seam (shown in dark blue; line 6), measure down from the red line 2 25", aiming towards the edge of pencil line 5. You'll see that in order to connect your side seam with the hem, you need to curve the hem ever so slightly in order to meet the side seam line. Use a French curve to help you here (shown in dark red; line 7).

Finally, we need to add seam allowances. I added 3/4” along the neckline, 5/8" at the side seam and hem, and 1/4” at the armhole (shown in pale blue).

You’ll also need a rectangle that measures 65” x 7” for the neckline ruffle, and another rectangle measuring 9 1/2" deep x (line 5 x 8) for the hem frill.
Sewing it all up
Cut out your pieces – two of the main dress piece (remembering to place the centre front/centre back line on the fold of the fabric), one of the neckline ruffle and one of the frill.
Close the side seams of your dress and press open.

Clip carefully into the curves at the armholes to release the tension. Press the scant 1/4” seam allowance in, finish the raw edge first on an overlocker (optional) and stitch. Alternatively, if you have more time/patience you could finish the armholes with bias tape instead.

Now for the ruffle!
Close the back seam to create a loop and press open.

We now need to mark the centre front (CF) and centre back (CB) on both the bodice and the ruffle to make sewing the two evenly together a doddle. Do that simply by folding the bodice in half so that the side seams are facing and notch the folds either side. For the ruffle, your CB should be marked by the seam, and the CF can be marked by folding it at the CB seam and notching the fold on the opposite side.
Now place the ruffle over the bodice, right side of the bodice facing the wrong side of the ruffle, and make sure that your CF and CB notches match up too. Pin the ruffle to the bodice along the front and back necklines and baste into place. Finish the raw edge on an overlocker/serger if you have one.

Fold and press in by 3/4” (if you don't have an overlocker, avoid a visible raw edge by pressing the neckline in by 1/4" and then again by 1/2"), and stitch into place, leaving an inch or so open at the centre back seam through which to feed the elastic.

Take your elastic (I used regular lingerie elastic as I wanted something narrow with a soft stretch to it, if you know what I mean… I felt like anything too harshly elastic would dig into my skin) and cut a length that sits securely but comfortably around your shoulders.
Use a safety pin to feed the elastic into the tunnel…

…And then either tie the two ends in a secure knot or stitch together when it reemerges. Stitch the tunnel’s opening shut and ¡ay caramba! You're almost done!

The final thing to do before moving onto the hem frill, is to hem the neckline ruffle and add any decorative trim such as pompom trim, lace, ricrac etc whatever rings your bell.
Finish the ruffle’s hemline and press in by 1/4”, pinning your chosen trim into place as you go. Stitch the hem and trim in one go from the right side. Or, stitch your hem first, then appliqué your trim over the top.

Take your long hem frill rectangle and close the short ends, right sides together, to form a loop. Press the seam open and finish.
Gather one of the raw edges to fit the hem of your dress. When gathering lightweight fabric, I like to run two parallel rows of wide basting stitches 1/4" and 3/4" respectively from the raw edge, pulling on the bobbin threads to gather. You can check out our tutorials, 3 ways to gather, or try our express technique!
Once your gathered frill matches the hem of your dress, pin them together right sides facing and stitch into place. Press the seam up into the dress and finish the excess seam allowance.
Lastly, hem your frill and you're done!


This dress was inspired by and adapted from the top I made for Portia Lawrie's annual The Refashioners challenge last year (see image below). You can find the original tutorial for the top here, and check out all the other amazing Refashioners here!

Still want a little more of that off-the-shoulder goodness? Check out our YouTube tutorial below on how to refashion a standard mens shirt:
-
Elisalex de Castro Peake

Comments on this post (9)
I didn’t see how much yardage we’ll need for this dress. Maybe I missed it too! Thank you!
— Nicole
Hello I am so thrilled I found your blog page, I really found you by error, while I was researching on Digg for something else, Regardless I am here now and would just like to say cheers for a marvelous post and a all round enjoyable blog (I also love the theme/design),
I don’t have time to browse it all at the moment but I have saved it and also added your RSS feeds,
so when I have time I will be back to read more, Please do keep up the awesome
work.
sundered, Devon,
— Sheryl
Oh boy am I glad I found this (even if I am a little late to the party). This is exactly what I have been trying to find in my price range. Now I can make myself a few. Thank you so much for sharing this excellent tutorial.
— Michelle McKean
Please can you tell me if the elstic was taught at all or just placed around the shoulders without pulling for measuring, thank you just cant wait to get sewing
— Angela kirk
This looks perfect! About how much fabric do you need?
— Denise
Wonderful tutorial – love the simple pattern
the model is lovely too :)
sarina
sewguide.com
— sarina
This is pretty much exactly what I had in mind to make for summer.
Great tutorial!
— Hilde
Awesomeness! !!
— Portia
This is lovely! If I wanted to add some elastic at the waist, how would I figure out how much to use?
— Caroline