This is it sewalongers - after a good couple of weeks geeking out on pattern alteration tutorials, today we finally get to lay our grubby little hands on some serious fabric and a real-life sewing machine!
*To be taken to all the posts in the Kim Dress Sewalong, please click here!*
Today we will be:
- Making sure we've pre-washed our fabric
- Talking about grainlines and selvedges
- Cutting out our fabric
- Transferring all notches and markings
- Stay stitching and stabilising
Pre-washing
Before you begin, have you pre-washed your fabric?? If not, go do that now! Just chuck it in the washing machine on a 30° express cycle, and either tumble dry or hang; however you would normally. Of course, if you're making your Kim from some exquisite silk or something that cannot be washed, this part won't apply to you, just make sure that you only ever dry clean your dress once it's all made up.
We're using our very own pretty blue floral cotton - Martha - for the gathered skirt variation...

...and this drapey rayon (a sweet £2 per metre Goldhawk Road find!) for the slinky wrap skirted variation.

How to lay out your fabric
If this is your first time working from a sewing pattern, you may be wondering how best to fold your fabric, what in the hell a "selvedge" really is, and exactly how to locate that elusive grainline... No fear, we've all been there!
Firstly, "selvedges" are the woven edges at either end of the fabric that come infinitely off the roll. We always find things much easier to explain with a little drawing...

When you fold your fabric ready to lay on your pattern pieces, you'll need to fold it in half lengthways, so that the fold is parallel to the selvedges, and from there the rest is easy: the "grainline" is also parallel to the selvedge, and the "bias" is basically just an imaginary line that runs diagonally across the fabric, at a 45° angle to the grainline. If a garment is "cut on the bias", it will have significantly more drape and body than something cut on the straight grain, but will also be slightly tricker to work with.

Once you've located the selvedges and folded your fabric according to the diagram above (right sides of the fabric together - this makes marking darts easier later on), you're ready to start pinning on your paper pattern pieces ready to be cut, using the layplans in your instruction booklet as a guide.

Cutting - pay extra attention to:
- Pieces that need to be placed on the fold of the fabric
- Placement of the pattern pieces according to the grainline & bias
- Pinning the pattern pieces to the fabric - keep pins as flat as possible to avoid distorting the fabric as you pin
- Saving space! Place the pattern pieces as close as possible to each other in order to waste as little fabric as possible
- Cutting - always cut to the left of your pattern piece

Cutting silks and other slippery fabrics - some helpful tips:
- Sharpness is key - make sure your scissors and pins are not blunt! You will also need more pins than usual to help you cut accurately
- Sometimes a super sharp rotary cutter can be your best bet for slinky fabrics - lay out your fabric on a large cutting mat and keep pattern pieces in place with pattern weights (see image above)
- Trim away all pesky little scraggly threads before you lay out your fabric - if you don't, they will get caught on something at some point and distort all your careful layings out
- Don't try to cut everything out at once - instead cut off enough fabric to cut out your bodice first and go about the cutting process in smaller, more manageable sections
- Once you're happy with your fabric laid out all straight, weigh it down with pattern weights or small and heavy items to keep it in place - even the smallest gust of wind can cause you to start all over again...
- Be extra careful not to distort the fabric as you're pinning your pattern pieces into place - insert pins as horizontally as possible to avoid lifting the fabric
- If you're worried about your pins leaving a mark in the fabric, make sure you place the pins close to the seam allowance edges of the pattern pieces so any marks left won't show on the outside of your garment
- When cutting, always cut with your scissors to the left of the pattern piece to avoid moving the fabric too much as you cut

Notching & marking
As you might have already guessed, especially after our Alterations mini-series, the key to a satisfying sewing experience is all in the prep (ugh, man I feel like punching myself for saying that! But it's truuue).
Now that we've cut out our pattern pieces, we need to transfer all the information from the paper onto the fabric.
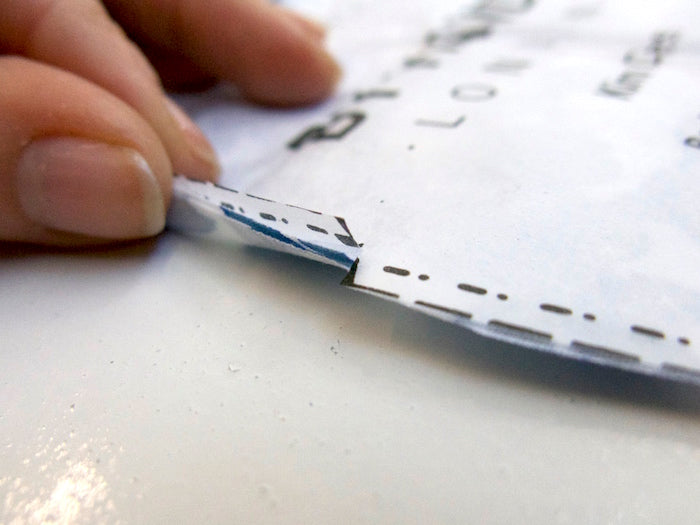
Mark notches by snipping no more than 3/8" or 10mm in from edge in the centre of the little triangles:


If your fabric is particularly delicate or liable to fray, cut little triangles poking away from the pattern pieces as opposed to notching into the seam allowance:

Mark darts on the wrong side of the fabric. Snip into the notches at the edges of the fabric as shown above, then mark the top of the darts and simply connect the top to the snipped notches using a ruler and tailor's chalk or an air erasable fabric pen:


Stabilising
The final thing to do before we can call it a day and close the sewing room door is the stabilising of certain unstable curved or bias-cut raw edges of fabric that, if left to their own devices, would stretch ever so slightly out of place (some fabrics more so than others, especially linen, silks, loosely woven cottons and tweed) and leave you with something that does not come together as crispily as it should, or worse - a gapey sweetheart neckline.
Stay stitching
Stay stitching is the quickest and easiest way of stabilising a raw edge that would otherwise "give". This method is ideal for waistlines, necklines, armholes and sleeve heads in general.
Simply run a line of wide machine stitches 3/8" or 10mm from the edge that needs stabilising. That way your stay stitches won't show when we later come to seaming with the usual 5/8" or 15mm seam allowance.

All for today, folks! Stay tuned this week as we get some bodices all made up, and maybe even a skirt or two...
-
Elisalex de Castro Peake

Comments on this post (4)
Hi Joanne, no such thing as a stupid question! Yes, you do indeed stay stitch the neckline on the lining as well – if one were to distort but not the other you’d have a nightmare time when you come to joining the two together!
— Elisalex - By Hand London
I expect it’s a really stupid question – do I stay stitch the lining as well? Thanks.
— Joanne
Awwww Pam, I think that’s up there with the best comments we’ve ever read!! SO GLAD to have been of help. We love you toooo! xxx
— Elisalex - By Hand London
I don’t know you guys … but I love you all! LOL!
I have been trying to understand the grainline, the selvedge and the bias forever! Your explanation got through my thick brain! I get it now!
Thank you from the bottom of my fabric freak heart!
~Pam
— Pam Hunter