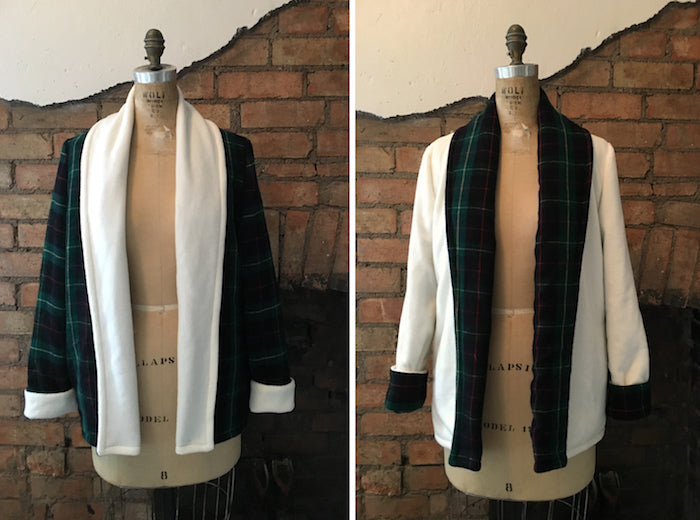
At the start of last week, I was excitedly planning my Christmas party dress(es). There would be midnight blue silk velvet, sweeping maxi skirts and neckline capelets aplenty. Then Tuesday came, I woke up sick and spent the rest of the week curled up on the sofa nursing a mug of Lemsip with a box of tissues clutched to my chest. All dreams of velvet party frocks were promptly replaced with dreams of plaid flannel, fleece and keeping the shivers at bay. I indulged in a little feverish online fabric shopping, treated myself to express next day delivery and by the end of the week I had myself the perfect combination of flannel shirt slash camping jacket slash grandpa's dressing gown. Plus, it's reversible. Here's how...
What you need:
- The Victoria Blazer pattern - front, back, sleeve and pocket pieces only
- Some extra paper to trace and alter the pattern - dot & cross, Swedish tracing or baking paper all ideal
- 2m of your main fabric - I opted for a classic forest green plaid flannel
- 2m of your contrast fabric - I had originally dug out some lofty red wool from my stash but is would've been waaaay too Christmas, so I quickly ordered some off-white medium weight fleece instead.
- Your usual dressmaking tools and supplies
Altering the pattern
The only major changes we need to make to the pattern are lengthening the sleeve and re-drafting the neckline on the blazer front to create a shawl collar. A shawl collar is simply an extension of the neckline that folds back on itself to create a relaxed, unstructured collar that can sometimes resemble a scarf draped around your neck. I aslo lengthened the blazer by extending the hemline by 2", but whether or not you want to do that, and by how much you lengthen it is totally up to you.
To lengthen the sleeve, place the pattern piece onto your spare pattern paper and tape it securely down at the sleeve head. About 4" up from the hem, cut horizontally across the sleeve. Shift the bottom part down so that your sleeve measures approximately 27" from sleeve head to hem - this will of course vary from person to person, but what you need to be factoring in is a full length sleeve with about 4" extra for a turned up cuff. It helps enormously to have someone on hand to help you measure your arm!
When you're happy with the new length of your sleeve, tape the bottom part down.
Adding 1/2" at either side of your sleeve's hem to allow for the extra bulk of a turned up cuff, re-draw the side seams using the diagram below as a guide.
To draft a shawl collar, start by tracing the blazer front onto your pattern paper - don't cut it out just yet!
Draw a line extending the width at the top of the neckline by 5". Now draw a line extending the width of the overall blazer at the hem by 2". With one smooth line, connect these two extensions. Shawl collar, done.
Now you can also extend the length of your jacket at the hem if you want. Remember to apply this to both front and back pattern pieces.
You're now ready to cut your fabric!
Cutting & assembling
You'll want to cut one pair of jacket fronts, one back piece on the the fold and one pair of sleeves in both your main and contrast fabrics. I chose to put pockets in one side of my jacket only so as to avoid making it too bulky at the side seams. I cut 2 pairs of pocket bags from my main fabric only.
Go about the sewing of your Victoria blazer as usual - sew the neckline centre back seam, sew the shoulder seams, close that lovely neckline dart, insert your pockets and close the side seams and set in your sleeves - remember that you can always refer back to our Victoria Blazer sewalong for help with this process. Do this for both your main fabric pieces and your contrast fabric pieces so you end up with two almost finished jackets:
If you're using a thick fabric like fleece, grade the excess seam allowance at the armholes to reduce bulk.
Now it gets fun! With right sides together, pin the two shells together all along the neckline and hemline, and stitch, leaving a gap of just 8" or so unstitched at the centre back hem.
Snip the corners at the centre front hem to reduce bulk when you turn your jacket out to the right side.
Turn your jacket out to the right side through the opening at the hem and give the entire neckline and hem a good press. Already looking insanely snuggly...!
Press in and pin the opening at the back hem and slip stitch by hand to close.
Feed your contrast sleeves into the main sleeves and seal the cuffs by hand in the same way.
I chose to run a line of topstitching all along the neckline and hem to secure my jacket and give it more of a finished, polished look. When doing this, I stitched from the main fabric side, allowing a couple of millimetres of the contrast fabric to spill over, enhancing the cozy, lofty effect of the fleece.
And it really is as quick and simple as that! A ridiculously soft and warm reversible jacket perfect for all sorts of frosty outdoor frolicking as well as throwing over your nightie on chilly mornings / sick days!
And the flip side...


Comments on this post (1)
Wow, so nice and cozy! I just found your blog, this is so cute, I am always freezing (starting to get hot flashes/ cold times too) this would be perfect for the cold times.
— Liz Bess