
I'm sure that the vast majority of you reading this can't have failed to notice the spectacular backless Anna Dress pattern hack we splashed all over our Instagram and Facebook feeds - the hack in question received a record number of likes, shares and comments pleading us to publish a tutorial. Well, we fell in love with this dress just as hard as y'all did, so you can bet that we immediately got in touch with its creator - the wonderful Nicole from Finch Sewing Studio - to ask if she'd kindly tell us all how she did it (so we can copy her). Luckily for us all, she agreed! Over to you, Nicole...
* * *
As an adult who grew up sewing, successfully hacking a pattern is truly a dream come true. The number of times I tried (and failed) to hack a pattern in my teen years had my mom shaking her head at me almost every time I sat down at the family sewing machine.
Planning Out Your Pattern Hack:
What I've learned since then is that it's not nearly as difficult as I made it in my teen years... my teenage self was simply incapable of patiently working through a pattern! In short, my adult self now knows never to try to hack a pattern before making it the way it was intended at least one time. Let me say that once more... Step one: make the pattern exactly as written before you try to hack it!
My second thought on getting started is to pick the right pattern... I know, that seems simplistic, but here's what I mean: if you hate the pattern the way it comes photographed or drawn, you may want to start with something different. There's a good chance that the pattern just may not be the right base to start with. This is why I love to hack the Anna dress so much! I like the Anna exactly as it is, making the hack even more fun to dive into! The other thing that I think makes the Anna an ideal pattern to hack is that it shows off fabric really well. There are so many different ways the dress can be styled and changed based on the fabric. So the fabric can help you choose the course you'll take.
It All Starts with the Fabric:
The first time I hacked the Anna, I used a great ITY (interlock twist yarn) knit fabric. It was slinky, and yet not too thin... I kept thinking of a trip we were taking to Florida - a drapey, comfortable, large print seemed like exactly the right ticket. So I decided it needed to be an Anna. I knew this provided a challenge. I didn't want to hem the sleeve openings and insert the facings the way the pattern called for (a bit of knowledge I had prior to starting because I had already made the dress once before), so I was going to have to make a modification. I also knew that putting in a zipper on this kind of fabric would be a certain disaster (ITY is often used for swimsuit fabric.... you get it....)! That's how I arrived at making my first hacked Anna a low V-back, slip on dress. I lined the bodice so that I didn't have to use facings (which wouldn't have acted as much of a stabilizer given the extreme drape of this fabric). The stretchiness of the fabric and the low v-back makes it easy to slip off and on without a zipper.

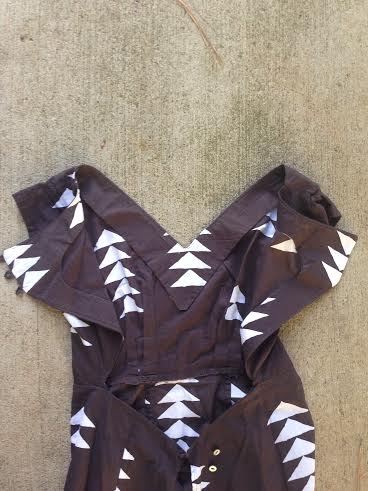
That brings me to the next Anna I made - it's my favorite. Again, it started with the fabric. Alison Glass asked me to make a dress for her booth at market using a new line of cotton batik that she designed for Andover fabrics. Of course I said yes! I thought the back would be really sweet with an opening in the middle this time, and I wanted to mimic the triangle theme in the opening.
The Nitty Gritty
Here's how I did it.
Step One
I always trace my pattern pieces using Swedish tracing paper (it's translucent so you can see the fabric beneath it and it's sewable so you can test out darts, position before cutting to accommodate directional fabric, etc.). I studied my traced pattern pieces, folding them into the shape I thought I wanted. I pinned the bottom right corner of the back bodice upward until I was happy with the angle and location of the opening as well as the depth of the top button placket. One thing I considered was any unsightly side wrinkles that I didn't want showing (you know what I mean!), so I made sure that I was careful about the depth and width of the opening. Which means I had to try on the see-thru paper a few times before cutting the back bodice piece. This is where your significant other or best friend (or, in my case, your shell shocked co-worker...) come into play. Throughout the process, I tried things on and had help getting the fit just right.
Step Two
Before I cut out my bodice pieces, I made sure to add a seam allowance to the new cut edge I created (to accommodate a facing). Oh, and I tried it on again.... Then I cut the bodice pieces out.
Step Three
I extended the back facing down along the entire cut edge to the bottom edge of the bodice. This was easier than you might think. I start by tracing the back neck facing, leaving the center back line untraced. Then I placed the traced portion on top of the cut out bodice matching it up with the neckline. I continued the line, following the back center line down to the bottom of the bodice. To draft the inside edge, I continued the line from the original facing pattern piece, making it the same width. This is what mine looks like:

Step Four
I made button loops and added them to the left back bodice piece, sandwiching them in between the bodice piece and the facing. This gets sewn together and turned out so the loops extend past bodice piece.

Step Five
It was important to me to have the back dip down a little since the original design of the pattern includes a high waistline. I thought it would be cool to have the dip be a slight 'V' shape in keeping with the arrow or triangle shapes in the fabric. So again, my fearless co-worker helped me pin and mark and get the waistline just so. I basted the center back seam together, leaving the top 4-5 inches open. I traced the angles of the waistline, and made another set of facings, including a couple of button loops on the left side and another one on the right (to keep the underside in place, I added a button on the inside as well). I tried the whole thing on again to check the fit and place the buttons. Once the buttons were in, the dress was ready to finish! I tried it on again only to find out that the buttons needed to be moved again, so I adjusted those and tried it on again... success! I hand stitched the raw edges in the waistline opening and sewed a more permanent seam in the center back.


I thought it would be fun to add a bit of a train, so I cut the back pieces a little longer and then curved it evenly with a styling design ruler. I think it's one of my favorite things about the dress!

Hacking patterns, for me at least, is the purest extension of my personal style. Each finished product is different, a one of a kind piece. In a way, it feels like giving my work and time and effort back to myself. What a gift… Happy Hacking!

-
Elisalex de Castro Peake

Comments on this post (3)
Has anybody pattern hacked an Anna bodice onto the Holly trousers to make a different jumpsuit combination? I have this scooting around in my head.
— Elisabeth
Great pattern hack! You’re a knockout in this dress!
— maddie
Your work is always amazing, Nicole! Great job on this hack and on sharing your insight with a world of makers!!!! XO
— Anna