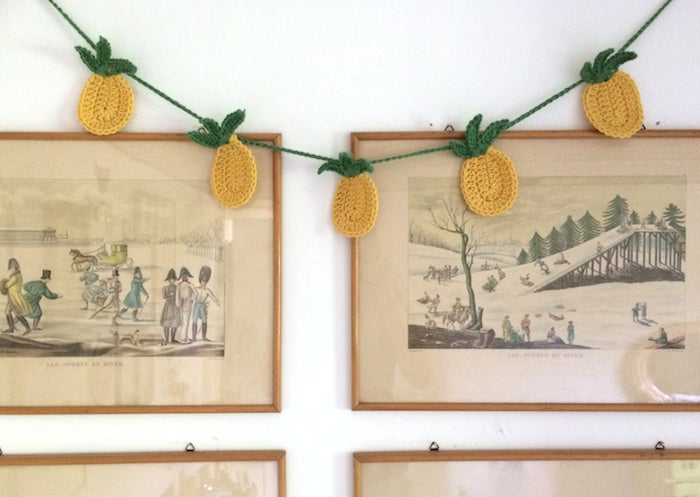
Looking around my house I've noticed that I seem to have a clear penchant for Things That Hang On Walls. Framed pictures, fairy lights, embroidery hoops, kiddy artwork, cuckoo clocks, woven wall hangings from around the world and Mardi Gras beads, to name just a few of the Things That Hang in the various rooms of my home. Add to that a love - shared and cultivated by all three of us here at BHL HQ - of a good tropical theme, and it was only going to be a matter of time before I ended up making a string of crochet pineapple bunting...! What's that I hear you yell? You desperately need some Club Tropicana bunting in your life too?? I thought so. Here's how I did it...

What you'll need:
- Worsted yarn in yellow and green - I used Spud & Chloe's sweater yarn from The Village Haberdashery, where, incidentally, I'll be teaching a crochet bunting workshop on Wednesday 25th June
- 5mm crochet hook
- Scissors
- A wall/window sill/somewhere to hang your bunting from
Crochet terminology abbreviations (UK):
ch - chain
dc - double crochet
htr - half treble crochet
tr - treble crochet
sl st - slip stitch
st(s) - stitch(es)
cont - continue
*NB: I will be using the crochet terminology abbreviations throughout, as it's really useful to become familiar with the crochet lingo, but I'll also try to explain the process as clearly as possible, and with LOTS of pictures!*

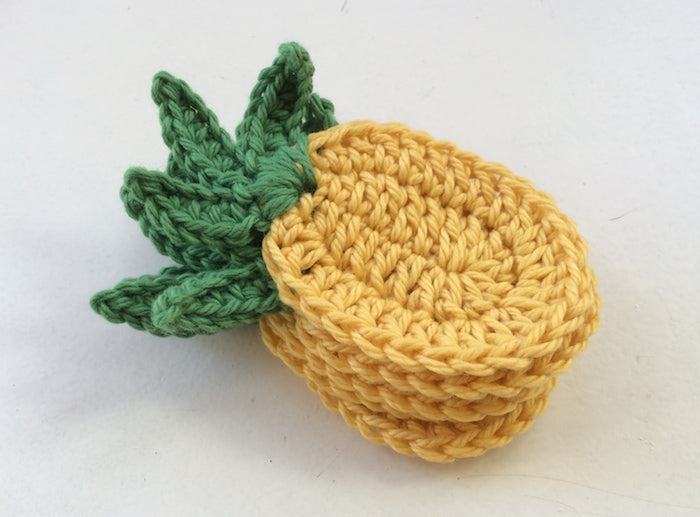
The Pineapple - round 1
Using your yellow yarn, ch 8.

1 dc in 2nd ch from hook.

1 htr in next ch.

1 tr in each of the following 5 ch sts, bringing you to the end of your ch.


Make 5 more tr in that end ch st (total 6 tr in last ch st).

1 tr in each of the next 4 sts.

1 htr in next st, 1 dc in next st, join at the top with a sl st.

The Pineapple - round 2
ch 1, dc in same st.

dc in next st, htr in next st, tr in following 5 sts.

Make 3 tr in next st...

...and 3 tr in each of the following 3 sts.

tr in following 5 sts, htr in next st, dc in next st, join at the top with a sl st.

Cut yarn and weave in tails.

The Leaves
Switch to your green yarn and join it into the top of your pineapple - there should be a little hole at the top where you last slip stitched in.


*ch 6.

sl st in next ch from hook.

dc in next st.

htr in next, and all following sts.

htr back into the pineapple where you joined the green yarn to anchor the leaf.

sl st into the top of the pineapple.

Repeat from * for two more leaves.

Cut yarn and weave the tail through the back loops as shown below:

Now just make a bunch more and you'll be ready to string them up into bunting!
Make it hang
With your green yarn, ch 20.

join your chain with a sl st into the leaf loops at the back of your pineapple.


ch 20 again, and join to the next pineapple, and so on. Finish with a final ch 20.


And that's that - yet another piece of wall, draped and done.
-
Elisalex de Castro Peake

Comments on this post (17)
Hi Joan – These type of things are intended for personal use.
— Jessica - By Hand London
Would you mind if I sold items made with this pattern? I would link to your blog post! Thanks in advance.
— Joan
Such an awesome piece of work (art). I adore it
— Avis V Simmonds
Hi there,
I really adore this cute & happy garland! Thank you so much for sharing the pattern. I made one myself, as a gift for my friend: http://hipmethaken.blogspot.nl/2017/05/ananas-slinger-pineapple-garland.html
Love your website / blog!
Saskia (Hip met Haken)
— Saskia van der Plas
This is awesome and cute … easy to make.
My niece loves pineapples this is the easiest gift ive made.
Thank you
— Meliss
Hello,
I just wrote a Dutch blogpost in which I used your lovely pineapple pattern to make a brooch. I linked to your website and to the blogpost with your pattern. I hope that’s okay? You can read my blogpost here: http://gittepetit.blogspot.nl/2016/06/zomerse-ananasbroche.html.
Warm greetings,
Brigit (from Holland)
— Brigit
This has got to be THE cutest crochet pattern I have EVER made! Seriously, I have been crocheting for years, and the sheer and utter summer silliness and joy these adorable little pineapples were to make was fantastic. Great tutorial, and they hook up in a jiffy! Shame I will be making these for a friends anniversary present….I want to keep for myself they are so sweet. Will have to start another chain just for me I love them that much! Thanks again. Really good fun.
— Verite
Thanks for the pattern! I´ve made the pineaple in a coffee cozy and i love it :)
www.facebook.com/cosicasraquel
— cosicasraquel
THANK YOU THANK YOU THANK YOU!!!!!!!!!!!!!!!!!!!!!!!!!!!!!!
I love this pattern SOOOOOOOOOOOOOOOOOOO much!!!!!!!!!!!!!!!!!!!!!!!
— Janet
Thank you so much for the tutorial! Had so much fun making it last night.
— Brigit
Thanks for this great DIY, I love it ! I already made this cute pineapple garland for my kitchen :)
— Nybellune
I’m sure Anita from Fun & VJs would love them. So cute!
— Fiona
So cute. I slip-stitched my green chain along the tops of the centre green spike instead of through the loops as suggested. They hung much more naturally, plus I gave them a quick press to stop them curling. Great tutorial!
— leilotusbloom
Omg this makes me want to learn crocket. To cute!
Submarinesandsewingmachines.blogspot.com
— gemma
Hi Margie, if you’ve used a natural fibre, you could try giving them a little press. Alternatively you could block them or spray them with a little starch spray to help them to keep their shape. Hope this helps!
— Elisalex - By Hand London
I’ve just made two pineapples! How do you get them to stay flat? Is it a tension thing, or do I need to do something else?
— Margie
This is the most adorable thing I’ve ever seen! I’ve never crocheted and I’m told it’s a bit tricky if you’re left-handed (which I am), but I’m totally bookmarking this to hopefully attempt one day!
— Amanda