Shall we start with the good news, or the really good news??
Well, the good news is that given the loose, swingy fit of the Sarah Shirt, there really aren't a whole lot of alterations that you'll need to make. No sway backs, no butt adjustments, no gapey necklines. Hooray! The really good news, is that the few minor adjustments that you might need to make are simple, straightforward and quick. Plus, if this is your first foray into the world of pattern alteration, it'll be a gentle introduction that'll put you in good, confident stead the next time you need to tackle something a little more tricky, like a fitted bodice or pair of trousers for example.
Today, we'll be showing you how to:
- Lengthen and shorten the shirt, plus a bonus explanation on how to dip the back hem for a more dramatic result
- Lengthen and shorten the long sleeve of Variation 1, because arms come in different lengths as well as widths!
- Increase the overall circumference of the sleeves (Variations 1 & 2), for ladies with larger upper arms or more athletic biceps
- Perform a full bust adjustment (FBA)
And you will need:
- Your Sarah Shirt pattern
- A tape measure
- Some extra pattern paper - we like dot & cross or baking paper
- Pens, a pencil and a ruler
- French curves or a patternmaster (optional)
- Tape - masking tape is good as it is easily removable if you make a mistake
- Paper scissors
Before you begin, have you read our posts on how to take accurate body measurements, and how to download, print & assemble a PDF sewing pattern?
*A word on sizing - The Sarah shirt is designed to be floaty and swingy with plenty of ease at the bust and a free waist and hips. If you're fairly proportionate, choose your size according to your bust measurement. If your bust is smaller and you often have to do small bust adjustments, choose your size according to your waist measurement in order to get a good fit through the shoulders. If your bust is more bodacious and you suspect you may be in need of a full bust adjustment, scroll to the bottom for our FBA tutorial (and how to figure out if you even need one!).
*To be taken to all the posts in the Sarah Shirt Sewalong, please click here!*
Lengthening & shortening
This is a very common and very simple alteration to make - and it can be applied to almost anything. Just as we come in a multitude of heights and weights, each section of our bodies vary massively in proportion. For example, Katy and Michelle (totally made up people, for demonstrative purposes only!) are exactly the same height and dress size, but Katy finds that shop bought jeans are always too long, whereas Michelle finds the same pair of jeans just right. What's going on here? Even though at first glance these girls appear to be very similar - they weigh the same, they buy the same size on the high street, and they're both 5'6" - their proportions are actually significantly different which will have a noticeable effect on the way clothes fit. Michelle, as far as commercial sizing ideals go, is perfectly in "proportion". Katy, however, has a long torso and short legs for her "size", and this is why jeans come up too long, and most likely tops are never really long enough.
Katy will need to lengthen her shirt in order to get the fit spot on. This same alteration can also be applied to the long sleeve for ladies with proportionally long or short arms.
Take your shirt front and back pattern pieces. Draw a horizontal line, perpendicular to the centre front or centre back, about 8 inches up from the hemline, on both front and back pieces.
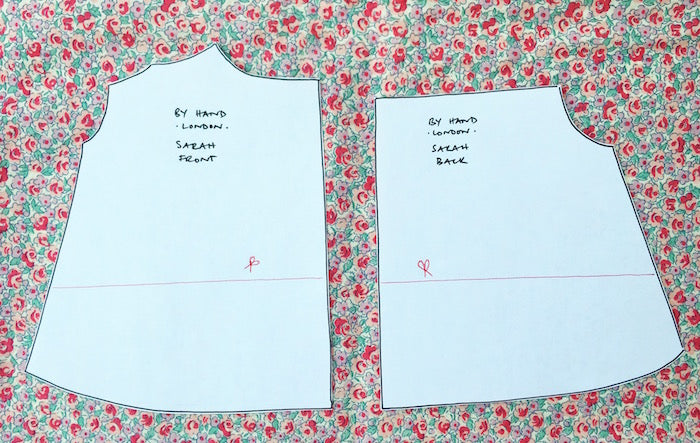
Cut across these lines.
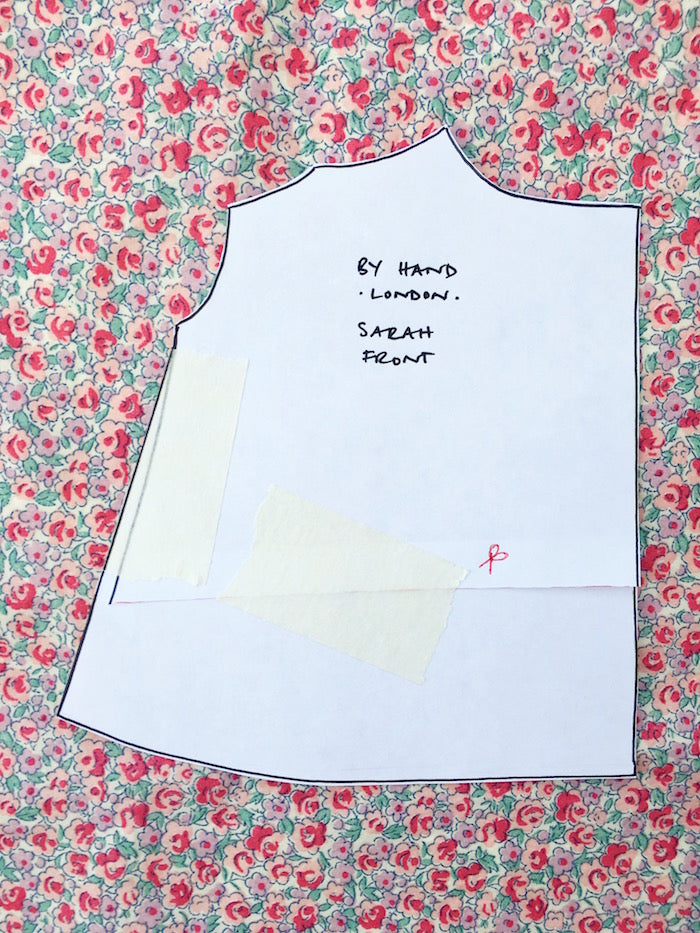
To lengthen your shirt - Bring the bottom piece down by however much you need to lengthen your shirt by, making sure that the centre front and centre back lines remain parallel. Slip a piece of scrap pattern paper underneath in order to fill the gap you've created and tape it down.


Make sure that you've extended the front and back by the same amount! Smooth out the line of the side seam and cut away any excess paper extending beyond the side seam and centre front/centre back.


To shorten your shirt - Move the bottom piece up by however much you need to shorten your shirt by, making sure that the centre front and centre back lines remain parallel.

Tape into place, making sure that you've shortened the front and back by the same amount, and smooth out the line of the side seam by slipping a scrap of paper underneath, taping it down and re-drawing the line.

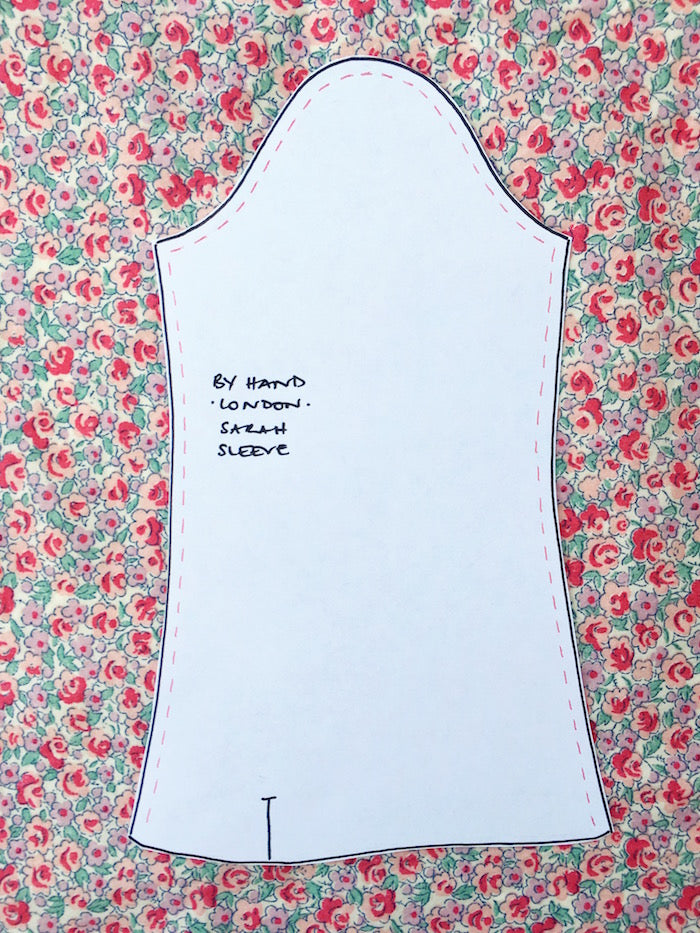
This exact same process can be applied to the sleeve piece in the same way.

Bonus alteration: Dipping the back hem
To lengthen the back hem for a dramatic, high-low sweeping effect, extend the centre back line by however much you want to increase the length by, then draw a smooth curve out to the side seam (keeping the side seam the original length).

Increasing the width of the sleeve (Variations 1 & 2)
The short turn-up cuff sleeve of Variation 2 is designed to fit comfortably around your upper arm with a good finger's worth of ease (meaning that you should be able to easily slip your finger between the sleeve and your arm without it feeling too snug!). The billowy long sleeve of Variation 1 is a lot fuller, but some may still want to open it up a bit, so we've included tutorials for both. Obviously, upper arms come in a rainbow of different circumferences so again, this is a very normal, and easy alteration to make. Please see our chart below for the finished sleeve circumference measurements so that you can compare them to your own.

Variation 1: Long sleeve
For the long sleeve, we want to increase the circumference at the upper arm, all the while keeping the width the same down at the cuff. If we simply opened up the sleeve all the way down, we'd end up with a suuuuuper full and billowy sleeve with exaggerated gathers that would probably be way too bulky to even fit in the cuff!
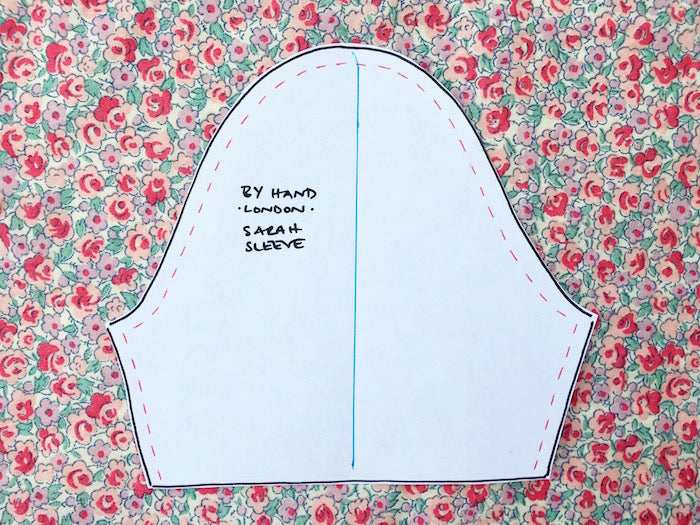
Take your long sleeve pattern piece and mark out the seam allowance line at the sleeve head and underarm seam.
We're going to open up the sleeve and increase the space at the upper arm with the slash & spread method. Draw a vertical line from the seam allowance line at the top of the sleeve, down through the middle to the cuff. Draw another line, this time horizontally from the seam allowance line at the underarm and across to the other side.

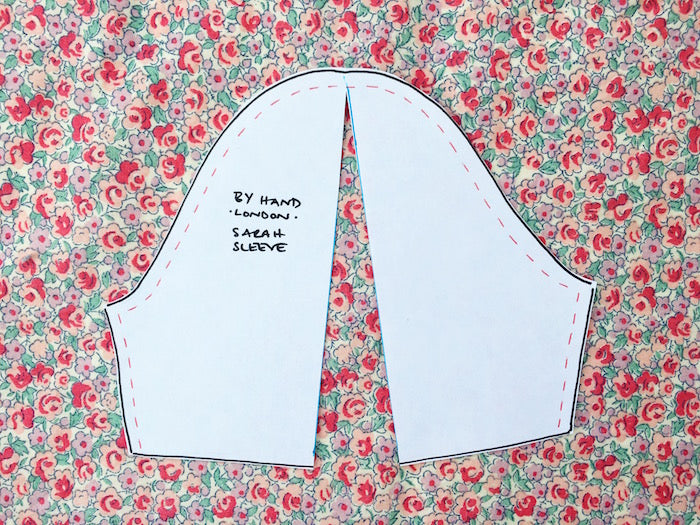
Cut up the vertical line from the cuff until you hit the seam allowance line. Now cut from the centre of the cross and out along the horizontal line, again stopping when you get to the seam allowance.
In order to be able to open up the sleeve, we need to create pivot points, or hinges where the slash lines meet the seam allowance lines. Very carefully, snip into the seam allowance to meet the slash lines, without actually cutting clean through. You'll see that now you can open up the sections of your sleeve easily, and without breaking the pattern up into separate pieces.

To increase the width, gently pull the underarm edges away from each other, allowing the horizontal slash line to slightly overlap.

Open up the gap now running down the centre of your sleeve by however much you want to increase your sleeve width by, keeping the cuff together:

Slip your scrap pattern paper underneath, tape it all down and trim away any excess scrap paper.

Variation 2: Short sleeve
Increasing the circumference of the upper arm of the short sleeve is basically the same as the long sleeve, only simpler...
Again, take your short sleeve pattern piece and mark out the seam allowances.

Draw a vertical line from the seam allowance line at the top of the sleeve, down through the middle to the cuff.
Cut this vertical line from the cuff and up to the seam allowance point at the sleeve head. Snip carefully into the seam allowance from the top of the sleeve head in order to create a hinge.
Swing the two sides of the sleeve apart, thereby increasing the width of the sleeve piece.
Slip some scrap paper underneath to fill the gap and, measuring across the width along the hem of your sleeve, when your sleeve reaches your desired width, tape it all down.
Use a ruler to re-draw the hem straight across, and trim away any excess scrap paper.


Finally, lengthen your Variation 2 cuff piece by the same amount you increased the width of your sleeve by.
Full bust adjustment (FBA)
Before we get stuck right in to the FBA, let me start by saying that even if you usually have to do FBA's to sewing patterns, you might not actually have to do it to this one... The Sarah shirt is designed to be floaty and drapey, and therefore has plenty of ease all over. It's also not fitted at the waist, so determining whether or not you'll be needing an FBA becomes a bust to shoulder ratio thing as opposed to a bust to waist ratio, as with fitted bodices.
If your bust measurement is up to two sizes bigger that the rest of your "size", then you'll be fine if you just cut your pattern in out in your size according to bust measurement. For example, I usually have to cut a size 8 in dresses, then FBA up to a 10, but seeing as that's just a difference of one size, with the Sarah I just go for a straight 10.
However, if your bust is more than two sizes larger than the rest of you, or the difference between your full bust and high bust measurement is more than 4" (making you a dressmaker's D cup), then in order to maintain the fit through the shoulders while still leaving ample space for the ladies, an FBA is in order.
First things first, we need to figure out how much we need to increase the space at the bust by. Start by taking your high bust measurement (if you're unsure of how to do this, check out our post on how to take accurate body measurements). Use this measurement in place of your bust measurement in order to choose your pattern size. Now take your full bust measurement. It's the difference between these two measurements (divided by two, seeing as we're altering only half of the pattern!) that will by the amount to FBA by. For example, if your high bust measures 35" (size UK12 / US8) and your full bust measures 39" (size UK16 / US12), you'll want to cut your pattern out in the smaller size and increase the bust on your shirt front pattern piece by 2" (resulting in 4 extra inches in total). And to be honest, given the generous ease at the bust, you could even get away with doing a slightly smaller FBA if you're worried about the shirt ending up too tent-like - have a look at the finished measurements chart, see how you feel and maybe start with a smaller alteration and see how the toile fits.
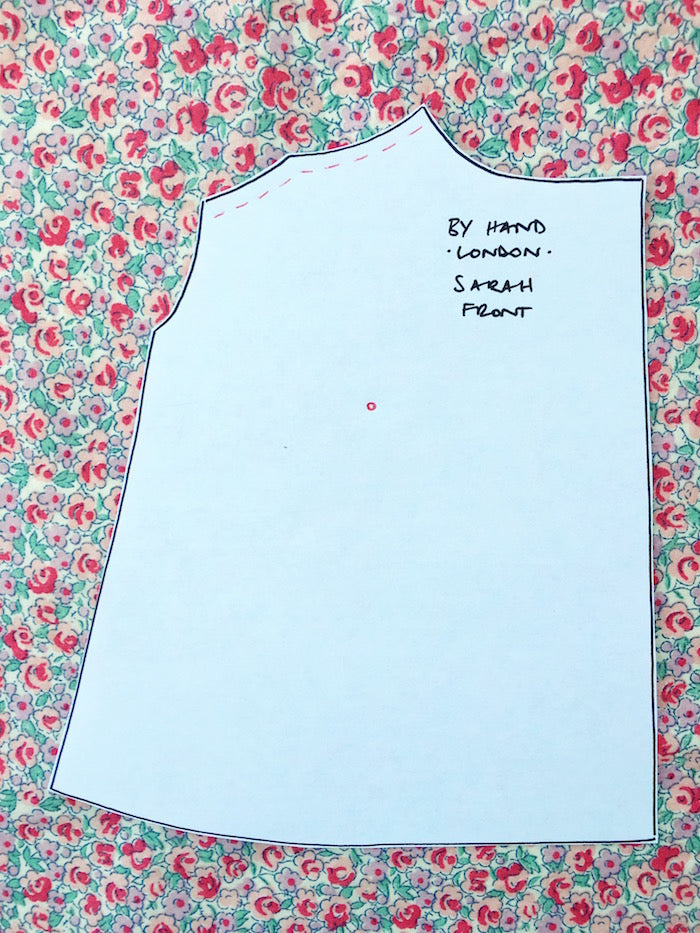
Take your shirt front piece and mark out the seam allowance along the shoulder seam (where the pleat is), and the apex. The apex is basically the point that would skim your nipple - and don't worry too much about getting that dead on accurate, an approximate location is fine!).
Now draw out your slash lines, using the image below as a guide - first, from the apex and straight down to the hem. Next, from the apex and diagonally up to the centre of the pleat, stopping when you get to the seam allowance line. Third, draw a line from the apex and out to the side seam, and finally one horizontal line from the centre front across to your first slash line.

Before you start hacking away at these slash lines, we need to go about it in a particular order...
Cut from the hem up to the apex and continuing diagonally up to the centre of the pleat where it meets the seam allowance line.

Snip into the seam allowance at the pleat to create a hinge.

From the side seam, cut up to the apex, but not all the way through - thus creating another hinge.

Finally, cut right through that last horizontal line at the bottom right.

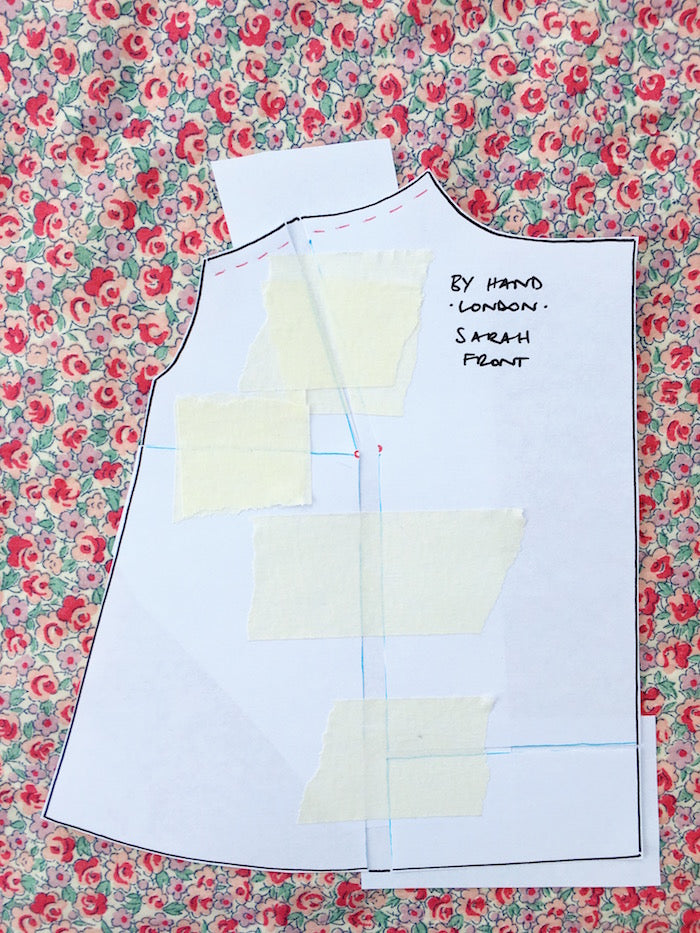
Slip a piece of scrap paper under your pattern piece ready to start taping it down...

...using a ruler, open up the space at the apex by however much you are increasing your bust measurement by. Make sure that that vertical opening running down from the apex remains parallel.

Tape it all down, except for your little bottom right rectangle for now.

So now we've got the right measurement at the bust, but we've also created a dart at the side seam, which we don't want. To get rid of it, we're going to rotate that extra fullness to the pleat at the yoke seam.
Cut along the line leading from the side seam to the apex, and from the pleat to the apex, being careful not to cut right through the apex as we want this to be our hinge.

Move that top left segment down so that the dart at the side seam closes. You'll see that in doing this, we've opened up the pleat.

Tape down the side seam, slip some scrap paper under the pleat and tape that down too. At this point, take that little bottom right rectangle and position it so that the centre front line and hem are flush. You'll notice that we've increased the length of the centre front by a smidge - this is normal and allows for the extra distance your shirt will have to cover with a fuller bust!
Snip away the excess paper, and your newly altered shirt front is done!

When making alterations to your patterns, it is always a good idea to sew up a quick toile/muslin to check that you're happy with the fit of your adjusted pattern before getting stuck in to your fashion fabric!
Up next: We get to start sewing!! Make sure your fabric is pre-washed, pressed and ready to go - we'll be cutting, marking and stabilising in the next instalment of the Sarah sewalong.
-
Elisalex de Castro Peake

Comments on this post (0)