
So here we are folks, the last post in the Victoria Blazer Sewalong... Once again, it's been wild - not only do we now have two pretty awesome new blazers, but as always it's seeing all of yours come together that really rocks our world! We've yet to photograph our finished blazers so we'll be revealing them early next week, but you guys still have until next Friday 3rd August to finish up and submit your blazers for our sewalong round-up party.
*If you'd like to share your Victoria Blazers with us (and we really love it when you do!), please either leave us a comment below with a link to your blog/social media, post on our Facebook page, tweet or Instagram us @byhandlondon using the hashtags #victoriasewalong / #victoriablazer / #byhandlondon or upload your pictures to our Flickr pool*
So, to finish our blazers, today we'll be:
- Basting the collar and lapels
- Joining the lining to the shell
- Finishing the armholes (sleeveless variation 3 only)
- Tacking down the collar/lapels at the corners (optional)
Let's do this!
Step 1: Basting the collar and lapels
Lay out your blazer shell, right way out, centre front opening facing you. Lay the collar and lapel pieces (which we prepped in this post) onto the blazer's opening using the image below as a guide, matching notches and making sure that the collar and lapel pieces do not overlap but instead meet perfectly, just like the cuffs.
We now want to baste these securely into place by stitching 3/8" or 10mm from the raw edge. Basting closer to the raw edge than our usual 5/8" or 15mm seam allowance means that once we attach the lining, these basting stitches will be hidden.
*TIP: it's a really good idea here to start your basting at the top and centre of the neckline, and stitch down each side of the blazer's opening one at a time to prevent the fabric moving and therefore distorting the positioning of the collar and lapels*
Step 2: Joining the lining to the shell
Before joining the lining to the shell, now is the time to finish off the raw edges at the lining's armhole to neaten them up and prevent them from fraying (variations 1 & 2 only; ignore this if you are making the sleeveless blazer). You could either overlock/serge the raw edge, go over it with a zigzag stitch or simply trim it with pinking shears. We've chosen to go over ours with a zigzag stitch this time:

Now with your blazer still right side out and facing you, turn your lining inside out and slip it over your blazer shell (as if you were dressing it), and pin it into place all along the blazer's opening and along the hemline - remembering to leave at least 6" or 15cm open at the hem on the back piece to allow you to turn the blazer back to the right side.

Stitch to secure, going back to your usual 5/8" or 15mm seam allowance and starting your sewing at the top and centre back of the neckline, stitching one side at a time, just like we did when basting the collar and lapels.

Turn your blazer out through the opening in the back hem, and give it a really good press at the centre front opening, pressing the collar and lapels flat onto the body of your blazer.
Now we just need to finish off that opening in the hemline of the back piece. Simply press the raw edges of the shell and lining in, following the folds already created by having joined in the lining. Pin the pressed folds together and close by hand with a blind slip stitch (see our hand stitches tutorial for more detailed images and how to).

If you're making either the main or cropped variation - that's it! Bloody well done guys! But if you'd like to tack down the collar and lapels at the corners to keep the flat, keep scrolling down...
And if you're making the sleeveless variation...
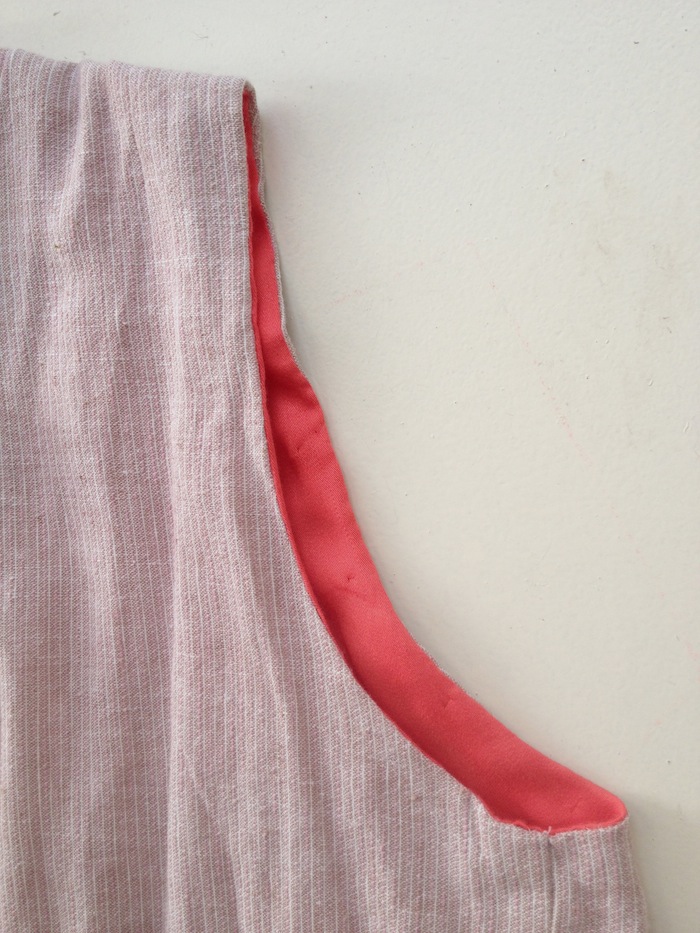
Step 3: Finishing the armholes (sleeveless variation 3 only)
All that's left to do now is to finish off those armholes! We're going to fold and press in the raw edges of both shell and lining and stitch them together by hand - just like we did to close the back hem - with a blind slip stitch.
The fiddliest part of this is the pressing, so go slow and steady, being careful to fold the raw edges in by 5/8" or 15mm. A really good way to do this accurately is by first machine sewing a line of stitches 5/8" or 15mm from the armhole's raw edges on both the shell and lining - this line of stitching will be the line that you want to be folding and pressing along.

Once you're happy with the armholes all pressed and pinned together, thread up a hand sewing needle, knot the end, and insert the needle directly into the fold of the armhole's lining. Slide your needle along the inside of the pressed fold and come out again after about 5mm. Now insert your needle into the fold of the armhole's shell, directly in line with where your needle came out of the lining. Come out after another 5mm, go back into the lining and keep going like this all along the armhole.


You could now topstitch the armholes for extra security, but we love the flawless finish of the blind stitch, and haven't found that the armholes need any reinforcement structurally.
Optional: Tacking down the collar and lapels
Just to keep the corners of the collar and lapels lying flat - or usually just the lapels; you might want to pop the collar! - we like to tack down them down with a couple of little hand stitches to stop them from flapping around.
Pin down the corners you want to secure, then peel the corner back so you can make a few little securing stitches that will be hidden behind the collar/lapel. Make sure that your needle only picks up the inside layer of the collar/lapel so that your stitches don't show through to the front.

And when you gently lift up the corner, the stitches keeping the corner in place should look a little something like this:

All finished! Thank you all so much for being a part of the Victoria Blazer Sewalong and helping to spread the love. We can't wait to get our blazers all photographed up and share them with you, but most of all, we can't wait to see what beauties you've come up with. That's the only problem with this wonderful community we've got here - as soon as you thought you'd made your last of a certain pattern, someone goes and makes another knockout in a way you'd never even imagined and all of a sudden you're inspired. Again.
Have a wonderful weekend guys, hasta la vista baby!
-
Elisalex de Castro Peake

Comments on this post (4)
I’m done, I’m done! It looks gorgeous (if I say so myself)!
— loup
Yay! I finished my first Victoria blazer, I made it in suede and lined it with cotton I dyed myself using Itajime techniques.
I’m absolutely loving it!
More details on my blog: Revesmecanique.blogspot.com
— Kim
Gah, I’m so close… Don’t think I’ll have everything ready and photographed by Friday though. Sorry ladies! Fear not, she will come!
— ZoSews
Thanks for this great sew along. I am hoping someone might get me a couple of BHL patterns for my birthday, including this one!! I love all the cropped versions I have been seing over the blogsphere.
— Manju