We've got a beauty of a pattern hack tutorial for you today (if we do say so ourselves!), plus a lovely discount code from the generous folks at Girl Charlee UK - who if you're not yet in the know are the new UK branch of the US knit fabric gods Girl Charlee.
Simply enter BHL15 at checkout to receive a juicy 15% off your order. Please note, this offer is valid until the end of October 2015, and open to UK and EU customers only, sorry rest of world...!
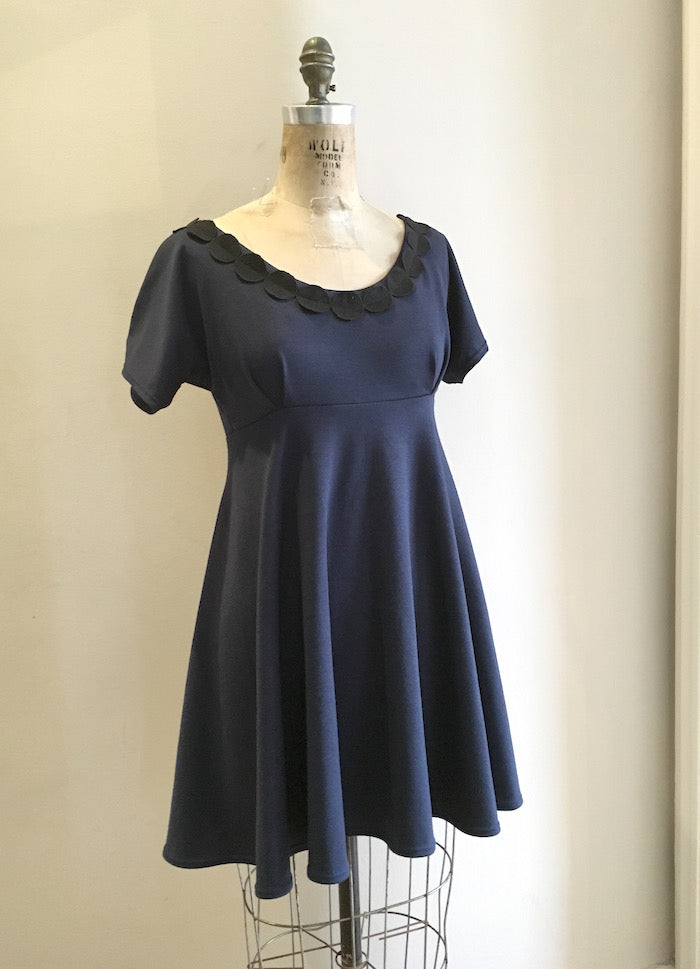
Right, back to the hack. We're going to be transforming the Zeena Dress into a 60s inspired empire line mini dress - sweet and flattering, and all the more of a delight to sew and wear in Girl Charlee's cosy ponte de Roma knit. If you're new to sewing with stretch fabrics, this is the place to start! Ponte de Roma is the perfect introduction to knits - it's got all the lovely drape and easy-wearing qualities of knit fabrics, yet it is stable enough that you won't find yourself slipping and stretching all over the place in an attempt to sew a basic seam. It also holds an invisible zipper beautifully, so there's no need to stray too far from your regular woven dressmaking formula for now!
You will need:
- The Zeena Dress PDF sewing pattern
- 2-3m of fabric - how much will depend on the width. We used a gorgeous midnight blue ponte de Roma knit from Girl Charlee UK
- The right needles for your machine - if you're going down the knit road like us, you'll need some ball point needles, plus a twin ballpoint for the hemming
- Your usual dressmaking tool and supplies - check out the technical info on the pattern itself for all you need
- Neckline embellishments totally optional

Hacking the pattern
Start by taking your bodice front piece - and the same applies to both bodice variations.
About 5" up from the waistline, draw a horizontal line all the way across the bodice - this will be your new empire waistline.

Before you commit to this, be sure that you have drawn this line in the right spot for your body. It needs to be hitting your underbust and allowing for 5/8" or 15mm seam allowance. Transfer the pleat notches to this new line.
Repeat for the bodice back, but leave the pleat notches for now.
We now need to take our underbust measurement, for two reasons:
- So we can cross-reference our underbust measurement with the new empire line of the bodice. Chances are you won't actually need the pleats on the bodice back.
- We're going to be joining the bodice to a half circle skirt, and in order to cut it accurately we'll need to use our underbust measurement as the circumference when doing the circle skirt math.
So. Armed with your underbust measurement, divide it in two. I'll use myself as a working example. My underbust measurement is 29", but I added on an inch for ease as I didn't want to feel restricted when taking deep breaths in my finished dress!
Half of 30" is 15" (and they said I was bad at maths!). So I want the new empire line to be measuring up at 15" on both my bodice front and my bodice back in order to total my underbust measurement of 30". I'm now going to measure the bodice front and back along my new empire line. Remember to take away the relevant seam allowance from your findings, and bear in mind that your bodice pattern pieces are just half of the full bodice front/back.
I found that, with the pleat assembled, my bodice front was coming up at 15", and my bodice back, without the pleat assembled, was also coming up at 15". Bingo. That's my 30" empire line underbust measurement sorted so no need for pleats at the bodice back.
You may find that you still need a little pleat on the bodice back if you have a narrow ribcage for your frame, or not at all. Just make sure you don't lose the pleats on the bodice front, as these are essential for shaping at the bust. And they look pretty!
When you're happy with your underbust measurement and your altered bodice, cut along the empire line to discard the excess.

You can now go ahead and cut your bodice front and back, and corresponding neckline facing pieces from your fabric.
To cut your skirt, using your underbust measurement as the circumference, use our circle skirt calculator or this post to figure out the radius and cutting diagram for your half circle. The length you go for is totally up to you, and how wide your fabric is! I went for a finished skirt length of 20" (underbust to hem), which gave me the cute mini mod vibe I was after.
Sewing your dress
The sewing of your Zeena hack is much the same as outlined in your instructions - assemble the pleats...

...Seam the shoulders and side seams... If you're working with a knit fabric and you don't have an overlocker/serger, simply seam with a shallow zigzag stitch, set to medium wide (see image below for a close up of my zigzag stitches). This will allow your seam a certain amount of flexibility which will prevent your stitches from snapping as your knit fabric gives and stretches with your body's movement. Don't forget to change to your ballpoint needle!
Even if you do have an overlocker, I would actually recommend that you sew up your bodice with the zigzag stitch first of all - that way you can try your bodice on to check you're happy with the fit under the bust before you serge away the seam allowance. Plus, unpicking overlock stitches takes forever.

Once you've assembled the bodice, you should have something that looks a little like this... Give it a press, try it on to check the fit and then overlock your seam allowances to finish.

Next, assemble and join your neckline facing as normal, join your skirt to the bodice, right sides together at the waistline, and insert the invisible zipper. Press and finish seams.


Already looking pretty great...! All that's left to do now is hem the sleeves and skirt. For this, we're going to bust out the twin needle.

If this is your first time with a twin needle, trust me - you're going to love it! The twin needle basically serves to hem knit fabrics without the need for a coverstitch machine. If you have a little peek at the insides of a shop-bought tee, you'll see that the inside of the hem looks like it has been overlocked, while the outside has two perfectly parallel lines of running stitch. That's what a coverstitch machine does. When hemming a stretch fabric on a domestic machine, you want to avoid using a straight stitch for the same reason we use a shallow zigzag stitch when seaming stretch fabrics - the straight stitch has zero give to allow for the natural stretch quality of the fabric. So, logically you could then use a zigzag stitch to hem your knit dress, right? Yes, you could, but don't you think that two perfectly parallel lines of straight running stitch would look waaaay better??
The twin needle does exactly that. It stitches two parallel lines of straight stitch feeding from two spools of thread from the top of your machine, but as you stitch, it catches just the one bobbin thread which effectively has to zigzag between the two top threads, thus giving your knit hem a little bit of much needed give.
Start by attaching the twin needle to your machine, and running two lines of thread together from the top of your machine down to the needle. Make sure that you've got a ball point twin needle to complement your knit fabric - a universal twin needle will give you the same aggro that a universal single needle on jersey would, such as skipped stitches.

Thread each thread into it's own individual needle eye:

Holding the threads taught, turn the handwheel until you catch and bring up the bobbin thread, and you're ready to go.
The one fiddly thing about hemming with a twin needle is that you have to do it from the right side of the fabric, meaning that you can't actually see whether or not you're catching the raw edge of the hem that's folded under...! To get around that, when I pin the hem into place, I make sure that the pin goes in and out just shy of the raw edge, that way when I'm stitching from the right side, as long as I stay inside the pin "bridge", I know I'm catching all of the hem.

Make sure that your machine is set back to a straight stitch, and wide-ish - I usually go for 3-3.5mm. It's always a good idea to practice on a scrap piece of fabric (the same fabric that you're using for your dress!) to get comfortable and iron out any tension/bobbin kinks before you get stuck into the Real Thing.
When it's done, it should look like this - neat and parallel from the front, and sort of herringbone / zigzag from the back.


Your dress is done! Give the whole thing one final press, whack it on and go for a twirl!
Optional neckline embellishment
So when I finished my dress and went for a twirl, I wasn't 100% happy with the way the neckline facing was sitting. As gorgeous and cosy and easy to sew with this ponte de Roma is, it doesn't press so great. Not bad, mind you, but not fantastic. So, to prevent the facing from peeping out I decided to go above and beyond understitching and I topstitched a pretty black circles trim that I've had forever (and have used on many a project in the past) along the neckline to really anchor that facing down for good.

I love how it turned out, and being a massive fan of navy and black, extra points!


***Disclaimer: The fabric used for this pattern hack was very kindly gifted to us by Girl Charlee UK for reviewing purposes. It is of utmost importance to us to provide you, our readers, with our honest opinions when reviewing products, so please rest assured that any gushing is genuine and not a pre-requisite for acquiring free stuff!
-
Elisalex de Castro Peake

Comments on this post (1)
Super cute hack!
— rbjaneite