This is it guys - the final leg in the making of our Charlie Dresses! Pretty much just a zipper and a hem, and we are done. Don't put away your pattern just yet though, and stay tuned, as we have a Charlie hack tutorial hot on our heels...
Today we will be:
- Inserting the invisible zipper
- Closing the side seam
- Hemming our dresses - two ways, one for each variation
*Click here to be taken to all the posts in the Charlie Dress Sewalong!*
Inserting the invisible zipper
If this is your first time inserting an invisible zipper, please don't fret! It's actually very straightforward, and once you've conquered your fear with a little practice, just think of all the things you could make...!
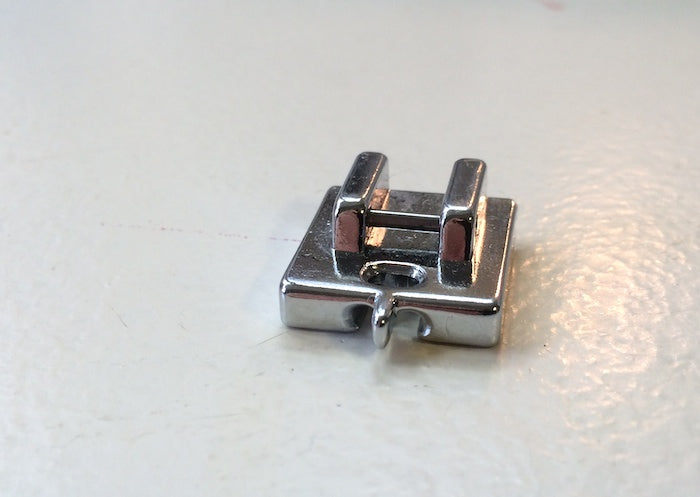
Before you begin, you’ll need to change the foot on your machine to the invisible zipper foot. The invisible zipper foot is unique in that it has two grooves along either side of where the needle goes up and down and in an out of the fabric. These grooves, or tunnels, are what we need to feed the zipper teeth through in order to get our stitching as close to the teeth and as straight as possible.
If you are using an overlocker/serger to finish your seams, it’s a good idea to apply that to your open side seam now, if you haven't already, as overlocking a seam once the zipper has been inserted is a nightmare. Just make sure you don’t trim away any excess as you go, as this will mess around with your 5/8” or 15mm seam allowance for your zipper and back seam.
Open the zipper as far as it will go, lay it face down and press the teeth away from the tape. Do this on a low heat, as the zippers are largely plastic after all and have been known to melt.
Place the right side of your zipper facing down and the right side of your fabric facing you. Then, place the right-hand side of the tape down the left-hand opening of your dress and pin into place. Bear in mind that zipper tape is not 5/8” or 15mm wide, so you will have to come a little further in from the raw edge in order to achieve the right amount of seam allowance. Double check this with a measuring tape if you’re unsure. Align the top of the zipper teeth with the neckline seam so that the redundant part of the zipper tape extends past the top of the neckband.


Starting from the top, position the raised teeth in the left hand tunnel of the foot, so that you are stitching to the right of the teeth.

Stitch until the foot meets the zipper pull (which should still be all the way down).
Gently press the fabric to reveal the side you have just stitched. Halfway there!
Now in order to be sure that the waistlines meet perfectly either side of the zipper, zip up your zipper and place a pin on the unstitched side of the zipper tape to mark the waistline.

Unzip your zipper and flip it over so it is lying face down onto the right-hand side open side of your dress, right sides together. Just as you did before, position and pin the loose zipper tape in place down the right-hand edge of your garment, starting with the pin you used to mark the waistline.

Position the teeth in the right hand tunnel of your zipper foot and stitch down the length of the zip.

Now zip up your zipper and gently press from the right side. Done! And woulddya look at that beautifully matched waistline seam?! #score

Finally, I like to tack down the seam allowance at the top of the side seam, either side of the zipper in order to keep things nice, neat and secure. You could either do that by hand, or by machine (as I did) using the smallest and densest zigzag stitch your machine has on offer - that happens to be step 1 buttonhole stitch on my machine!

Closing the side seam
To close the remainder of the open side seam, we need to swap to a regular zipper foot:

With right sides together, pin the remainder of the side seam down to the hem.
Start your line of stitching as close as possible to where the stitching finished on your zip, and just a little bit up from where it ends, and continue down to the hem. It may not align perfectly at first, and will certainly be a bit fiddly as the bulk of the zipper gets in the way – so don’t worry!

Once you're done with that, press the seam open, being especially careful when pressing over the zipper - turn down the heat!
Hemming (Variation 1)
Hemming the straight skirt of Variation 1 is incredibly straightforward, will either provide you with a nice and mindless final task in the making of your dress, or be a great opportunity to practice a hand stitched or decorative hem. Check out this post for tips on hand sewing, or if you feel like trying out some of the fancy stitches your machine has to offer, make sure that you practice on a scrap of fabric first.
I've opted for a very simple, neat little double turned hem which I pressed in by 1/4" and then again by 1/2" and then stitched into place by machine with a standard straight stitch. You could of course press the hem in by however much you need in order to achieve your desired skirt length - try your dress on now if you're unsure!


Hemming (Variation 2)
Hemming the curved 3/4 circle skirt of Variation 2 is slightly trickier than the straight hem of Variation 1, but no need to panic - with just a little extra prep you'll end up with a perfectly stitched curved hem without a single tear (of the eye watering kind!) or pucker.
Start by running a line of wide basting stitches 1/4" or 6mm from the raw edge of your hem. This will act as a guide when you come to pressing the hemline in.

Press the hem in along the stitches...

...and then again by 1/2" - 3/4". Pin into place.

Stitch your hem either by machine or by hand using a blind slip stitch.
Check out this post for tips on hand sewing, or if you feel like trying out some of the fancy stitches your machine has to offer, make sure that you practice on a scrap of fabric first.


Next up: Now that your Charlie Dress is done, hands up who's already planning their next?! Our next post will be a bonus pattern hack tutorial, so keep your eyes peeled.....
-
Elisalex de Castro Peake

Comments on this post (0)