Hello and good morning! I think we can all agree - at least, those of us back in grizzly, drizzly London Town - that the Summer is officially over... But that's not necessarily a bad thing, and as I sit by the fire, coffee cup in hand and a new knitting project by my side, I can say hand on heart that I'm looking forward to the colder months and all the wholesome cosiness they bring. I always feel a huge sense of motivation come September - probably a hangover from my school days and that unshakable feeling that the New Year actually begins now. With that in mind, we have a very back-to-school-esque post for you today, possibly even the ultimate in Nerdy Sewing Tips: how to sew a bound seam.
What is bound seam finish?
If you like your handmakes to look pristine both inside and out, then this is the technique for you! A bias bound seam finish is when the raw edges of your seam allowances are bound in a length of bias binding, preventing any possible fraying and hiding the unsightly raw edges within the binding. This technique is most effective when the garment is made from a stable, opaque fabric (if you're sewing with sheer or very drapey fabrics, you won't want the bound seams to show through - go for a French seam instead), and your binding fabric is a lightweight woven, such as cotton lawn, so as to avoid adding any unwanted bulk to your seams. Even better if you choose a pretty contrasting colour or print for your binding to really make a feature of your perfect seams!
How to sew a bias bound seam:
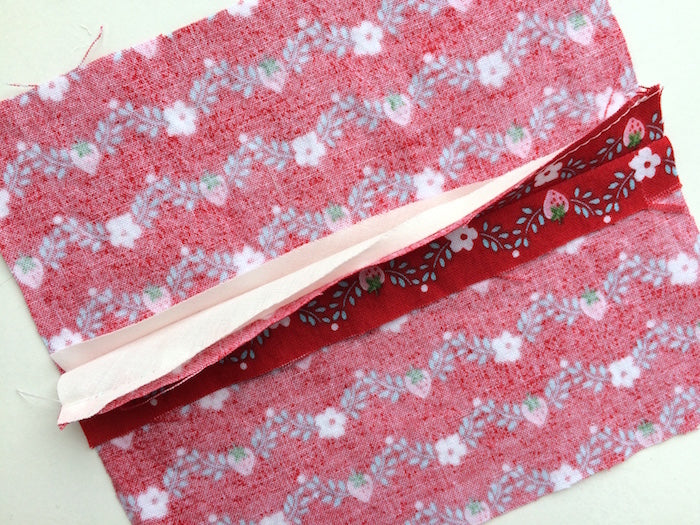
Start by stitching your seam as usual, and pressing is open. Do not trim, grade, pink or overlock/serge the raw edges at the seam allowance!

Take your length of bias binding - either shop bought or homemade is fine - and open it out, pinning one length to the wrong side of one of your seam allowances.

Stitch into place, 1/4" from the raw edge, and being careful not to trap the loose seam allowance as you stitch.
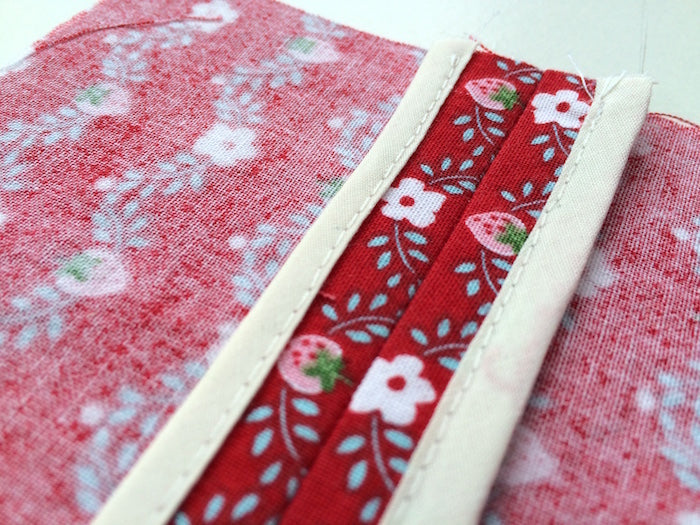
Now fold and press the binding around to the right side of your seam allowance and pin it into place:

Edgestitch carefully 1-2mm from the fold of the binding, choosing a medium-wide straight stitch on your machine and going as slow as you need to in order to achieve as neat a finish as possible.
Et voilà!

Now repeat for the other side, sit back and admire your work!
*This technique can also be applied to a seam that is not required to be pressed open, even hems! Simply bind both seam allowances in the one length of bias binding as opposed to each length individually*
-
Elisalex de Castro Peake

Comments on this post (2)
Megan you’re absolutely right!! Silly mistake/misunderstanding on our part, and we’ve fixed the blog post accordingly. And that gives us an excuse to write up a new Hong Kong tutorial!
- Thank you!
— Elisalex - By Hand London
Hi, I realize that this was posted awhile back but you should probably update this so as to not confuse newer sewers. This is not actually a Hong Kong seam, but a bias bound seam. There is a difference! A Hong Kong seam is sewed as a flat bias strip, attached to the front first and then folded over to the back and stitched again. The edge on the inside is left raw. What you have described is a bias bound seam which is sewed in reverse with no raw edge. The advantage of using a Hong Kong seam over a bias seam is that the bulk is reduced quite a bit. A bias bound seam would be better suited to lightweight fabrics such as cotton.
— Megan