Hellooooo and welcome to Alterations Week for the Holly Jumpsuit Sewalong! During Alterations Week we will be going through as many pattern alteration tutorials as we can physically crush in, making this our most comprehensive Sewalong yet! The extra great news is that a lot of these tutorials will be applicable not only to the Holly Jumpsuit, but to a huge amount of other patterns too as we tackle most of the common issues surrounding pattern fitting.
*To be taken to all the posts in the Holly Jumpsuit Sewalong, please click here!*
In this tutorial we'll be showing you how to do a basic Full Bust Adjustment to the button-down bodice of Variation 1. If this is your first foray into the world of pattern alteration, don't be scared - it's really very straightforward, can be applied to most bodices, and will make the world of difference to the way your homemade jumpsuits and dresses fit!
What you'll need:
- Your traced Bodice Front piece of the Holly Jumpsuit (Variation 1, cut out in the size dictated by your waistline measurement).
- Ruler
- Pens
- Paper scissors (not the fabric shears!)
- Extra paper
- Tape
Please note: We are using itty bitty replica's of the pattern pieces to illustrate the alterations as simply and clearly as possible - please make sure that you alter your real-life pattern pieces, complete with notches, pattern info and grainlines!
So how do I know if I need a Full Bust Adjustment?
There are a number of ways to determine whether or not you'll need to alter your bodice pattern, and by how much. The first thing to be asking yourself (and you probably already have if you're taking the time to read this post!) is how do your clothes - homemade or shop-bought - usually fit you? Do you find that dresses and tops squish down or flatten your tatas? Or is there room for an extra padded bra or two?! If you find that you're of the former, more boobalicious variety, you've come to the right place my friend. Now let's investigate further...
Some more tell-tale signs that an FBA is in order:
- Your high bust measurement is more than 2" less than your full bust measurement (see this post on how to measure yourself)
- Your full bust measurement falls into a larger size group than that of your waist measurement
- Waistlines on dresses often ride up and sit higher than your natural waist (avoid the temptation to lengthen the bodice before determining if you need an FBA first)
Step 1
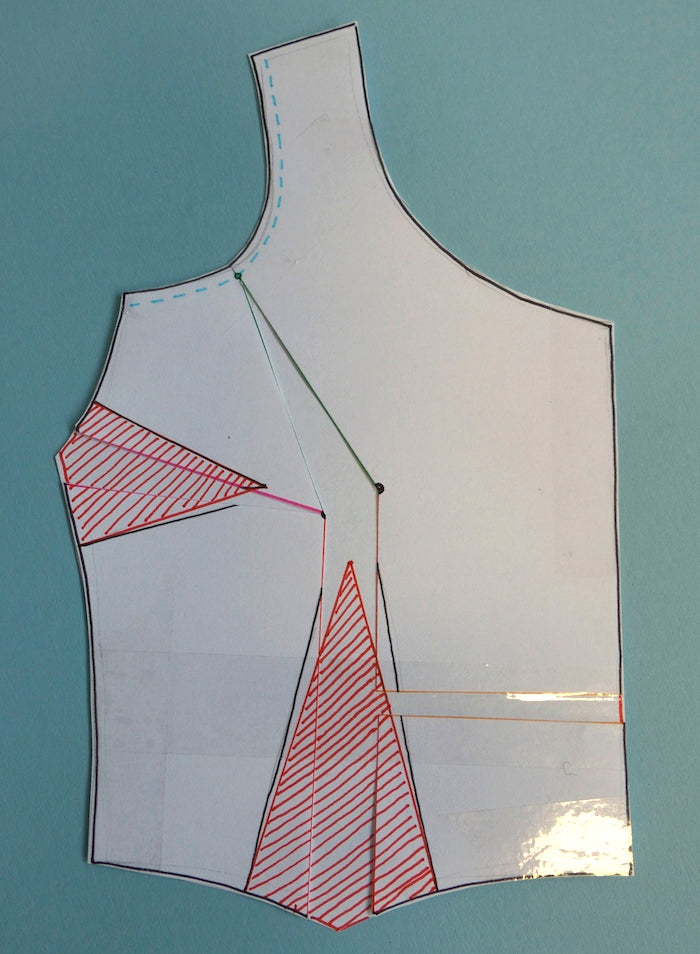
We need to begin by marking out the apex (basically the nipple - this is roughly the point where the seams of the bust and waistline darts, if extended, would intersect). We also need to mark out the seam line of the armscye, 5/8" or 15mm in from the edge of the armhole (shown in blue).

Step 2
To do the FBA, we're going to use the 'slash & spread' alteration method. Sounds a little creepy and murderous, I know, but slashing & spreading is basically just the technique of cutting along key lines through the pattern in order to open it up to allow more space for the ladies.
Draw a vertical line through the centre of the waistline dart up to the apex (red).
Draw a line through the centre of the bust dart to the apex (pink).
Draw a line from the middle of the armscye (from the seam line) to the apex (green).
Draw a horizontal line from the middle-ish point of the waistline dart and out to the centre front (orange).

Step 3
Cut upwards through the red line from the waistline, through the apex and along the green line ending at the armscye's seam line.

Now cut along the pink line from the side seam, through the bust dart and ending just before the apex - do not cut all the way through it, we need the apex to be able to pivot.

Cut the horizontal orange line.

Finally, snip into the seam allowance at the armhole up to the green line, but not through it - this will be another pivot point.

Step 4 - The FBA
Take your slashed bodice and place it onto a spare piece of paper.
We are now going to open up the apex by however much we need to increase the bust by.
For example, if your waistline measurement is 26" - and you have therefore cut a size UK8/US4, but your full bust measurement is 35" - and therefore 2" larger than that of a size UK8/US4, you will need to increase the apex by 1" to give you the 2" total extra space around the bust.
Spread out the bodice, pivoting at the armhole and apex. When you have opened up the apex by your desired amount, making sure that the vertical opening is even and parallel, tape it all securely down.

You'll notice that by slashing and spreading your bodice, the side seam will have become longer. Because of this, we now need to lengthen the centre front to match. Simply move the bottom right piece (where we cut horizontally along the orange line from the waistline dart out to the centre front) down, keeping the centre front perfectly vertical. Tape into place.
Almost there guys - the last thing we now have to do to the bodice front is to re-draw the darts. Peasy!
Starting with the waistline dart, mark a point level with the top of your original dart, but bang in the centre of the space we've just opened up. Using a ruler, re-draw the dart legs starting at the point you marked and going out to the waistline dart notches either side. This now much wider dart will close the excess we created at the waistline.
Re-draw the bust dart keeping it level with the slightly higher apex point. Use your ruler to re-draw the dart legs from the new point out to the original side seam dart notches.
As you can see, both the waistline dart and the bust dart have become bigger - don't worry! When they're all stitched up, the side seam and waistline will be exactly the same length as they were before the FBA. That way we will have increased the space at the bust, but kept the waistline and side seams the same. No alterations need to be made to the bodice back piece or the waistline of the trousers to match.
Tip from the top: Always check your adjustment by making another toile to check the fit. Once you're happy with your newly adjusted pattern, copy it out onto some card for extra safe-keeping! Although this is an easy adjustment to make, no one wants to have to do it twice...
For further reading on Full Bust Adjustments, we also have tutorials for the following:
- Full Bust Adjustment to a cowl bodice (Holly Jumpsuit)
- Full Bust Adjustment to princess seams (Elisalex Dress)
- Full Bust Adjustment to a kimono bodice (Anna Dress)
- Full Bust Adjustment to a tank bodice (Flora Dress)
- Full Bust Adjustment to bustier cups (Georgia Dress)
-
Elisalex de Castro Peake

Comments on this post (0)